The QueueMetrics Platform model
Platforms are the way QueueMetrics is able to connect to different models of PBXs; each platform encapsulates the logic required to exchange data with the underlying PBX.
Generic concepts
A Platform is composed of a number of swappable components that encapsulate all interaction with the underlying PBX.
Those components let you define the way QueueMetrics:
-
pulls data from the PBX ("Ingestor")
-
analyzes and stores data sent from the PBX ("Storage")
-
interacts with the PBX ("PBX Actions")
-
drives an outbound dialer ("Dialer")
-
listens to stored recordings ("PM Recordings")
-
listens to live calls ("PM Listen")
Each platform is defined through the 'configuration.properties' file by setting the appropriate properties.
| Platform feature | Main controlling property | Notes |
|---|---|---|
Ingestor |
- |
Not yet implemented. |
Storage |
default.queue_log_file |
|
PBX Actions |
platform.pbx |
|
Dialer |
platform.dialer |
|
PM Recordings |
audio.server |
|
PM Listen |
audio.liveserver |
These components are meant to be "mix-and-match", so that you can e.g. use the same audio recordings mechanism with totally different storage engines.
Defining system properties for members of a cluster
Unless otherwise specified, in the case you are running a clustered system, you can have "default" settings and then separate settings for each machine in the cluster.
For example, if you are trying to read a configuration property called "my.prop" and you are on a cluster server called "alpha":
-
first, a property called cluster.alpha.my.prop is read
-
if not found, the property my.prop is read
-
if not found, the default value is used.
Supported platforms
The following is a list of supported platforms.
Classic
This is the "classic" locally-hosted QueueMetrics platform. Data can be stored on a flat-file, uploaded to the QueueMetrics database or read out Asterisk’s own tables. In order to perform actions on the PBX, the custom QueueMetrics dial-plan is required for all actions (Actions: Classic) or only for outbound dialing (Actions: DirectAMI).
| Platform feature | Suggested modules | Notes |
|---|---|---|
Ingestor |
Not needed (upload via Uniloader) |
|
Storage |
SQL, flat-file, Cluster |
|
PBX Actions |
CLASSIC / DIRECT_AMI |
Default |
PM for recorded calls |
LocalFilesByDay, Oreka, MultiListener |
|
PM for live calls |
ClassicQMListenerRT, Oreka |
QueueMetrics-Live
This is the QueueMetrics-Live platform. Data is stored on the SQL database and is uploaded through Uniloader. Actions to be performed are sent back to Asterisk through the Uniloader and require custom dialplan added to the local PBX.
As there is no local audio storage, we suggest using a custom JSON audio recording platform for audio storage.
| Platform feature | Suggested modules | Notes |
|---|---|---|
Ingestor |
Not needed (upload via uniloader) |
|
Storage |
SQL/Cluster |
|
PBX Actions |
CLASSIC_LIVE / DIRECTAMI_LIVE |
Also enabled if CLASSIC and default.webloaderpbx=true |
PM for recorded calls |
JsonListener |
|
PM for live calls |
ClassicQMListenerRT |
Freeswitch
The Freeswitch platform is able to receive rewritten data from a Freeswitch / FusionPBX system. Each QueueMetrics system analyzes one single tenant.
| Platform feature | Suggested modules | Notes |
|---|---|---|
Ingestor |
Not needed (upload via |
See Uniloader manual. |
Storage |
SQL |
|
PBX Actions |
FREESWITCH / FREESWITCH_LIVE |
|
PM for recorded calls |
None |
|
PM for live calls |
None |
Enswitch
The Enswitch platform is able to receive data from an Integrics Enswitch 3.14+ system, perform actions on the system and listen to audio recordings.
| Platform feature | Suggested modules | Notes |
|---|---|---|
Ingestor |
Not needed (upload via native loader) |
|
Storage |
SQL |
|
PBX Actions |
ENSWITCH |
|
PM for recorded calls |
EnswitchPlatformListener |
|
PM for live calls |
ClassicQMListenerRT |
Will work. |
MirtaPBX
The MirtaPBX platform is able to receive data from a MirtaPBX system, perform actions on the system and listen to audio recordings.
| Platform feature | Suggested modules | Notes |
|---|---|---|
Ingestor |
Not needed (upload via native loader) |
|
Storage |
SQL |
|
PBX Actions |
MIRTAPBX |
|
PM for recorded calls |
MirtaPbxListener |
JSON API
The JSON API platform is able to control an external platform through a unified API.
| Platform feature | Suggested modules | Notes |
|---|---|---|
Ingestor |
Web |
Usually Uniloader or custom integration |
Storage |
SQL |
|
PBX Actions |
JSONAPI |
|
PM for recorded calls |
ClassicXmlRpcRecordings |
|
PM for live calls |
ClassicXmlRpcListenerRT |
Storage models
At the moment, QueueMetrics only supports its classic storage model, either reading from the database or through a flat-file.
PBX Actions
Each action driver allows a distinct set of features to be switched on, so not all actions are supported by all drivers.
Even when an action is supported an allowed by adriver, it is possible
to disable it by setting the relevant property to false, like in:
platform.allows.addmember=false
If no property is set, or it is set to true, then the property will be shown if the underlying driver supports it.
A complete list of allowed actions that can be switched off on-demand can be found at Configuration properties for Platforms.
Classic PBX Actions
This is the default platform for QueueMetrics and it is able to perform all QueueMetrics interactions to the PBX. Actions are executing by calling the 'extensions_queuemetrics.conf' dial-plan, that must be available on the target machine.
Depending on the target PBX, you may need to edit the supplied dialplan to use it.
Configuration
To turn it on you need to set:
-
platform.pbx to CLASSIC (or just leave blank).
Available actions are controlled in configuration.properties by setting:
-
default.hotdesking to a number > 0 to enable hotdesking
Each action is controlled by a stanza in configuration.properties, for example to set call outcomes:
callfile.calloutcome.enabled=true
callfile.calloutcome.channel=Local/12@queuemetrics/n
callfile.calloutcome.extension=10
callfile.calloutcome.context=queuemetrics
More details are availble in Enabling Agent’s page actions.
QMLive PBX Actions
In this mode, actions are performed by queueing them and waiting for 'uniloader' to fetch and perform them. Actions are expressed as calls to the 'queuemetrics' dialplan, that needs to be available on the target PBX.
This platform is used in QueueMetrics Live to allow remote actions.
| To inspect the status of commands being sent to the remote system, see Checking the AMI Queue. |
Configuration
To turn it on you need to set:
-
platform.pbx to CLASSIC_LIVE
-
or set default.webloaderpbx to 'true' in Classic mode
DirectAMI actions
In DirectAMI mode, actions performed on the PBX do not require a piece of dial-plan to be included; QueueMetrics will connect directly to the AMI port of your Asterisk system (as determined by callfile.dir and its cluster.*.manager equivalents in cluster mode) and will perform the actions you require.
This mode is slightly less flexible than the dialplan-based Classic mode, but:
-
It is way easier to set up, as you just need to specify once the channel formats for your PBX
-
It is more efficient when you need to join or leave multiple queues, as actions are batched into a single transaction
Tracking outbound
As it is not currently possible to originate outbound calls tracked by QueueMetrics without using the dialplan, if you need to do manual outbound you still need to include the custom ''extensions_queuemetrics.conf'' dialplan; QueueMetrics will then dial extension '28@queuemetrics' for manual outbound dialing.
Since Uniloader 0.4, it is possible to track outbound calls made by QueueMetrics without using the dialplan if you have outbound tracking enabled. This feature is not turned on by default and has to be set manually. This feature is at the moment experimental.
| Outbound dialing is turned off by default and must be turned on manually if needed. |
Configuration
To turn it on you need to set:
-
platform.pbx to DIRECTAMI
The following configuration options are available:
-
platform.directami.verbose whether to dump all AMI interactions to the system log (default: false)
-
platform.directami.agent the way an agent channel is supposed to be (default: "Agent/${num}")
-
platform.directami.extension the way an agent extension channel is supposed to be (default: "SIP/${num}")
-
platform.directami.localext the channel used for chanspy (default: "Local/${num}@from-internal")
-
platform.directami.transfer the transfer destination, in the form 'ext@context' (default: "${num}@from-internal")
-
platform.directami.outbound.enabled whether outbound dialing, though dialplan or Uniloader, is enabled (Default: false)
-
platform.directami.outbound.stanza the point in the dialplan that should be called when doing outbound (Default: "28@queuemetrics")
-
platform.directami.outbound.usetracker will use the Uniloader to track outbound call. (Deafult: false)
-
platform.directami.outbound.trackerdialout the point in the dial-plan that will be used to generate outbound calls with the Uniloader (Default: "${num}@from-internal")
-
platform.directami.spyoptions the additional options you want to use for the Asterisk application ChanSpy when listening to calls (Default: ""). By changing these options, you can have extra parameters added. The main "kind" of option ('b' for spy, 'w' for whisper or 'B' for barge) is added automatically depending on the kind of spying required.
-
platform.directami.cmdseparator the separator used for parameters in your Asterisk version. Defaults to comma (",") and should be changed to pipe ("|") only for very old Asterisk systems (pre-1.8)
-
platform.directami.optimizedagentchannel is the format of the agent channel when it is live and you want to spy on it. If blank, uses the same physical agent channel, based on the agent code or the extension code depending on whether you are in hotdesking mode or not. Defaults to blank. Please note that the
${num}variable may contain the full agent name including its technology (e.g. "SIP/1234"), so you may want to use${num:s}to include only the numeric part. -
platform.directami.stateinterface is the interface to get the agent state from. This is useful when adding Local channels, where Asterisk is not aware whether they are in conversation or not. By specifying a SIP device, Asterisk can always know its correct state and act accordingly. If not specified, it is simply not sent to the queue.
In all channel configuration, the string ${num} is replaced with the local agent code or extension, as appropriate. When adding or removing members from a queue, the string ${queue} is expanded to the identifier of the current queue. Both placeholders accept a suffix syntax like ${num:3} to include the string without the first three characters, ${num:s} to capture what comes after the slash (if present) and ${num:p} to capture what comes before the slash.
|
When running in cluster mode, you can have configuration that is specific for one single cluster member and it will override the general one - see Defining system properties for members of a cluster.
Examples
Example for a FreePBX system running without hotdesking enabled. The agent is logged on to the queue as "Local/XXX@from-internal", that is rewritten by QueueMetrics as "Agent/XXX", and matches a SIP extension with the same code. We specify a StateInterface so the queue is always aware of the state of the agent’s phone.
default.hotdesking=0

platform.pbx=DIRECTAMI
platform.directami.agent=Local/${num}@from-internal
platform.directami.transfer=${num}@from-internal
platform.directami.outbound.enabled=true
platform.directami.localext=Local/${num}@from-internal
platform.directami.optimizedagentchannel=SIP/${num:s}
platform.directami.stateinterface=SIP/${num}
platform.directami.verbose=false
This is an example for a FreePBX system running with hotdesking enabled. The agent is logged on to the queue as "SIP/YYY" but appears in QM as "Agent/XXX" and a proper hotdesking record is written to match the two entities.
default.hotdesking=86400

platform.pbx=DIRECTAMI
platform.directami.agent=Agent/${num}
platform.directami.extension=SIP/${num}
platform.directami.transfer=${num}@from-internal
platform.directami.outbound.enabled=true
platform.directami.localext=SIP/${num:s}
platform.directami.verbose=false
This is an example for a FreePBX system running with hotdesking enabled but without dialplan. Uniloader must be running in "tracker" mode with "outbound" enabled.
default.hotdesking=86400

platform.pbx=DIRECTAMI
platform.directami.agent=Agent/${num}
platform.directami.extension=SIP/${num}
platform.directami.transfer=${num}@from-internal
platform.directami.outbound.enabled=true
platform.directami.outbound.usetracker=true
platform.directami.outbound.trackerdialout=${num}@from-internal
platform.directami.localext=SIP/${num}
platform.directami.verbose=false
Some Notes on Spying
When spying, QueueMetrics always tries to connect the supervisor to the agent’s channel.
If the live agent channel appears under a different name from the one used to create it (e.g. if the
agent channel was a Local/XXX@ctxt that has been optimized to SIP/XXX), then you need to
supply the parameter platform.directami.optimizedagentchannel in order to let QueueMetrics
find the correct agent channel to spy on.
When spying, you can try different settings of platform.directami.spyoptions to configure additional behavior. The following options are added automatically:
-
b (spy): Supervisor is able to listen to the on-going call, but cannot talk. This is the default.
-
w (whisper): Supervisor is able to listen to the on-going call and can talk to the agent; caller does not hear supervisor.
-
B (barge): Supervisor is able to listen and speak to all parties on the on-going call
DirectAMI Live actions
In DirectAMI Live, DirectAMI calls are not performed immediately but stored on the AMI queue and then performed by Uniloader on the receiving server. This means you can have the advantages of DirectAMI (no dialplan included for most use cases) on remote systems where actions are proxied by Uniloader.
| To inspect the status of commands being sent to the remote system, see Checking the AMI Queue. |
Configuration
To turn it on you need to set:
-
platform.pbx to DIRECTAMI_LIVE
All other configuration options are the same as DIRECTAMI.
Freeswitch actions
With the Freeswitch actions module, commands are sent to Freeswitch’s 'mod_callcenter' though the ESL API.
As in FusionPBX the id of 'mod_callcenter' agents is a UUID, it is important to
configure all agents so that their UUID is set in the 'External reference' field.
A list of agents with their UUIDs can be obtained by running uniloader pbxinfo fusionpbx.
| At the moment, only actions for agent login, logoff and pause are supported. Also, as agent presence is unique and not related to specific queues, on the agent page only a "ALL" queue will be shown. |
Configuration
To turn it on you need to set:
-
platform.pbx to
FREESWITCH -
and make sure that your callfile.dir is set to
fsw:ClueCon@127.0.0.1:8021, or whatever credentials you need for the Freeswitch ESL.
The following configuration options are available:
-
platform.freeswitch.use_external_ref whether to use the agent’s own id or the "external reference" configured on the agent (default: true - use external reference)
-
platform.freeswitch.verbose whether to dump all interactions to the system log (default: false)
| The Freeswitch module will not enable any interactions if hotdesking is enabled. |
Examples
Example for a FusionPBX system running at address 192.168.7.5:
default.hotdesking=0
callfile.dir=fsw:ClueCon@192.168.7.5:8021

platform.pbx=FREESWITCH
platform.freeswitch.use_external_ref=true
platform.freeswitch.verbose=true
Freeswitch Live actions
In Freeswitch Live, Freeswitch API calls are not performed immediately but stored on the AMI queue and then performed by Uniloader on the receiving server.
| To inspect the status of commands being sent to the remote system, see Checking the AMI Queue. |
Configuration
To turn it on you need to set:
-
platform.pbx to FREESWITCH_LIVE
All other configuration options are the same as FREESWITCH.
Examples
This example is for a system where Uniloader and Freeswitch are running on the same machine. Please note that the ESL address is relative to Uniloader.
default.hotdesking=0
callfile.dir=fsw:ClueCon@127.0.0.1:8021

platform.pbx=FREESWITCH
platform.freeswitch.use_external_ref=true
platform.freeswitch.verbose=true
JSON API Actions
This platform lets you control an arbitrary external system that implements a very simple JSON API. This way, QM can control any PBX system, and it is often used to interact with cloud providers that "abstract away" the specific PBX API.
For each interaction request, a simple JSON stanza like the one below is sent to
an HTTP/s end-point you define as a parameter called cmd, using either HTTP POST
or GET.
{
	"requestor": "Loway QueueMetrics 19.04.3",
	"token": "1234",
	"action": "ADDMEMBER",
	"login": "demoadmin",
	"serverId": "aleph",
	"agent": {
		"agentId": "101",
		"externalReference": null
	},
	"extension": "999",
	"targetExtension": null,
	"queues": [{
		"queueId": "111",
		"penalty": "UNKNOWN",
		"externalReference": null
	}, {
		"queueId": "112",
		"penalty": "UNKNOWN",
		"externalReference": null
	}],
	"callId": null,
	"message": null
}
QueueMetrics expects no specific answer to the call, as long as it succeeds with an HTTP status 200,
as any requested action will be reflected in the queue_log data being uploaded.
For example, imagine an agent that wants to join a queue. They send a call for action ADDMEMBER with the correct details.
As soon as the PBX processes the call, an ADDMEMBER event for the agent appears on the queue_log;
at this point QueueMetrics updates the agent status to show that they joined the queue.
|
Configuration
An example configuration might be like the one below:
platform.pbx=JSONAPI
platform.jsonapi.url=https://api.your.pbx.com/yourendpoint/
platform.jsonapi.method=POST
platform.jsonapi.token=1234
platform.jsonapi.enabled=ADDMEMBER,REMOVEMEMBER,PAUSE,UNPAUSE
platform.jsonapi.verbose=true
The meaning is:
-
platform.jsonapi.url: is the URL end-point that will be called. Must be specified. -
platform.jsonapi.method: eitherGETorPOST(default: POST) -
platform.jsonapi.token: a token used to identify the specific QueueMetrics instance. Default: empty. -
platform.jsonapi.enabled: a comma-separated list of which actions are possible through the API. You do not need to implement them all, just the ones you specify. Default: none. -
platform.jsonapi.verbose: whether the request an payload will be written on QM’s system logs. Default: false.
Actions
-
AGENTLOGIN - Agents starts working. Queues are controlled externally.
-
AGENTLOGOUT - Agents stops working.
-
ADDMEMBER - Agents joins one or more queues.
-
REMOVEMEMBER - Agent leaves one or more queues.
-
PAUSE - Agents starts a pause. The pause code is passed as
message. -
UNPAUSE - Agent stops the pause.
-
CALLOUTCOME - Agents sets a call outcome for a specific call. The outtcome code is passed as
message. -
ADDFEATURECODE - Agent adds a feature code to a call. The feature code is passed as
message. -
REMOVEFEATURECODE - Agent removes a feature code.
-
CUSTOMDIAL - Agent dials out a specific number on a given queue.
-
SENDTEXT - Send SIP SMS to an extension.
-
SOFTHANGUP - Supervisor wants to close a call.
-
TRANSFER - Supervisor transfers a call to a new extension/queue
-
SPY_INBOUND - Supervisor wants to start a spy session on an incoming call.
-
SPY_OUTBOUND - Supervisor wants to start a spy session on an outbound call.
-
WRITE_INFO_VAR - Agent wants to write an arbitrary variable to a call.
You will usually implement either AGENTLOGIN/AGENTLOGOUT or ADDMEMBER/REMOVEMEMBER-style presence for your agents.
JSON request details
In the JSON request, fields have the following meaning:
-
requestor: the specific version of QueueMetrics sending this request -
token: an auth/identification token you use to distinguish from which QM system the request is coming -
action: one of the actions above -
login: the login of the user starting this action -
serverId: on clustered QM system, to which machine in the cluster this request belongs to. You can set up thecluster.XXX.platform.jsonapi.tokenproperty to override the default token for server XXX. -
agent: the agent to which this action belongs. Contains fieldsagentIdandexternalReference -
extension: the extension we are referring to -
targetExtension: an extension that is the target of this action (e.g. spying) or a variable name for WRITE_INFO_VAR -
queues: an array of queues this action refers to. Each queue defines aqueueId, apenalty(if known to QM), and anexternalReference -
callId: the Unique-ID of the call this action refers to -
message: a free text message, e.g. the feature code or the pause code this action needs. For features codes, if the feature code contains a text entry as well, our message field appears in the formatftrcode|message, otherwise if the text entry is blank or missing, just the feature code. For variables, the contents of the variable.
When parsing the JSON request, you can expect all the fields above to be present, and must accept any other fields that may be
added to the request in the future. The JSON block has always the same shape, and unused parameters for the current action
are set to null.
| External reference ids are not currently returned. |
| When testing specific action, it is often useful to point QueueMetrics to a service like Requestbin, so you can easily track outgoing requests and see which fields are set and how. |
Enswitch actions
The Enswitch actions module will connect over HTTP/HTTPS to an existing Enswitch 3.14+ system and perform actions.
The following actions are supported:
-
Setting outcomes and call features
-
Hanging up and transfering calls from the RT page
-
Spying inbound calls from the RT page
-
Logging-on and logging-off agents to queues
-
Pause and unpause agents
Configuration
To turn it on you need to set:
-
platform.pbx to
ENSWITCH -
default.hotdesking to 0 (very important - if not so all actions will be disabled and an error will be logged)
The following configuration options are available:
-
platform.enswitch.http.baseurl is the main URL for the Enswitch system
-
platform.enswitch.http.login an API user log-in
-
platform.enswitch.http.password an API user password
-
platform.enswitch.guiaddmember whether ADDMEMBER/REMOVEMEMBER actions are available (default: false - only chanspy is enabled and actions must be done through the agent’s phones)
-
platform.enswitch.verbose whether all Enswitch interactions should be logged in full to the standard log (default: false)
-
platform.enswitch.lookbackClosedCalls for how long a recently-closed call should be searched on CDRs (default: 7200 seconds)
-
platform.enswitch.spyPrefix the default prefix to use to initiate a chanspy on an inbound call (Default: *91)
-
platform.enswitch.bargePrefix the default prefix to use to initiate a barge-in on an inbound call (Default: *92)
-
platform.enswitch.qpriority.main the queue priority for an agent being logged in with priority MAIN (default: 8)
-
platform.enswitch.qpriority.wrap the queue priority for an agent being logged in with priority WRAP (default: 6)
-
platform.enswitch.qpriority.spill the queue priority for an agent being logged in with priority SPILL (default: 4)
-
platform.enswitch.openLogons whether agents have an "open" logon or must already be present on the queue. Default: false
-
platform.enswitch.dialoutPrefix the prefix used to implement dial-out. Use placeholder
$Qto add a queue-id (see below) -
platform.enswitch.dialoutSpyPrefix the default prefix to use to initiate a chanspy on an outbound call (Default: *91)
-
platform.enswitch.dialoutBargePrefix the default prefix to use to initiate a barge-in on an outbound call (Default: *92)
-
platform.enswitch.dialoutClid a caller-id to be used as presentation for outbound calls. If none is specified, the default one is used. Note that if an incorrect one is specified, all calls will fail.
To listen to audio recordings, you also need to turn on the EnswitchPlatformListener (see Pluggable Listener for the Enswitch platform).
Selecting chanspy vs barge-in
As QueueMetrics has only one "spy" action available, the choice of whether it is a "normal" spy or a barge-in depends on the number you enter as your local extension.
If the extension is prefixed with a "!", then a barge is attempted using the default prefix defined in platform.enswitch.bargePrefix; otherwise the prefix specified in platform.enswitch.spyPrefix is used.
Prefixes are set as in the Features → Feature prefixes menu of your Enswitch system.
Open and Closed log-on modes
The default integration mode for Enswitch uses a "closed" log-on mode; this means that QueueMetrics cannot log an arbitrary agent on to Enswitch, but will basically toggle the pause status of an existing agent, albeit logging the event "as if" it was a real log-on/log-off or a pause/unpause event.
Weird as this sounds, this means that an administrator can configure with certainty which agents are supposed to work on a queue, and end-users cannot change them - they can just toggle them on and off.
If you set platform.enswitch.openLogons=true, a log-in will instead mean
that an extension with the same agent code and dtype=phone will be added to the queue,
with a priority as defined on the QM queue definition. A log-off will
remove such extension from a queue.
Outbound mode
In order to use outbound, you need to create a special extension prefix that
will take a few digits for the queue id and then the number to be dialled,
for example let’s say our prefix is *787, then tree digits for our queue,
then the number to be dialled - e.g. eg *787 146 123456 will dial number
123456 on queue 146.
Then queue 146 must be a real Enswitch (inbound) queue, that we will use as a placeholder
to make sure that only active agents (currently logged on, not puased), can actually dial out.
Agents will then:
-
select an outbound queue from the GUI. Only outbound queues that they are currently logged on can be selected. This means that you can control the visibility of queues to agents though each queue’s visibility key
-
enter a number of at least two digits and click on the phone icon to initiate a call
When this happens, a call is sent to the agent’s phone; as soon as they pick it up, a second leg to the callee is dialled and all queue log events are to be recorded in real-time as the call progresses.
The outbound call is displayed on the agent’s panel as it happens, and also on the real-time screen. As the agent need to be logged on to an outbound queue to make an outbound call, there is no risk of misalignment between their log-in status and calls made; and the queue will be existing in Enswitch (though not actually used to process incoming calls).
Also, from the real-time page and the wallboard, it is possible to start a chanspy of such an outbound call.
A possible configuration could be:
platform.pbx=ENSWITCH
default.hotdesking=0
platform.enswitch.guiaddmember=true
platform.enswitch.verbose=true
platform.enswitch.http.baseurl=https://my.pbx....
platform.enswitch.http.login=user
platform.enswitch.http.password=password
platform.enswitch.dialoutPrefix=*787$Q
platform.enswitch.dialoutSpyPrefix=*91
platform.enswitch.dialoutBargePrefix=*92
platform.enswitch.dialoutClid=
platform.enswitch.audioSearchMargin=500
Note how the $Q placeholder allows adding the queue id within the outbound prefix. This also
allows having only one default outbound queue, by not adding the placeholder in the generated
number.
For example, if you are dialling number 1234 on queue 101 with platform.enswitch.dialoutPrefix set to…
-
*787$Qwould dial*787 101 1234- normal node (spaces added for clarity) -
*787would dial*787 1234- no queue id, all outbound logged on a queue you define -
*787$Q999would dial*787 101 999 1234
Generated queue_log
When QueueMetrics works with Agent/1234 on Enswitch:
-
It creates artificial logs for Agent/1234
-
It adds/removes/toggles presence for an Enswitch extension 1234 having
dtype=phone -
The extension itself will most likely log its calls under SIP/1234@enswitch or something similar
Therefore it is important in the agent definition that your agent be called Agent/1234 with an alias of SIP/1234@enswitch so that it will work properly.
| Enswitch extensions are often long numeric codes, and agents may have a hard time remembering that their login is Agent/770102319. To work around this issue, make sure you configure their email address in the agent’s user profile - it can then be used in place of their login and it’s easier to remember. |
Another difference in generated queue_log is that the PAUSEALL verb will appear not just once but for all queues, that might in turn emit a local pause event. This causes no problem to QueueMetrics, and is caused by the fact that any log entry on Enswitch must belong to an existing queue. So you may see duplicated records at the same time-stamp.
MirtaPBX actions
The MirtaPBX actions module will connect over HTTP/HTTPS to an existing MirtaPBX system and perform actions.
The following actions are supported:
-
Setting outcomes and call features
-
Hanging up and transfering calls from the RT page
-
Logging-on and logging-off agents to queues
-
Pausing and Unpausing agents on queues
Configuration
To turn it on you need to set:
-
platform.pbx to MIRTAPBX
-
default.hotdesking to 0
-
platform.mirtapbx.baseurl to your MirtaPBX url (e.g. https://my-mirta-pbx.com/)
-
platform.mirtapbx.key to your MirtaPBX tenant key (e.g. a234Dadf4dfsdg4)
-
platform.mirtapbx.tenant to your MirtaPBX tenant (e.g. TEST)
Outbound dialer
The outbound dialer is controlled through the
platform.dialer configuration property.
Allowed values are:
-
NONE - no dialer available
-
WOMBATDIALER - Connects to an instance of WombatDialer. This parameter is inferred if the property `default.wombat.agent_recall_enabled is set to true.
WombatDialer
QueueMetrics is able to connect to a WombatDialer instance to schedule calls.
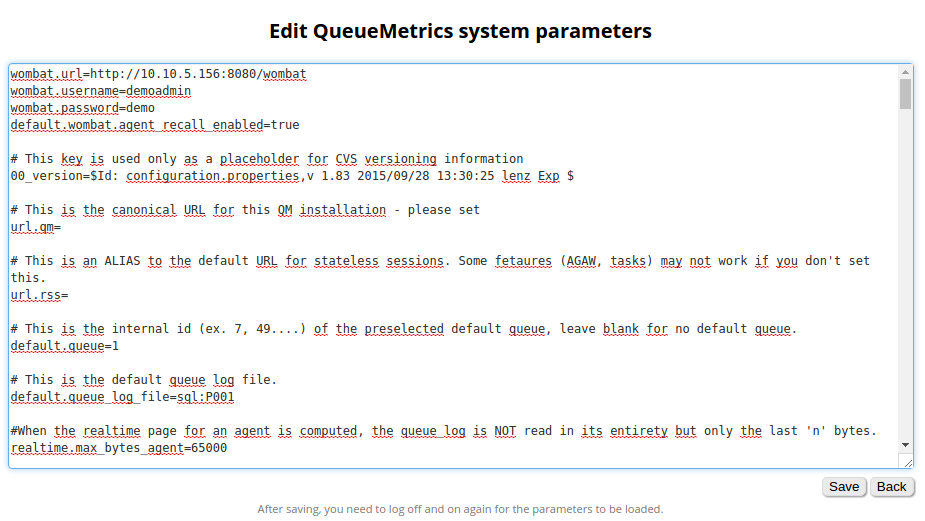
This must be provided in the form of four system parameters (that can be set in the Edit System Parameters page).
-
wombat.url: The URL of our WombatDialer instance. -
wombat.username: A valid username associated with a user with the needed grants. -
wombat.password: The password for the user.
| For more information of how to integrate WombatDialer within QueueMetrics, please see The Recall Scheduler. |
Listening to calls using Pluggable Modules (PM)
Pluggable modules are used in two areas:
-
Listening to recorded (closed) calls, i.e retrieving recordings
-
Listening to live calls, i.e. setting up a channel "spy" feature.
In order to control which module is called, two configuration properties are set:
-
audio.server controls the module to do find recorded calls
-
audio.liveserver controls the module to set up live call listening
Each configuration property is set to the complete name of a Java class that implements the required server. Such names must be set exactly as described, or an exception will be raised. Each module can then have its own configuration properties to control its own behaviour.
PMs to match Recorded Calls
These PMs are used to find audio recordings.
Plain old recordings: LocalFiles
| Module name: | LocalFiles |
|---|---|
Full Java Path: |
it.loway.app.queuemetrics.callListen.listeners.LocalFiles |
Properties used: |
default.monitored_calls in a single-server environment, or cluster.SERVER.monitored_calls in a cluster |
Available since: |
1.4.7 |
This is the standard search method that comes with QueueMetrics. Basically, all directories under default.monitored_calls are explored recursively, and all audio files matching the Asterisk ID of the main call that was queued are retrieved. Therefore the call files found can be zero or more.
This PM is sub-optimal for very large call centres, where the cost of scanning through all recordings (maybe on remotely mounted disks) could take a significant time. If you are in such an environment, see the LocalFilesByDay entry.
This PM is used by default if no other server is specified in the configuration.properties file.
Large storage with recordings: LocalFilesByDay
| Module name: | LocalFilesByDay |
|---|---|
Full Java Path: |
it.loway.app.queuemetrics.callListen.listeners.LocalFilesByDay |
Properties used: |
default.monitored_calls in a single-server environment, or cluster.SERVER.monitored_calls in a cluster audio.lookBack for how many hours before or after midnight is a call considered a "borderline" case (default 4). |
Available since: |
1.4.7 |
This PM works exactly like the LocalFiles one, but allows using placeholders in the file path; this way, you can set the default recordings directory to handle only a subset of all recordings.
For example, if you set default.monitored_calls to /var/myrecordings/%YY-%MM/ when trying to listen to a call that was made on Jan 9, 2007 will expand to /var/myrecordings/2007-01/ therefore making the directory scanning much more manageable.
Valid placeholders include:
-
%YY → the 4-digit year when the call was made
-
%MM → the 2-digit month when the call was made
-
%DD → the 2-digit day of month when the call was made
-
%SE → in a clustered environment, the server name (all lower case)
-
%QU → the queue name (all lower case)
Though this is unlikely, it is possible that a call gets recorded on a given day and then gets queued on a different day, e.g. for calls that happen around midnight. QM handles this case by double-checking all calls within a boundary of n hours from the midnight in both the days that are divided by that midnight. This behaviour can be set using the audio.lookBack property.
Asterisk can easily adapt to recording files in a way that is compatible with this storage model, like e.g.:
. . . .
exten => 999,n,Set(MONITOR_FILENAME=/audio-nas/${STRFTIME(${EPOCH},,%Y-%m/%d)}/call-${UNIQUEID}.wav)
exten => 999,n,Queue(778,t,,)
. . . .
Will store audio files as:
/audio-nas/2011-03/10/call-123456.7890.wav
The nice part is that Asterisk will automatically create missing directories, as needed.
Using an external server: ClassicXmlRpcRecordings
| Module name: | ClassicXmlRpcRecordings |
|---|---|
Full Java Path: |
it.loway.app.queuemetrics.callListen.listeners.ClassicXmlRpcRecordings |
Properties used: |
default.audioRpcServer (non-clustered) or cluster.SERVER.audioRpcServer: The address of the XML-RPC server implementing the QMAudio.findStoredFile interface. |
Available since: |
1.4.7 |
This is the standard XML-RPC implementation and makes it easy to create a completely custom scheme to handle recordings. The output of this function must be a single URL that can either stream the audio file or launch a player to stream that call. This is completely user-configurable.
The details of how to write an XML-RPC server for the QMAudio.findStoredFile interface can be found on the XML-RPC guide for QueueMetrics. We ship a sample implementation of such a server in the xmlrpc_audio_server.php server that comes with QueueMetrics.
See also section Enabling XML-RPC call listening and streaming.
External audio recorder: OrekaWeb
| Module name: | OrekaWeb |
|---|---|
Full Java Path: |
it.loway.app.queuemetrics.callListen.listeners.OrekaWeb |
Properties used: |
* oreka.jdbcUrl points to the server where the OrekaWeb database is stored. Firewalls and MySQL user setup must allow a JDBC connection coming from the QueueMetrics server. * oreka.sipHeader is the name of the tag to be tracked in the Oreka system. If missing, it’s X-Unique-ID. * oreka.web is the URL of an OrekaWeb application - QM uses Oreka’s applets for video playback. * oreka.playersize lets you set the size of the player, e.g. "1024x780" * oreka.mode: set to "1" if running Oreka up to minor build number 2494, to "2" if newer. |
Available since: |
1.5.1 |
This PM lets you offline all the audio recording to an Oreka system - see http://oreka.sourceforge.net/
This PM lets you playback audio (and optionally video) of recorder calls stored in Oreka. In order to listen to live calls, it is possible to use either some Asterisk-based method, e.g. ClassicQMListenerRT below, or an Oreka-based methos like OrekaWebRT below.
It needs the JDBC URI to point to the Oreka database; the database must contain the following tables: orktag, orksegment, orktape, orkservice, orktagtype.
| In order to have QueueMetrics associate the Asterisk call-ids correctly, you must configure Asterisk and Oreka to store the call-id of the main leg of the call, the one upon which the Queue() command is called. |
Propagating the SIP header
As Oreka is a passive recording solution based on SIP, and the call’s UniqueId is used to match a call in QueueMetrics, it is necessary for you to add the UniqueId information to the SIP headers.
If/how this can be done depends on the kind of channels you have as members of the queue.
If you have static or dynamic SIP phones as members of the queue, e.g.
  [myQueue]
  ....
  member => SIP/1234
  member => SIP/1235
you can simply use the following piece of dialplan:
  ....
  exten => s,n,SIPAddHeader(X-Unique-ID: ${UNIQUEID})
  exten => s,n,Queue(myQueue|t|30)
  ....
If instead you have other types of channels as members of the queue, e.g.
  [myQueue]
  ....
  member => Agent/101
  member => Local/102@agents
then you need to store the UniqueID in an inherited variable, e.g.
  ...
  exten => 411,2,Set(__MASTERID=${UNIQUEID})
  exten => 411,3,Queue(myQueue|t|30)

  [agents]
  exten => _XXX,1,SipAddHeader(X-Unique-ID: ${MASTERID})
  exten => _XXX,2,Dial(SIP/${EXTEN}|300)
This makes it possible to use Oreka in all common usage scenarios.
Configuring event capture in Oreka
You need to modify OrkAudio’s config.xml, under the <VoIpPlugin> section:
<SipExtractFields>X-Unique-ID</SipExtractFields>
And restart OrkAudio.
Which version of Oreka do I need?
The minimal software you can use seems to be the commercial version (Orecx TR). This includes G729 Codec and Live Monitoring.
Video playback
| As the original Java applet does not work anymore in modern browsers, video playback is not supported any longer. Documentation remains for historical purpouses. |
Orecx is able to capture and store along with the audio recording of the call a screen capture of the agent’s workstation while the call was made. The importance of such a feature is obvious.
If a video recording is present for a given call, then the audio file will be followed by the string "[vid]" to show that it’s a joint audio and video recording.
In order to play it back, QM will not stream it through a browser but will open up the VNC player that ships with OrkWeb; therefore you must configure the oreka.web property. The applet is not used in case of audio-only recordings.
Advanced Oreka support: OrekaEncrypted
| Module name: | OrekaEncrypted |
|---|---|
Full Java Path: |
it.loway.app.queuemetrics.callListen.listeners.OrekaEncrypted |
Properties used: |
* oreka.jdbcUrl points to the server where the OrekaWeb database is stored. Firewalls and MySQL user setup must allow a JDBC connection coming from the QueueMetrics server. * oreka.sipHeader is the name of the tag to be tracked in the Oreka system. If missing, it’s X-Unique-ID. * oreka.web is the URL of an OrekaWeb application - QM uses Oreka’s applets for video playback. * oreka.playersize lets you set the size of the player, e.g. "1024x780" * oreka.username and oreka.password: the account used to access OrekaWeb * oreka.mode: set to "1" if running Oreka up to minor build number 2494, to "2" if newer. |
Available since: |
12.04 |
Requires: |
OrkWeb 1.4-2178 or newer |
This PM is an advanced version of the OrekaWeb module, and it offers the same functionalities plus a few additional ones:
-
Support for encrypted Oreka calls: calls can be stored in an encrypted format and will be decrypyed dinamically by Oreka. The PM may handle encrypted and unencrypted contents at the same time.
-
Support for audio-only playback through the Oreka player (a new link will let you open the player as well as download the file as was possible in earlier versions)
-
Support for tags: call tags are passed to the Oreka player, and you can use the player to move back and forth between them
-
QM acts as a proxy for all OrekaWeb contents
The same set-up instruction apply as per the OrekaWeb PM.
Secure access
The OrekaEncrypted PM has QM act as a secure proxy for all Oreka contents:
-
The OrekaWeb server can be invisible to the user (e.g on a private network);
-
There are no more limitation for cross-domain downloading
-
There is a double security check; first, when a file is requested, the proxy checks that this file belongs to the list of audio files that the current user just searched; then, QM will authenticate to OrkWeb and, if successful, will try and stream the file back to the client.
-
For additional security, any audio/video file is streamed through a small content buffer that is constantly overwritten and that is immediately cleaned after usage; it is never written to disk on the QM server.
If you turn on encryption and authenticated downloads on the Oreka system, and use HTTPS to connect to QM, the result is a very secure audio server for your Asterisk system.
Using multiple PMs at once: MultiListener
| Module name: | MultiListener |
|---|---|
Full Java Path: |
it.loway.app.queuemetrics.callListen.listeners.MultiListener |
Properties used: |
audio.multi lets you define a set of PMs to be queried for files (enter their names, separated by pipe) audio.multi.* specifies the properties of each listener. |
Available since: |
1.7.0 |
This PM lets you query multiple PMs in the order you specify to look for the call you are looking for. A common scenario may be the following one:
-
All calls are recorded to a local volume, e.g. /queues/audio. This is where files just recorded are held.
-
A nightly process compresses the files to MP3 and moves them to a large NAS device mounted under /mnt/nas, where they are stored separated by day.
In order to retrieve calls, we want QM to first check in /queues/audio; if nothing is found, then we will look under /mnt/nas/2010-11-23. This can be implemented with the following configuration:
# define the PM and the search order
audio.server=it.loway.app.queuemetrics.callListen.listeners.MultiListener
audio.multi=loc|nas

# first PM: local calls
audio.multi.loc=it.loway.app.queuemetrics.callListen.listeners.LocalFiles
audio.multi.loc.default.monitored_calls=/queues/audio

# second PM: NAS storage
audio.multi.nas=it.loway.app.queuemetrics.callListen.listeners.LocalFilesByDay
audio.multi.nas.default.monitored_calls=/mnt/nas/%YY-%MM-%DD
What we do here is the following:
-
We first define a MultiListener and tell it via the audio.multi property to actually query a PM called "loc" first and one called "nas" if nothing is found. You can have as many PMs as you need and you canset their names as you best see fit.
-
We specify the PM to be used for "loc" in the audio.multi.loc property. Properties to be set for it are appended to the audio.multi.PMNAME. hierarchy, as we do in this example to set the default.monitored_calls property.
-
As you can see, you can have multiple PMs of the same type as well as different, and ecah can have their own configuration properties.
If you use MultiListener within a cluster, and you the cluster has members s1 and
s2, you should use a configuration like the following one:
# define the PM and the search order
audio.server=it.loway.app.queuemetrics.callListen.listeners.MultiListener
audio.multi=loc|nas

# first PM: local calls for either server
audio.multi.loc=it.loway.app.queuemetrics.callListen.listeners.LocalFiles
audio.multi.loc.cluster.s1.monitored_calls=/mnt/server_1/current_calls
audio.multi.loc.cluster.s2.monitored_calls=/mnt/server_2/current_calls

# second PM: NAS storage for either server
audio.multi.nas=it.loway.app.queuemetrics.callListen.listeners.LocalFilesByDay
audio.multi.nas.cluster.s1.monitored_calls=/mnt/nas/s1/%YY-%MM-%DD
audio.multi.nas.cluster.s2.monitored_calls=/mnt/nas/s2/%YY-%MM-%DD
If you want, you could use the same folder for recordings of both servers (though it is better to keep them separate to speed-up access); still, they have to be specified for all servers in the cluster.
(Obsolete) Pluggable Listener for Enswitch Platform Integration
| This module is obsolete. Please use Pluggable Listener for the Enswitch platform instead. |
| Module name: | Enswitch |
|---|---|
Full Java Path: |
it.loway.app.queuemetrics.callListen.listeners.thirdparty.Enswitch |
Properties used: |
enswitch.serverclass is the full qualified name of an external class code implementing the interface specified on next paragraph. We expect to have an external implementation resulting in a .class files (IntegrationExample.java in this example) stored in a suitable jar and/or classpath available to QueueMetrics. enswitch.server used to provide authentication on the remote server. enswitch.user used to provide authentication on the remote server. enswitch.password used to provide authentication on the remote server. |
Available since: |
12.5.4-418 |
Exposed Interface
QueueMetrics expects to have in his classpath an implementation of the following interface:
public interface EnswitchRecording {
        public String[][] getUrls(String host, String username, String password, String callID);
}
The getUrls should return a matrix containing the list of URLs associated to the specified callID. Each row in the matrix specifies:
-
The URL at column 0
-
The name (usually shown as clickable link by QueueMetrics) at column 1
Pluggable Listener for CallCabinet Platform Integration
| This listener was removed from QM 20 onwards. |
| Module name: | CallCabinetForQm |
|---|---|
Full Java Path: |
it.loway.app.queuemetrics.callListen.listeners.CallCabinetForQmListener |
Properties used: |
* default.callcabinet.customer_id used to provide authentication on the remote server. * default.callcabinet.site_id used to provide authentication on the remote server. * default.callcabinet.api_key used to provide authentication on the remote server. |
Available since: |
18.04.1 up to 20.xx |
To make sure QueueMetrics looks for your recordings on your CallCabinet online repository, five parameters must be set.
-
Your CallCabinetForQmForQM Customer ID.
-
Your CallCabinetForQm Site ID.
-
The Valid CallCabinetForQm API Key.
-
The CallCabinetForQm Listener
-
The HTML5 Audio Player has to be enabled (optional)
And you must make sure that the recordings are saved on CallCabinet with the CustomerInternalRef field set to the Asterisk Unique ID of the call used by QueueMetrics.
| Please note that CallCabinet for QueueMetrics requires a special key, and won’t work with normal API keys. |
Go to Edit System Parameters and edit the following parameters:
audio.server=it.loway.app.queuemetrics.callListen.listeners.CallCabinetForQmListener
default.callcabinet.customer_id=xxxx
default.callcabinet.site_id=xxxx
default.callcabinet.api_key=xxxx
audio.html5player=true
Make sure you replace the "xxxx" characters with your Customer ID, Site ID and API Key. The audio.html5player=true parameter lets us to listen to the recordings directly on our browser.
Go back to the HomePage and take a look at any report containing some of the calls that are recorded.
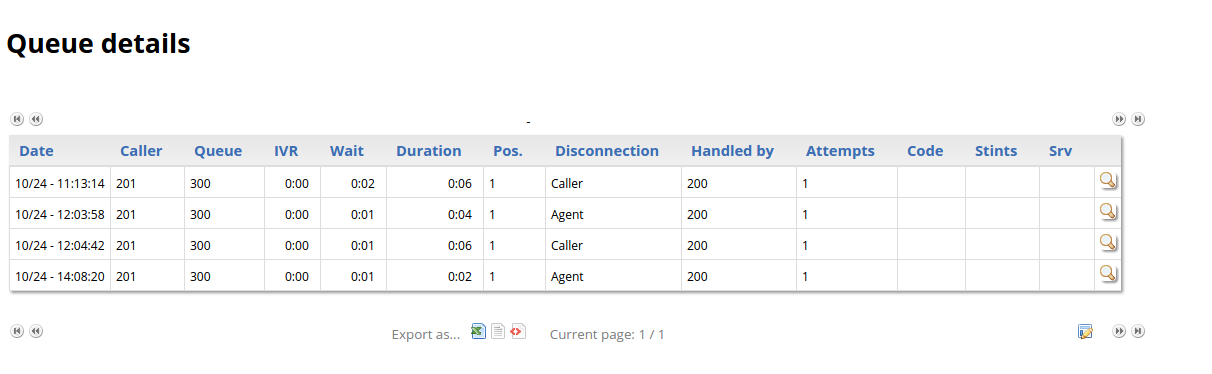
Clicking on the Call Detail Icon (the magnifying glass icon on the right), will show at the bottom that QueueMetrics retrieves the recordings related to that call’s Call ID (Asterisk Unique Call ID).
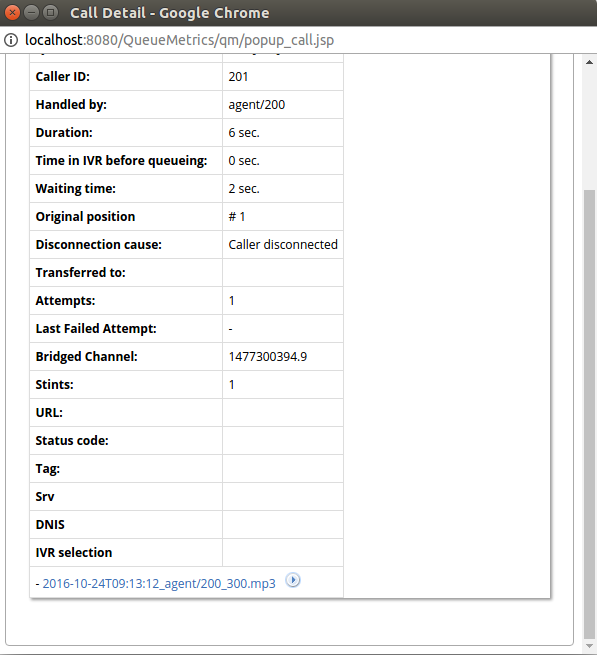
The name format QueueMetrics uses to represent a recording is the following:
DateTime_agent_queue.mp3
Clicking on the Play icon just right of the recording name will stream the recording directly without downloading it.

To download it instead, one must click on the recording name.

Cluster Mode
If QueueMetrics is working in Cluster Mode, it can manage recordings stored on different CallCabinet Sites.
This is because Cluster Mode allows the user to define different System Parameters for different PBXs.
we can define properties specific to each PBX Server, by using the following syntax:
-
cluster.servername.callcabinet.customer_id=xxxx
-
cluster.servername.callcabinet.site_id=xxxx
-
cluster.servername.callcabinet.api_key=xxxx
So, by using the prefix “cluster.ServerName.SystemParameter”, where ServerName is the name of the PBX (as defined in the cluster.servers system parameter) and SystemParameter is the name of the System Property to be set (e.g. “default.callcabinet.site_id”), without the “default.” prefix, we can allow the same properties to have different values depending on the server we are currently monitoring.
Pluggable Listener for the Enswitch platform
| Module name: | EnswitchPlatformListener |
|---|---|
Full Java Path: |
it.loway.app.queuemetrics.callListen.listeners.EnswitchPlatformListener |
Properties used: |
* platform.enswitch.audioSearchMargin The search margin, in seconds (default: 3600). * Plus, the same properties used for the Enswitch PBX platform to connect - see Enswitch actions |
Available since: |
16.10.9 |
This listener is able to retrieve and download calls through the Enswich 3.13+ API. Shares its configuration with the Enswitch Actions module.
To find a call, it goes looking for all the calls recorded that are "around" the time of beginning of the call to be retrieved, so e.g. with a margin of one hour, it starts searching one hour before the beginning of such call and ends two hours (two times the margin) after the beginning.
The width of this "margin" is controlled by platform.enswitch.audioSearchMargin - on busy systems, it might be advisable to set it to a lower value (e.g. 1000 seconds) as to avoid retrieving hundreds or thousands of calls.
Pluggable Listener for the MirtaPBX platform
| Module name: | MirtaPbxListener |
|---|---|
Full Java Path: |
it.loway.app.queuemetrics.callListen.listeners.MirtaPbxListener |
Properties used: |
The same properties used for the MirtaPBx PBX platform - see MirtaPBX actions |
Available since: |
20.xx |
This listener is able to retrieve and download calls through the MirtaPBX API. Shares its configuration with the MirtaPBX Actions module.
Query an external system: JsonListener
| Module name: | JsonListener |
|---|---|
Full Java Path: |
it.loway.app.queuemetrics.callListen.listeners.JsonListener |
Properties used: |
- audio.jsonlistener.url: the URL that will be queried - audio.jsonlistener.method: the HTTP method to use (GET or POST; default: POST) - audio.jsonlistener.searchtoken: a token that authorizes/identifies the system. - audio.jsonlistener.verbose: whether HTTP connections must be logged. Default: false. |
Available since: |
20.xx |
This listener will query an external server, sending in a JSON payload thet identifies the call and expecting a result for each media file that is attached to it. If there are no recordings, the server is expected to return an empty list of results.
What this module does is:
-
Connects to the url you specified, using the method you specified.
-
Sends a JSON payload (see below) that specifies a call to be checked for recordings.
-
Expects zero or more results of recordings (audio, video or other) found for that call
The payload that is sent us similar to the one below - it is sent as parameter query of a web form - this way the same semantics is used for both GET and POST forms (though POST has a content-type of application/x-www-form-urlencoded):
{"searchToken": "TOK1234",
 "callStartTst": 1546765179,
 "direction": "inbound",
 "agent": "agent/6039",
 "callId": "1544818293.8579",
 "callServer": "",
 "queue": "2004",
 "requestor": "demoadmin",
 "clientIp": "10.10.3.123"}
That is interpreted as:
-
searchToken: is the token you specified in the configuration. This can be used to grant access to your server, and/or to identify separate QM servers -
callStartTst: the time-stamp when a call started in QM. This will be close but not necessarily exactly the same time when recordings started -
direction: inbound or outbound. Might not be accurate on all calls. -
agent: the agent code -
callId: the unique identifier of the queue leg of the call -
callServer: if QM is monitoring a cluster, the PBX on which the call was processed -
queue: the queue identifier -
requestor: the log-in of the user requesting this operation -
clientIp: the remote IP address of the requestor
And the results must be a list of zero or more JSON objects, like the below:
[
 {"name": "My call 1544818293.8579.mp3",
  "url": "https://audiostore:9999/audio/a_mp3.mp3?unqid=1544818293.8579",
  "type": "MP3",
  "size": "1234"},
 {"name": "Suopevisor Chat for 1544818293.8579",
  "url": "https://audiostore:9999/chat/?unqid=1544818293.8579",
  "type": "OTHER",
  "size": ""}
]
For each object:
-
name: is a human-readable name that will be shown to the user -
url: is a URL where the audio/media can be retrieved from. You may want to include security features in it, e.g. time or ip-based limits -
type: a tag specifying the contents of this recording (see below) -
size: a string describing the file (currently not used).
Allowed type tags are:
-
MP3: MP3 - will use the Audio player if enabled -
WAV: Wav file - will use the Audio player if enabled -
GSMWAV: A GSM file in a WAV container -
OGG: Ogg Vorbis - will use the Audio player if enabled -
M4A: AAC audio - will use the Audio player if enabled -
AUDIO: Other audio -
VIDEO: Any video -
OTHER: Any other attachment to be opened in the browser
| Whe developing a new service, note that if if the service fails to run, it will report no error to the user, as if there were no audio files. Still, detail on the errors will appear on QM’s log. |
PMs to match Live Calls
These PMs are used to listen to live calls.
Live calls through QueueMetrics: ClassicQMListenerRT
| Module name: | ClassicQMListenerRT |
|---|---|
Full Java Path: |
it.loway.app.queuemetrics.callListen.RTlisteners.ClassicQMListenerRT |
Properties used: |
For listening to inbound calls: callfile.monitoring.channel, callfile.monitoring.extension, callfile.monitoring.context; For listening to outbound calls: callfile.outmonitoring.channel, callfile.outmonitoring.extension, callfile.outmonitoring.context; In a single-server environment: callfile.dir (points to a local call-file directory or a manager interface port); In a clustered environment: cluster.SERVER.manager (points to each Asterisk server’s manager interface port) |
Available since: |
1.4.7 |
This is the standard QM behaviour: when listening to inbound or outbound calls, a popup appears and asks for a local extension. That local extension is connected to the live channel so that the local user can listen to the ongoing call.
In order for this to work, the dial-plan on each Asterisk server must implement the correct logic - an example is given in the [queuemetrics] context that comes with QueueMetrics.
This PM is used by default if no other server is specified in the configuration.properties file.
Live calls through an external module: ClassicXmlRpcListenerRT
| Module name: | ClassicXmlRpcListenerRT |
|---|---|
Full Java Path: |
it.loway.app.queuemetrics.callListen.RTlisteners.ClassicXmlRpcListenerRT |
Properties used: |
default.audioRpcServer (non-clustered) or cluster.SERVER.audioRpcServer: The address of the XML-RPC server implementing the QMAudio.listenOngoingCalls interface. |
Available since: |
1.4.7 |
This is the standard XML-RPC implementation and makes it easy to create a completely custom scheme to handle live monitoring. The output of this function must be a single URL that will launch a player to stream that call. This is completely user-configurable.
The details of how to write an XML-RPC server for the QMAudio. listenOngoingCalls interface can be found on the XML-RPC guide for QueueMetrics. We ship a sample implementation of such a server in the xmlrpc_audio_server.php server that comes with QueueMetrics.
See also section Enabling XML-RPC call listening and streaming
Live calls through Oreka: OrekaWebRT
| Module name: | OrekaWebRT |
|---|---|
Full Java Path: |
it.loway.app.queuemetrics.callListen.RTlisteners.OrekaWebRT |
Properties used: |
oreka.rtserver is the master property that tells QM if Oreka is clustered or not oreka.web is the URL of an OrekaWeb application - QM uses Oreka’s applets for playback. oreka.rtserver.xxx is used for clustered configurations. |
Available since: |
1.5.2 |
This PM lets your supervisors monitor agents using a web-based interface provided by Oreka. The supervisors will simply click on a live call and it will be streamed to them through their browser (note: a window will open and will close immediately before the popup opens. This is expected behaviour).
In order for this PM to work, your system configuration must matche these criteria:
-
You should be using Callback agents, where the agent extension is correctly filled in at logon time
-
Pop-up windows should be openable by QM - this feature is disabled by default in most modern browsers.
-
You should also select a way for this PM to choose on which Oreka server the call must be listened on.
Do not forget to set the oreka.web property in any case in order to download the playback applet.
Using only one Oreka server
If you are deploying only one Oreka server, you should set the address of the live listening port by setting oreka.rtserver to fixed and then entering the live streaming port as follows:
oreka.rtserver=fixed
oreka.rtserver.address=http://hostname:59120/?type=stream&localparty=#AGENTEXT#
This will work even on a clustered system, as long as there is only one Oreka server. Note how the agent extension is expanded in the string (see below for the full list of expansion tokens).
Using a cluster of Oreka servers
If you have a set of Oreka servers (likely because you have a cluster of Asterisk servers), you can associate a separate Oreka server to each box in the cluster. You do so by setting oreka.rtserver to cluster and then entering the live streaming port for each member of the cluster, as follows:
oreka.rtserver=cluster
oreka.rtserver.aleph=http://ork_aleph:59120/?type=stream&localparty=#AGENTEXT#
oreka.rtserver.beth=http://ork_beth:59120/?type=stream&localparty=#AGENTEXT#
In this example, all calls processed on server "aleph" will be searched on server "ork_aleph", while all calls processed on server "beth" will be processed on server "ork_beth".
Using multiple Oreka servers with UniqueID
If you have a set of Oreka servers that are not linked one-by-one to a set of Asterisk boxes, you can associate a separate Oreka server to each call in the cluster, by prepending a digit to the call’s UniqueID that will be used to know on which server each call is being handled. You do so by setting oreka.rtserver to chandigit and then entering the live streaming port for each member of the cluster, as follows:
oreka.rtserver=chandigit
oreka.rtserver.1=http://ork_aleph:59120/?type=stream&localparty=#AGENTEXT#
oreka.rtserver.2=http://ork_beth:59120/?type=stream&localparty=#AGENTEXT#
In this example, all calls which UniqueID starts wilth "1" will be handled by the "ork_aleph" server, and all calls which UniqueID start with "2" will be queries on the "ork_beth" server.