The real-time agent page
| The Icon agent page is currently deprecated - it still works, but you should consider upgrading to the new Agent Page. |
QM lets each agent have his/her own page, where they can see the current flow of calls they have just answered and launch external CRM web apps..
This is quite useful, because the agent can:
-
see their own status, i.e. whether they’re logged on or they’ve been disconnected;
-
see their last calls, including information like Caller ID, duration and waiting times;
-
see from which queue the call is coming, even if they lost the announcement message;
-
launch external web apps - like CRM software - that might be automatically linked to the Caller-ID or other information input by the caller
-
read the messages broadcasted to him
-
start a new conversation calling a phone number
-
have a subset of AGAW information
-
track information about the current call on QA forms
Also, it is possible to use this page in order to:
-
Log the agent on and off to Asterisk and/or a specific queue
-
Pause and un-pause the agent, entering the pause activity code if needed
-
Set the outcome code for each call
In order to use this feature, a user must be configured as having the same login as the Asterisk agent string (e.g., "Agent/101") and it must hold the key AGENT. Our suggestion is to use the same set of credentials the agent uses to login to the Asterisk system.
The Icon Realtime Agents Page
Since release 14.06 QueueMetrics includes a new real-time page based on movable resizable and draggable panels. The new page is available for agents holding the key NEWAGENTPAGE.
Using the new page has several advantages:
-
Draggable and resizable panels for each main activity. This ensures only the options used by the agent are visible on the page.
-
Integrated soft-phone, WebRTC enabled (currently working only on Chrome browsers and Asterisk11+Webrtc2sip or with Asterisk12) allows agents to receive and generate calls without an external SIP phone.
-
Whole integration with an external CRM and/or other custom web pages.
-
Easy login/logout and pause/unpause procedure.
-
Per agent layout customization with sessions persistence.
-
Keyboard shortcuts help to open/close most of the panels.
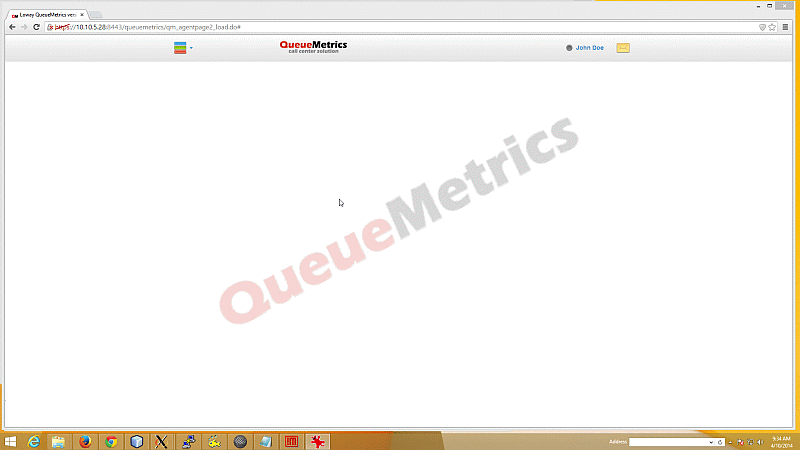
The first time an agent enters the real-time page he sees something similar to the below picture:
At the top of the page there is a menu bar. On the right side there is an icon representing a letterbox. By clicking on this icon the agent can show/hide a panel containing the most recent received messages. If the panel is not visible and the agent receives a new message, the icon starts blinking. The message panel could be accessed through Alt+9 keyboard shortcut

On the left side of the current agent name there’s a tooltip, appearing via mouseover, that contains the agent session details. The agent status contains a bullet that defines the status of the agent with different colors, as per below scheme:
-
black: the agent status is unknown. This could happen if the last agent activity is outside of the configurable analysis timer used by QueueMetrics to retrieve agent information.
-
green: the agent is logged in on at least one queue
-
purple: the agent is logged out from all queues
-
red: the agent is currently paused
At the right side of the menu bar there’s the dropdown menu shown in the below picture:
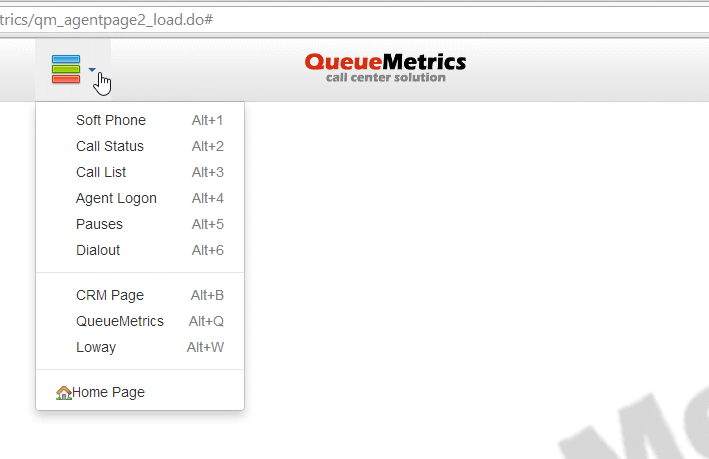
The dropdown menu allows the agent to access all the different panels:
-
SoftPhone
-
Call Status
-
Call List
-
Agent Logon
-
Pauses
-
Dialout
All the panels can be accessed by clicking on the associated menu row or through the keyboard shortcut combination key as specified in the menu (i.e. Alt+1 for softphone panel). If properly configured, the dropdown menu allows to select a web page that will be shown as background. This is the case, for example, of an external CRM page or Company intranet pages.
CRM Integration
Each time the call history changes, and if there is an URL associated to the call shown on top of the list, a new window will automatically be opened pointing to the specifig URL. This feature could be disabled modifying the value associated to the configuration key realtime.agent_autoopenurl.
URLs are passed to the Queue() command in Asterisk, or - if missing - they can defined in the QueueMetrics queue configuration as a default. If not present, the URL defined in the default.crmapp property will be used (make sure the default.crmlabel property is also defined). The URL can include a set of placeholders that are expanded with the details of the call being handled, as in the following table.
| Placeholder | Meaning |
|---|---|
[A] |
The agent’s numeric code, e.g. 101 for Agent/101 |
[X] |
The agent’s login extension |
[U] |
The call’s Asterisk UniqueId |
[S] |
The Server ID (for clusters) |
[Q] |
The name of the queue |
[T] |
The timestamp of the call |
[C] |
The caller-id, if present |
[D] |
The DNIS, if present |
[I] |
The IVR Path, if present |
[O] |
The outcome code, if present |
[P] |
The position in the queue, if present |
[M] |
The number of attempts, if present |
[TAG] |
The call tag, if present. See Adding Tags to a call. |
[F:x] |
If the call has a feature called 'x', the text of feature 'x'; otherwise blank. See Adding Feature codes to a call. |
[FX:x] |
If the call has a feature called 'x', it is set to '1'; otherwise '0' |
[V:x] |
If the call has a variable called 'x', the value of 'x'; otherwise blank. See Custom variables. |
The integrated soft phone panel
Keyboard shortcut: Alt+1.
The new real-time agents page integrates a softphone based on the JsSIP library. This softphone is expected to work witth all recent Asterisk releases (13+) and recent browsers.
The softphone automatically registers to the SIP/WebRTC server with the SIP credentials specified in the user administration page and a green bullet is shown in the softphone panel. The agent can start calls typing the number to be dialed then clicking on the "Start Call" button.
![]()
Each time the agent receives a call from the queue, the softphone pops up and will prompt the user to answer. Clicking on the "Start Call" the agent could answer to the call. During the call touch tones could be sent by clicking on the dial pad provided in the panel. Since QueueMetrics 15.02 the softphone shows the callerId SIP username (usually this information matches the incoming caller ID).
For more information on how to configure the softphone, please refer to Configuring the new Real-time Agents Page and Configuring agents
| The softphone uses the local PC microphone. Chrome security policies allow permanent use of the local microphone only for sites secured with HTTPS. Please make sure your QueueMetrics instance is running over HTTPS and relax all security policies for the QueueMetrics URLs. This could be done by clicking on the shield located in the Chrome URL bar and selecting "allow not secure scripts for this site". Be sure to allow microphone usage for the QueueMetrics URL at the very first call. |
Softphone settings
The integrated softphone uses a combination of agent settings and system parameters to fetch it’s own settings.
The settings that are available in the Edit system parameters page and in the Explore system parameters page are the following:
-
default.connection_recovery_max_interval: Maximum time interval before attempting a reconnection in case of connection failure
-
default.connection_recovery_min_interval: Minimum time interval before attempting a reconnection in case of connection failure
-
default.no_answer_timeout: How long should a call ring with no answer before being hanged up.
-
default.iceservers: List of STUN / TURN servers to use (e.g. stun:stun01.sipphone.com|stun:stun01.sipphone.com|stun:stun.fwdnet.net)
-
default.websocketurl: URL for the web socket that the softphone uses to send data (e.g. wss://10.10.5.181:8089/ws)
| These settings will be shared across all agents using the softphone and are not individually configurable. |
The softphone settings that are individual for each agent are the following, and can be found in the Agent configuration page, under "Agents" in the Administrator homepage.
-
WebPhone Username: the SIP username for the extension
-
WebPhone Password: the SIP password
-
WebPhone Realm: the SIP realm (eg: 10.10.5.181)
-
WebPhone SIP Uri the SIP URI (eg: sip:200@10.10.5.181)
-
Auto answer details if the softPhone should operate in auto answer mode (Default is no)
The AutoAnswer Feature, if enabled, allows the softphone to answer calls automatically. This applies only if there are no other active calls at the moment. If the agent is already on a call, and receives another call, this call will ring normally, regardless of auto answer being enabled.
Users with the security key AUTOANSWER_PHONE can enable/disable the auto answer feature by clicking on the auto answer icon (Speech bubble icon). If the icon is green, auto answering is enabled, if it’s black auto answering is currently disabled.
Users that do not hold the security key cannot change the auto answer status, that will be decided by the administrator in the agent settings page.
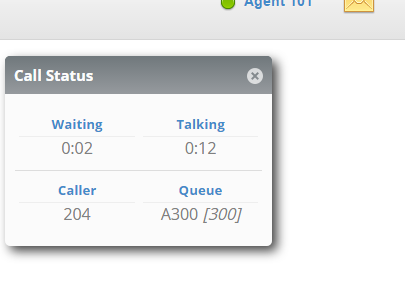
The call status panel
Keyboard shortcut: Alt+2.
This panel reports a summary of current ongoing call.
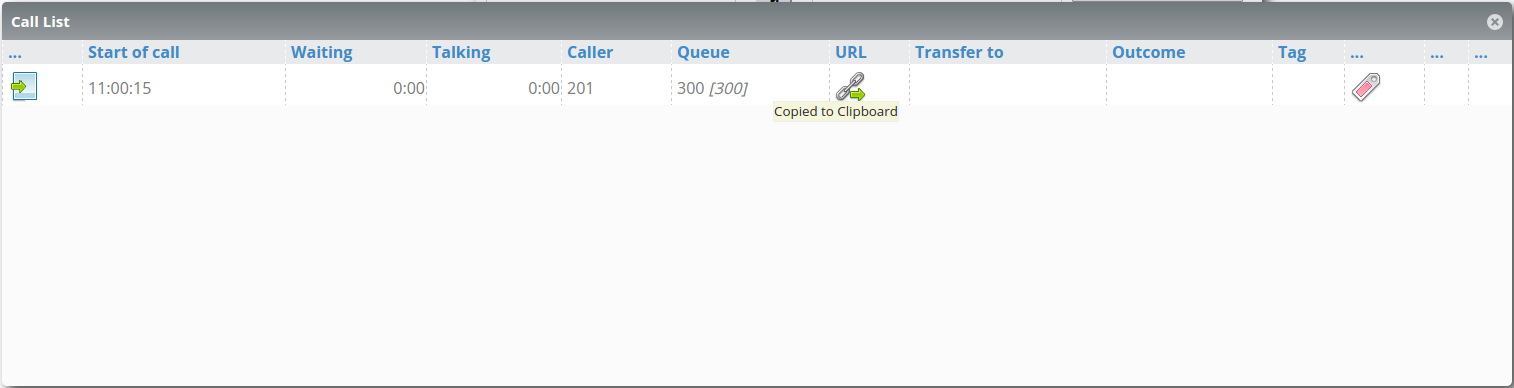
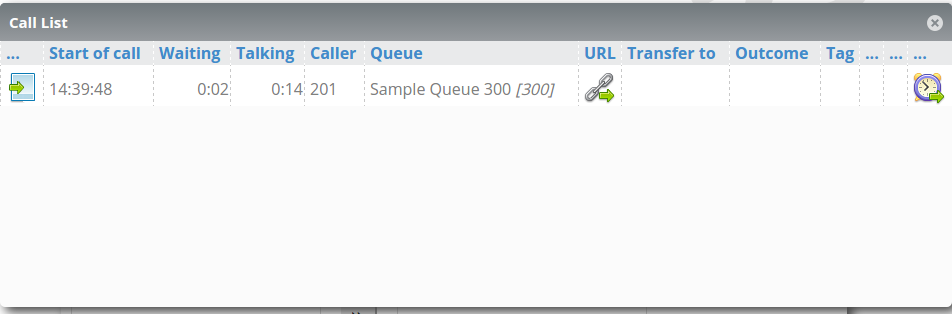
The call list panel
Keyboard shortcut: Alt+3.
It reports the list of most recent calls. Each row is associated with a call. The agent could find, for each call, a set of clickable icons useful to open the URL associated to the call (if any) or to open the outcome or the QA form panel (see below).
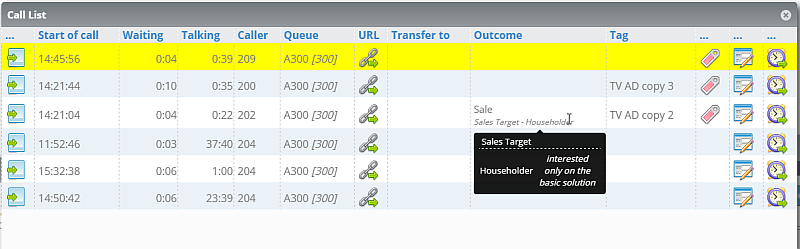
Calls are chronologically ordered and the first row is yellow marked for live calls. The icon shown in the first column reflects the queue direction (inbound or outbound calls). Since QueueMetrics 15.02 the list reports also outbound calls that are not answered by the calleed (like the second call in the example below where the talking period is null). Since QueueMetrics 15.04 agents can schedule a redial for a specific call through WombatDialer integration. To do this, a recall scheduler panel can be open by clicking on the icons at the very right side of each call reported in the list. Since QueueMetrics 15.09 the list reports call tags and feature codes. When flying over the outcome column, a popup with optional notes associated to feature codes is shown. Since Queuemetrics 18.04 the list shows a column containing a list of all the variables that are attached to the call. To view the whole list of variables the user must hover above the text in the table cell.
Click & Copy to Cliboard
Since QueueMetrics 16.09 the agent page’s call list supports clicking and copying caller IDs directly to the agent’s clipboard. In order to do so, the agent must click on the caller field in his call list, a message should appear confirming the number has been copied to his clipboard.
Agent logon panel
Keyboard shortcut: Alt+4.
The Agent logon panel is used to handle the login and logout process. The panel reports two lists of queues. On the left side there is the list of queues where the agent could login; on the right side there is the list of queues where the agent is already logged in. To login/logout to a queue or a set of queues, the agent must select the queue(s) from the correct list then click on the proper button located in between the lists. Based on the direction defined by a set of arrows on each button, the login (from left to right) or logout (from right to left) process is performed. The agent can login/logout on all the assigned queueues or on all the available queues with a single click through the arrow/line or double arrows labeled buttons.

In order to login/logout, the agent must compile the Agent Code and the Current Extension fields (available in hotdesking mode). If not properly specified, the fields will be marked red and no login/logout processes are triggered. The Agent cannot change their Agent Code and Current Extension fields if already logged on a queue (this feature may be disabled setting a specific configuration key, see Appendix C: System preferences for realtime configuration parameters).
If the underlying PBX platform does not allow log-on by queue, then only a queue named "All Queues" will be shown and agents will use it to switch on/off.
The Agent logon panel lets the agent switch between multiple servers (only for cluster mode).
| Since QueueMetrics 16.09, if the system property realtime.assertExtensionNotInUse is set to "True", QueueMetrics will check if the selected extension is being already used on every queue the agent has visibility for, as opposed to checking only the queues where the agent was a member (previous versions). |
Pauses panel
Keyboard shortcut: Alt+5.
The Agent can pause and unpause itself by selecting the appropriate pause code from the dropdown list then clicking to the Pause button. The Agent can teminate the pause by clicking on the Unpause button.
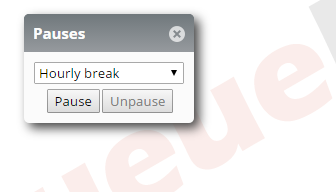
| A pause can be associated to an undefined code only if specified by a configuration key set, otherwise the agent must always specify an appropriate pause code before clicking the Pause button. |
Dialout panel
Keyboard shortcut: Alt+6.
The dialout panel is used to start a call through an outbound queue. The dropdown in the panel reports only the outbound queues where the agent is already logged in.
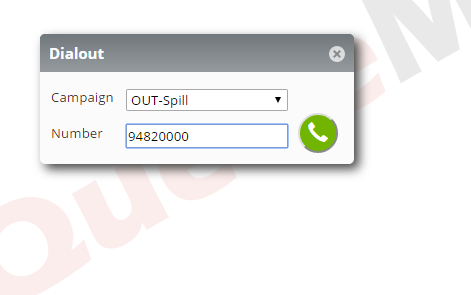
An agent can start a call by typing the number in the text field, then selecting the appropriate outbound queue from the dropdown and clicking on the "Dial" button. If the softphone panel is enabled it will pop up with the "Start Call" button blinking red. The Agent must click on this button in order to start the call.
Custom Web panel
Keyboard shortcut: Alt+7.
The custom web panel is used to embed a user defined external website or custom intranet pages. The panel is refreshed each time it’s selected and/or moved. Target for this panel is to allow integration with custom implemented indicators and/or messages. For complex external pages, or for pages where spurious refreshes should avoided, please use the custom background (see below) instead of this panel.

The panel is optionally enabled by modifying the configuration keys realtime.agent_webpanel1_url and realtime.agent_webpanel1_label located in the configuration.properties file.
| For technical reasons is not possible to handle keyboard shortcuts if the current keyboard and mouse focus is associated with this panel. It’s recommended to click on a different panel or the menu bar in order to take the focus before using again keyboard shortcuts. |
| When QueueMetrics is operating by an HTTPS secured server, be sure to provide the panel contents too over HTTPS, or instruct the Agent browsers to allow mixing unsecured HTTP contents on secured pages. |
QA Form panel
QA grading is available through the QA form panel by clicking on the proper icon associated to the call list for a specific call. This panel is the exact copy of the "old" QA form panel so the Agent can still perform every action available through the old form.
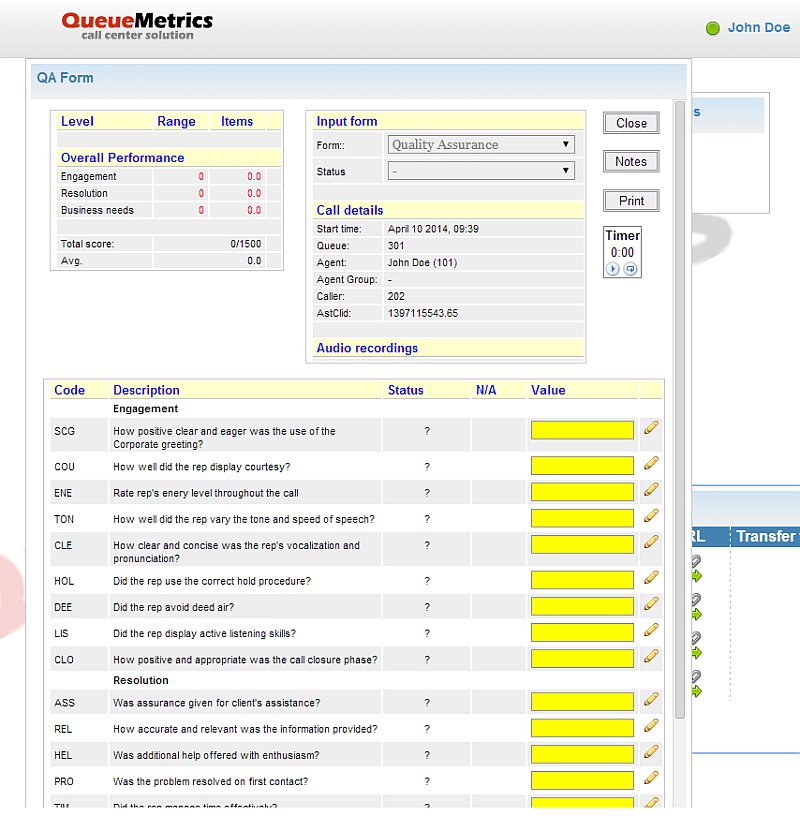
| QA grading is enabled only for agents holding the security key QA_TRACK |
Outcome code panel
Each call can be flagged by an outcome code and, if the enabled, by a set of feature codes. This could be done through the outcome panel reachable by clicking on the related icon in the call list panel. To assign an outcome code, the Agent should select it from the dropdown, then click on the Run pushbutton. If feature codes are enabled and available, they are shown in the lower part of the dialog. Available feature codes, associated with current assigned outcome, are shown in the dropdown. To add a feature code, a user should select it from the dropdown list, add an optional note on the textbox placed on the very right side, then press Add button. As soon as the feature code has been added, it will be shown in the list on the lowest part of the dialog. Each feature code has its own red cross mark that can be used to remove the specific feature code by clicking on it. Multiple feature codes can be added to a single call. If same feature code is added several time to a specific call, only the last version will be shown in the reports.
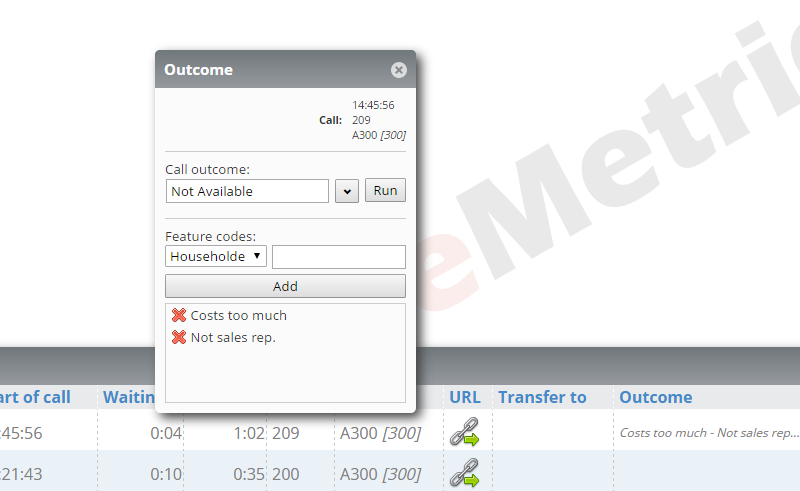
| The feature code sub-panel is not shown if not enabled by system configuration. For more documentation, please see Asterisk interactions on Appendix IV |
| The outcome panel is enabled only for agents holding the security key USR_OUTCOME |
| The outcome panel, if enabled, is available only for a certain amount of time, while the call can be edited. See Updating past calls to change it. |
Recall Scheduler
If WombatDialer is available and the queue is properly configured, agents can ask for a redial on a specific call by mean of this dialog. Scheduling a recall is done by selecting the number to be dialed (this field is already populated when opening the dialog, but can be changed by the agent if needed), the scheduling time and the WombatDialer campaign. An optional note can also be added; notes will be sent to the WombatDialer toghether with the rescheduling information.
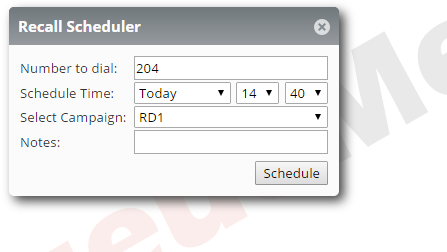
To setup the Recall Scheduler, QueueMetrics needs some information regarding the WombatDialer instance. They can be set in the system configuration as explained in Outbound dialer configuration .
When these parameters are set, in the Edit Queue section, an administrator can specify the name of the WombatDialer campaigns that will take care of the scheduled recalls, under the "Recall Campaigns" field (multiple campaigns must be separated by the "|" pipe symbol.
If everything has been set up correctly the agent will notice, on the call list panel, an alarm clock icon that, if clicked, will open the Recall Scheduler Panel.
Custom Backgrounds
The background of the working area in new real-time page can be customized with up to tree different URLs pointing to external websites. Each background can be selected by clicking on the left dropdown menu and/or through the keyboard shortcuts ALT+B (for the first background) or ALT+Q or ALT+W (for the second and the third background). The first background is something different from the other two backgrounds because it’s aimed to be used by an external CRM subsystem. If properly configured, each time an Agent answers to a call, the first background is automatically selected reflecting the information associated to the new call. This is useful for retrieving information about the caller. The Agent can promote the first background to be placed on top of the panels through the keyboard shortcut ALT+0. Reverting to the normal operation is accomplished by clicking on the menu bar in the area located between the left menu icon and the QueueMetrics logo.
| For technical reasons is not possible to handle keyboard shortcuts if the current keyboard and mouse focus is not associated with a panel but with the background. It’s recommended to click on a panel or the menu bar in order to take the focus before using keyboard shortcuts. |
| When QueueMetrics is operating by an HTTPS secured server, be sure to provide the background contents too over HTTPS, or instruct the Agent browsers to allow mixing unsecured HTTP contents on secured pages. |
| Since many Web Pages don’t allow framing for security reasons, QueueMetrics can be set up so that it will load your CRM in another page or tab. To enable this feature set the agent.openUrlInPopup property to "true" in the configuration.properties file or in the "Edit System Parameters" page in QueueMetrics. |
Default Extension
Since QueueMetrics 16.09 the Agent Page keeps track of the last extension the agent was logged in with, regardless of any default extension (Current Terminal in the "Edit Agents" page) setting that has been specified. When an agent logs into Icon, the Queue Login Panel presents the agent with the last extension he used on a queue.
Resolving agent page issues
Connectivity and Session Warnings
The Agent Page will notify the agent if any connectivity or session issue arises, by showing a warning message in the top-right of the screen regarding the nature of the error.
Yellow Warning (Connectivity Problem)

If this message is displayed Icon may be experiencing connectivity problems with the QueueMetrics Server (e.g. lost internet connection). During this time Icon will try to restore the connectivity by polling the main server; if successful the warning will disappear on its own.
Red Warning (Session Problem)

If this message is displayed the agent session has expired for some reason (e.g. a server restart). When this message is displayed Icon will let the agent finish any current calls but it won’t allow him to perform any other action without logging in again first.
This warning will not dissapear on its own, and the only way to restore functionality in case of a Session error is by relogging into the server. Clicking on the warning Icon will prompt the agent to the login screen.
Help! my agent page is not refreshing!
If your agent page does not seem to refresh when something is supposed to happen, this may be caused by three different causes:
-
the action you expected to happen has not actually happened, or QM was not notified it happened
-
the action happened at the wrong time (e.g. seemingly in the past or in the future)
-
the action happened for the wrong agent
In order to diagnose these kind of issues, you need to open a second browser window displaying the database tester page - see Using the DbTest Diagnostic Tools. On this page, you will see the latest records coming in from the PBX, and you will see a value called Time Delta that shows how old are the latest records that came in. You would expect Time Delta to be zero if you have any new records coming in and the clocks of the PBX and of the server are aligned.
| In order not to drown in a deluge of log entries that make it impossible to understand what is happening, make sure that you run these tests on a system that is not being actively used, e.g. off hours. |
An example of the first kind of issue, action not happening, is when you try logging on to a queue but the agent page keeps showing a "spinning" icon and then the queue goes back to not logged in. If you force a page reload, the queue is shown as not logged in. By looking at the database inspector, you can see if any log is generated (in which case, see case "wrong agent" below) or if no log is generated at all. In this later case, you have an issue with the way logins (and actions in general) are performed, maybe an incorrect setting of the AMI or a missing dial plan entry.
An example of the second case, wrong time, is when you see records being sent but time delta tells you they happened in the past or in the future. The agent page keeps asking for events that just happened, so if they happened in the past or they will happen in the future, the page does not know that there is new information and so it won’t reload.
You can see if you have a reload issue because if you force a reload by pressing F5, the page will display correct information. You may also notice this case because call durations, as observed from the wall board or the real time page, are either too long or too short, but will be correct on reports.
To fix this issue, make sure that the clock on the PBX and the clock on QueueMetrics are aligned to a sub-second difference.
| To keep clocks in sync, the easiest thing is to have them synchronized automatically using a public NTP server - this is nowadays supported by all servers and PBX manufacturers. |
An example of the third case, wrong agent, happens when for some reason the agent page is looking at the wrong agent codes coming in on the logs. This may happen if your configuration is incorrect and for example the agent page is looking for a SIP agent but the actual logs contain PJSIP. While the result of the analysis is a bit more forgiving (so when you force a reload by F5 it may look correct), the agent page, for efficiency reasons, requires exact codes to be matched.
To understand which codes are required, you may manually add a parameter to the page URL: dbgPoll=1, so that your agent page URL looks like http://queuemetrics.server/queuemetrics/qm_agentpage2_load.do?dbgPoll=1. This will force a reload of the page; at this point open up the browser console (it works better in Chrome) and look for entries like:
On polling query ActivePollingReq{agentCode='1742', serverId='', part='P001', preset='1', minTst=1613237251, channels=[local/1742@, pjsip/1742, agent/1742], uniques=[]}
 response: AgentState{stateUpdated=false, currentServerTst=1613237286, max_tst=1613237251, loggedOn=0, sessionStarted=0, pauseStarted=0, localExtension='', queuesLoggedOn=[], pauseCode=null, agentsCalls=[], possibleChanNames=[], currPartition='', currPreset='', currentServerId=''}
 took 19ms
 Server: current time is ahead of requested minTst: 35s.
 Server max_tst is ahead of requested minTst: 0s.
From these records you can see:
-
the list of agent prefixes that was requested to the server (parameter
channels). They must match the agent field of any new logs coming in for the agent. -
the minimum timestamp that should be checked for new data to trigger a reload.
-
how long the service took from the point of view of the client.
-
whether a full analysis was triggered or not (stateUpdated equals to true), also visually enhanced with a prefix
[UPDATE]. -
the current time on the server and the current known maximum timestamp for agent data.
Self-service agent reporting
It is now possible to allow agents to run specific reports directly from the agent page. These new features are available as of QueueMetrics version 12.10 and are already enabled for the included sample agents. In order to configure other agents having the same functionalities available, the following steps need to be implemented:
-
Assign a queue (or a set of queues) to the agent
-
Assign a new report to the agent
-
Assign the SSAREPORT key to the agent
-
To assign a queue to an agent, select 'Edit queues' from the Home page, select the 'Assign reports to agents' icon, select the check-box next to the chosen agent. Save to confirm.
-
To assign a report to the agent, select 'Edit reports' from the Home page, select the 'Assign reports to agents' icon, select the check-box next to the chosen agent. Save to confirm.
-
To assign the SSAREPORT key to the agent, select 'Edit users', select the 'pencil' icon, add the key to the 'User keys' field. Alternatively, it is possible to assign the SSAREPORT key to all agents by editing the agents class by selecting 'Edit users' from the Home page, select the 'Show classes' button, select the 'pencil' icon of the 'Agents' class and add the SSAREPORT key in the 'Keys' field.
-
This new block of reporting functions is made visible for agents by enabling the SSAREPORT key within the user configuration/administration page ('Cfg Users' tab), which can be reached by selecting the 'Edit users' link form the main QueueMetrics administrator Home page. An agent can run a report based only on the queues and reports assigned to him/her. To assign queues to an agent you have to select the 'Edit queues' link from the QueueMetrics administrator Home page and select the 'Assign reports to agents' icon next to the queue you want to assign. This will take you to the page where you can simply assign the queue to the chosen agents.

When assigning reports, the same criteria applies as assigning queues, where we access the report configuration page from the 'Edit reports' link on the administrator Home page. Selecting the 'Assign reports to agents' icon takes to the page where you assign the selected report to each agent.
An administrator can also assign the maximum amount of time that an agent can have available, when viewing historical reports from the agent web page. The key default.ssarMaxReportPeriod is defined within the configuration.properties file. If this key is not present within this file, then the default time is 15 (days).

When an agent runs a report, the agent does not have a 'Search' button enabled, so s/he is not able to access any kind of Custom Reports.
Gathering call information through agent-side QA forms
QA forms - described in detail in Advanced tracking of agent and grader performance - can be used on the agent’s page in order to gather generic information about the current call. They may act as a kind of embedded database of calls that is accessible for reporting within QM itself.
In order to turn on the filling of QA forms by agents, you need to:
-
Make sure your agents hold the QA_TRACK security key. You might consider adding it to the Agents class.
-
Create special QA forms to be used by agents. You can use security keys to make sure that your agents have access only to the forms they are supposed to see, versus forms used for "proper" QA tracking by QA specialists
-
Create form items made of multiple-selection or "Yes/No" questions
-
In agent’s forms, all or most questions will be non-scoring, as you are gathering information and not evaluating an agent’s behavior
-
QA forms can have multiple sections that turn on or off based on the answers to other questions. Questions can also be made optional.
-
You can associate free-text comments to QA items by clicking on the pencil icon on the right-hand side of the question