A WombatDialer Cookbook
This section of the manual contains a few examples of WombatDialer deployments that show common usage patterns.
Title |
Diff. |
EPP |
EPQ |
API |
NOT |
ATT |
INP |
EVT |
TTS |
QM |
* |
X |
X |
X |
|||||||
* * |
X |
X |
X |
X |
||||||
* * |
X |
X |
X |
X |
X |
X |
||||
* * * |
X |
X |
X |
|||||||
* * |
X |
X |
X |
|||||||
* * |
X |
|||||||||
* * |
X |
X |
X |
|||||||
* |
X |
X |
X |
|||||||
* * |
X |
X |
||||||||
* |
X |
X |
X |
- Diff
-
The level of difficulty -
Beginner -Intermediate -Advanced - EPP
-
Uses PHONE end-points
- EPQ
-
Uses QUEUE end-points
- API
-
Shows HTTP APIs
- NOT
-
Shows HTTP notifications
- ATT
-
Shows call attributes
- INP
-
Importing and exporting call lists
- EVT
-
Call events
- TTS
-
Using Text-to-Speech engines
- QM
-
QueueMetrics integration
A social media dialer
Let’s imagine that we work for ACME Social, a company that specializes in tracking the success of its clients on social networks like Facebook or Google+. So, every time someone befriends one of their clients, we want WombatDialer to call the client telling them their current number of friends. The call would say something like "Hello ! Customer 1234 has 127 friends. Goodbye!"
This example shows a couple of features that are not trivial to implement on most dialers, notably:
-
The message will be customized with a number of parameters, so that each client receives a personalized version and not just a pre-recorded note
-
The dialer starts calling on-demand when something happens and handles reschedules internally
In order to implement this, we start by editing the Asterisk dialplan and create a couple of new contexts. The first one is called "telecast" and is used to generate the message being played:
[telecast]
exten => 100,1,Wait(1)
exten => 100,2,Answer
exten => 100,n,Playback(hello-world)
exten => 100,n,Playback(agent-loginok)
exten => 100,n,SayDigits(${user})
exten => 100,n,Playback(vm-youhave)
exten => 100,n,SayDigits(${friends})
exten => 100,n,Playback(vm-Friends)
exten => 100,n,Playback(vm-goodbye)
exten => 100,n,Hangup
As you can see, the context above introduces two channel variables ${user} and ${friends} that are placeholders for the user-id of our client and the number of friends they currently have.
As a convenience when testing, we want all numbers dialed during the test phase to actually dial our own SIP phone; to do this we create a new context called dialout that routes any number to our extension:
[dialout]
exten => _X.,1,Dial(SIP/500)
exten => _X.,n,Hangup
We reload Asterisk to pick up the dial-plan changes. Then we log-in in WombatDialer and configure it, so that:
-
ASis our Asterisk server -
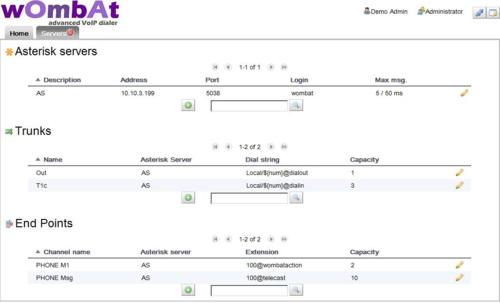
We create a trunk called "Out" on server AS that points to our telephone. We enter
Local/${num}@dialoutas its dial string and set its capacity to 1 (so we never receive more than one call) -
We create an end-point called "Msg" on our server AS with extension
100@telecastand a capacity that is enough for the campaign - let’s say 10 lines.
Your configuration will look like the following screenshot:
At this point, we create a new List called "Test" and add only one number to it; you may enter the number as:
0916300000,user:10,friends:100
This uploads the number and associates the variables "user" with value 10 and "friends" with value 100.
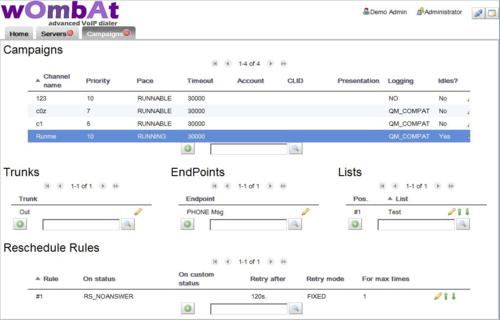
Then we create a new campaign - this is where all the pieces are tied together:
-
We set its name as "Runme" - avoid long names or spaces if you plan to control it externally
-
We set its priority to 10 - the priority is the order in which campaigns are queued when trying to assign free lines. A campaign with a lower number will run first, while campaigns with the same priority will have a fair share each.
-
We set "Idle on termination?" to Yes - this way this campaign will not just stop when it is out of numbers but will wait for more.
-
We set "Additional logging" to "QM compatible" so that you may use QueueMetrics to keep track of it.
After saving the campaign, we select it and then add:
-
Trunks: Out
-
Endpoints: Msg
-
Lists:Test
As you can see, a campaign can have multiple trunks, multiple end-points and multiple call lists, and they may be shared between multiple campaigns.
It would be fair to add some rescheduling rules as well - for example, if we do not get an answer within 30 seconds, we want the system to retry placing the call exactly once after two minutes.
In the end, you would get a situation similar to the one here:
At this point we’re ready to go:
-
make sure that the WombatDialer engine is turned on (from the Home Page, click on the "Play" icon)
-
go to the "View Live" page and select our campaign "Runme" under "Available campaigns"
-
click on "Start"
If all goes well, within a few seconds you should receive a call to your SIP phone telling you that user 10 has 100 friends. Hooray!
After this, you should see your campaign being shown on the Live page in gold, with status IDLE; now, when our internal tracking system detects new friends for one of our valued customers, all it needs to do is to send a HTTP request to the WombatDialer, like we would manually from the command line:
curl "http://server:8080/wombat/api/calls/index.jsp?
   op=addcall&campaign=Runme
   &number=0916309765&attrs=user:107,friends:123"
If you do, in a few seconds the dialer will send this new call. You can send all the calls it needs to place, one at a time, and it will try scheduling them as soon as possible given the current system conditions, running campaigns and available outbound lines.
Now, if you want it to actually dial out and not just call our SIP phone, edit your Trunk "Out": set the dial string to something like SIP/myprovider/${num} and set its capacity as the total number of parallel calls you want to place. Then go to the Live page and reload the campaign.
When you want to stop the campaign, you have two choices:
-
You can temporarily pause it
-
You can remove it from running campaigns when it is paused
Of course, you can have this campaign run on multiple trunks and multiple endpoints, using multiple separate Asterisk servers, just by creating the relevant items and telling the campaign to use them. This way, handling hundreds of channels is just as easy as testing with your SIP phone!
Further evolution:
-
You could create your own audio recordings - the example here was created with sounds present in a standard Asterisk distribution, but of course you should record your own messages.
-
You can do even better and embed a Text-to-Speech engine script, so you are not limited to inserting numbers but can play back nearly anything
-
You can add an IVR option to the "telecast" context, so that if the callee wants to talk to a live person, they are sent to a queue. By monitoring the number of lines that you are using on your trunk and the number of available agents, the WombatDialer acts as a simple progressive dialer.
-
As all the configuration is GUI-agnostic, you can use your favorite Asterisk configuration GUI to create End-points - play messages, read IVRs, add time-dependent rules like you would for incoming calls. All you need to know is the point in the dialplan that they start from - e.g. internal number 123 in FreePBX is always available as
123@from-internal. -
You can optionally add an Active Period to the running campaign, so that calls on it are placed only - say - between 9 AM and 6 PM no matter when the messages are queued.
Helping Wombats one carrot at a time
You know how it goes; so many good ideas in real-life end up being limited by the amount of funds you can raise to implement them. That’s why Vicky, the energetic new president of "Friends of the Wombat", called you. "Friends of the Wombat" is a nonprofit institution that helps wombats in need, but their activities are limited by the rising cost of carrots; so they decided to start a volunteer fund-raising campaign.
What they would like to do is to call a list of known contacts that expressed an interest in wombats and ask them to make a donation. They started doing this manually with paper and pencil, but getting to a lead is really tiring and time-consuming - their volunteers spend most of the time dialing numbers and it is really hard for them to get through to somebody who is interested.
After a good cup of green tea, what you propose to do is to use WombatDialer to automate the process by dividing it into multiple stages:
-
Create an electronic list of those leads
-
Leads from their list are dialed
-
If the call is answered, a message is played that explains what the campaign is for
-
If the callee is interested, they press 1 to be put in conversation with a volunteer that will explain how to send a donation.
This setting leads to two huge efficiency boosters:
-
As numbers are dialed automatically and error conditions are handled behind the scenes, a lot of drudge work with paper and telephone keyboards is automated; no more post-it notes to recall a busy number!
-
As they noticed that about 50% of the calls made manually result in calls to busy numbers or numbers where nobody picks up, and that only 50% of the callees are actually interested after an initial interview, they expect that 75 calls out of every 100 they make can be screened out automatically. So if they have 4 volunteers on shift, WombatDialer could start 16 calls at once on average, and have all of our volunteers busy most of the time with people who are actually interested in contributing.
In order to implement such a campaign with WombatDialer, we start by creating a call queue that will hold our agents and will send them calls. You can use any Asterisk GUI to do this - in the example below we use Elastix, but you can choose the one that suits you best.
We go to Queues → Create new, set the extension for the queue as 999, enter any name you want, and look on the settings below so that:
-
Strategy is set to "rrmemory"
-
Queue events: yes (this is very important - if you don’t do this Wombat won’t be able to observe your queue at all).
-
Autofill: yes (all free agents are assigned calls at the same time)
If you create a queue manually without using a GUI, configure it with the parameters below so that WombatDialer can observe it.
[999]
autofill=yes
eventmemberstatus=yes
eventwhencalled=no
maxlen=0
strategy=rrmemory
Now we create a custom piece of dialplan to be called as an end-point for calls that connect successfully.
[friendscampaign]
exten => 100,1,Answer
exten => 100,n,Playback(campaign_message)
exten => 100,n,Read(type,,1)
exten => 100,n,GotoIf($["${type}" = "1"]?ok)
exten => 100,n,Goto(1)

exten => 100,n(ok),UserEvent(CALLSTATUS,Uniqueid:${UNIQUEID},V:1)
exten => 100,n,Queue(999,,120)
(In order to make this example shorter, we assume you have a basic familiarity with WombatDialer concepts such as Campaigns, Servers, Trunks and End-points.)
Now log-in to WombatDialer and create a new End-Point:
-
Type: QUEUE
-
Queue: 999
-
Max channels: 10
-
Boost factor: 2.0
-
Max waiting callers: 2
This means that WombatDialer will try and place two calls for each agent available, but never more than 10, and will stop placing calls if there are two or more people waiting in queue. We expected to use a boost factor of three to four given the previous statistics, but it is better to start with a small figure and grow it if needed.
It is important to understand the impact of different boost factor settings; in general having more calls made than agents may result in calls waiting in queue when all of your agents are busy (in call-center parlance this is usually referred as "nuisance calls"). WombatDialer tries to minimize the impact of this case by continuously monitoring the number of calls waiting on the queue and avoiding placing new calls if there are too many. If you don’t want to have cases where calls are not immediately connected to an agent, you should leave the boost factor to 1, that is, place no more calls than available agents. The trade-off here is that agents end up being underused, as they have to wait for a successful call to come in.
We then create a test trunk, upload a list of test numbers and create a campaign called "friends" as in the previous examples; we now start the dialer and start the campaign from the Live page. When we start running it we notice that it does not seem to work - the campaign is running but no calls are placed. How comes?
If we reload the current Dialer status, we see that it is saying that the queue has 0 channels available - this is because there are no agents on the queue.
If we log an agent on (e.g. by entering 999* on Elastix), we will notice that WombatDialer starts dialing. If you pause an agent or log him off, WombatDialer will immediately react and adapt to the changed number of available end-point channels.
Another thing that we do is to track (through a status code) which callers ask for being put in contact with a volunteer - this allows easy inspection of what goes where from the Campaign Report panel.
Now all we have to do is to set our campaign to use an actual telephone trunk and upload the "real" list of numbers and we are ready to go - it’s time to buy some new carrots for our wombats!
Understanding statistics
If you run a report of our campaign with a queue analyzer like QueueMetrics, you will have two different views of the campaign:
-
if you analyze the queue "friends" (the one that matches the name of your WombatDialer campaign) you will see the total "external" system activity - all calls placed on the campaign are tracked, and the wait time matches the external wait time (that is, the time between the dial request and a successful connect). All calls appear to be connected on the end-point, as you could have multiple ones assigned to the same campaign.
-
if you analyze the queue "999", you will see the human side of action - how many calls were queues for humans to interact with, how fast they were answered and by whom.
Further expansion
-
You can use the same end-point in multiple parallel campaigns, if needed.
-
It is possible that your campaign reaches someone who is interested but is currently doing something else so does not have the time to speak to your volunteers. They could tell you by hitting 2 - you could add a Reschedule Rule that reschedules the call in a few hours.
-
You could easily generate personalized messages instead of one single recorded message by using a Text-to-Speech synthesizer
Please note that outbound telemarketing, whether it is of the good or evil persuasion, is regulated by your local law, so be sure you comply to its terms before you start calling millions of people!
Outbound IVRs and dr. Strangelove
A Dr. Strangelove just called, saying he needs your help for an automated appointment reminder system. Dr. Strangelove is tired of patients forgetting appointments, so he needs a way to call them the day before and making sure they will be there at the right time. Also, as he specializes in every possible thing, he needs to know what the appointment will be about so he can either have an operating room ready to remove your appendix or his psych couch cleaned and stocked with a large supply of paper towels. Do you think you can help?
After calling him, you understand that he wants a system that will not only connect to a list of numbers and handle common issues (busy calls, non-answers, etc) but also a system that is able to detect whether the callee actually confirms receipt of the message. If they do, that’s okay; if they don’t, a new call is placed after a while.
He also wants a system that is able to synthesize a custom message for each call, and that is able to gather data from the callee and pass it along to his office management system as it is collected.
Doing this with WombatDialer is easy; it is basically a matter of implementing an outbound IVR and tracking call parameters and call completion codes. Doing so will also let us show how WombatDialer handles call retries. As an added bonus, we’ll see how WombatDialer notifies other systems over HTTP.
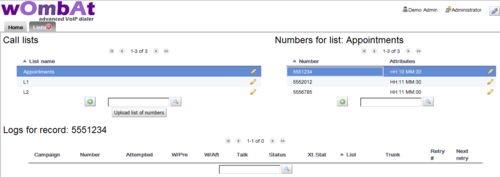
To get us started, we create a list of telephone numbers called "Appointments" with custom attributes; in order to do this, we log in to WombatDialer, go to the Lists page and create a new list. After creation, we select it and upload a list of numbers like the following one:
5551234,HH:10,MM:30
5556785,HH:11,MM:00
5552012,HH:11,MM:30
This means that the person at number 5551234 is to be reminded an appointment for tomorrow at 10:30. We use two separate variables as this makes life easier for our Text-to-Speech engine.
We now have to program the outbound IVR context in Asterisk; we can do that easily with the help of WD call attributes so that we know what we have to tell our customer. In this example, we will also use the Google Text-to-Speech engine to synthesize audio on-demand.
[drstrangelove]
exten => s,1,Answer
exten => s,n,Set(TIMEOUT(response)=5)
exten => s,n,UserEvent(CALLSTATUS,Uniqueid:${UNIQUEID},V:0)
exten => s,n(start),agi(googletts.agi,"Your appointment with doctor
                strangelove is for tomorrow at ${HH} ${MM}")
exten => s,n,agi(googletts.agi,"Press 1 for to book for major surgery
                press 2 for psychiatric counseling.")
exten => s,n,Read(type,,1)
exten => s,n,GotoIf($["${type}" = "1"]?appe)
exten => s,n,GotoIf($["${type}" = "2"]?psyc)
exten => s,n,Goto(start)

exten => s,n(appe),UserEvent(ATTRIBUTE,Uniqueid:${UNIQUEID},APPT:APPE)
exten => s,n,agi(googletts.agi,"You choose the appendectomy.")
exten => s,n,Goto(confirm)

exten => s,n(psyc),UserEvent(ATTRIBUTE,Uniqueid:${UNIQUEID},APPT:PSYC)
exten => s,n,agi(googletts.agi,"You choose psychiatric counseling.")
exten => s,n,Goto(confirm)

exten => s,n(confirm),agi(googletts.agi,"Thank you! Now press 1
                to confirm the appointment")
exten => s,n,agi(googletts.agi,"or 2 to cancel it.")
exten => s,n,Read(conf,,1)
exten => s,n,GotoIf($["${conf}" = "1"]?ok)
exten => s,n,GotoIf($["${conf}" = "2"]?ko)
exten => s,n,Goto(confirm)

exten => s,n(ok),UserEvent(CALLSTATUS,Uniqueid:${UNIQUEID},V:1)
exten => s,n,agi(googletts.agi,"The appointment was confirmed.
                See you tomorrow.")
exten => s,n,Hangup

exten => s,n(ko),UserEvent(CALLSTATUS,Uniqueid:${UNIQUEID},V:2)
exten => s,n,agi(googletts.agi,"Boo the appointment was canceled.")
exten => s,n,Hangup
Notable points in the code above are:
-
Custom call attributes
HHandMMare passed along with the phone number so we can know what to tell each client. -
We set the call status to "0", "1" or "2". "0" means that the call was connected but no choice was made, "1" means that the appointment is confirmed and "2" is that it is canceled
-
We generate some UserEvents in order to populate the outbound (that is, coming from outbound) attribute
APPTwith the patient’s choice
We now have to create an end-point for our campaign that points at extension s@drstrangelove so that WombatDialer knows where to connect successful calls. We will also need at least one trunk to send calls through - to get us started it is advisable to have a "dummy" trunk routing everything to a local extension.
If you have not already done so, it would be advisable at this point to have a look at our previous tutorial - A social media dialer - to see how to create and control a simple campaign.
When done, we create a new Campaign to connect all pieces together.
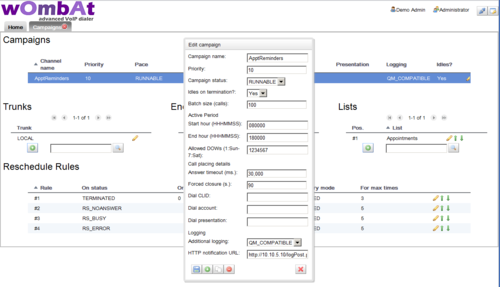
We set the campaign to be idle on termination, so that we can add more numbers over HTTP when they become available. We also program it to be running only between 8AM and 6PM, every day of the week, so we don’t call people in the middle of the night if a nightly job is used to load new appointments every day.
We also set a forced closure after 90 seconds so that if the call exceeds a duration of 90 seconds, it is automatically hung up to prevent using valuable resources on a call that is likely invalid.
As a last measure, we set the logging format to QM_COMPATIBLE (so that we can observe activity via QueueMetrics) and enter the HTTP notification URL of Dr. Strangelove’s office management system to be notified of call events (see below for more information).
We then complete the campaign by adding a trunk, our new end-point with the outbound IVR and our Appointments list.
As a last step, we create a set of Reschedule Rules that implement the retry logic.
-
If the call is unanswered, busy or in error, we retry every 300 seconds for up to five times.
-
If the call times out because of a forced closure, we retry after 120 seconds.
-
If the call completes naturally but its extended status is 0 (no choice), we retry it for up to three times after 300 seconds each.
-
If a call completes naturally but its extended status is not 0, then it is not retried.
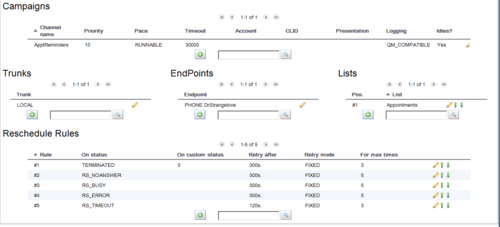
Now it is time for us to start the campaign - make sure the WD is running, go to the Live page, select your campaign and run it. If all goes well, you should start receiving calls on your test extension.
While the campaign is running, you can add more calls to it via HTTP by issuing:
curl "http://server:8088/wombat/api/calls/index.jsp?
 op=addcall&campaign=AppRemiders&number=45678
 &attrs=HH:12,MM:15"
and you can even specify a minimum time for calls to be placed at, like e.g.
curl "http://server:8088/wombat/api/calls/index.jsp?
 op=addcall&campaign=AppRemiders&number=45678
 &attrs=HH:12,MM:15
 &schedule=2012-06-01.10:00:00"
When the campaign terminates, it will be in IDLE state. In order to close it, first pause and then remove it.
After a successful run, you can see its statistics, by viewing the Campaign Report screen:
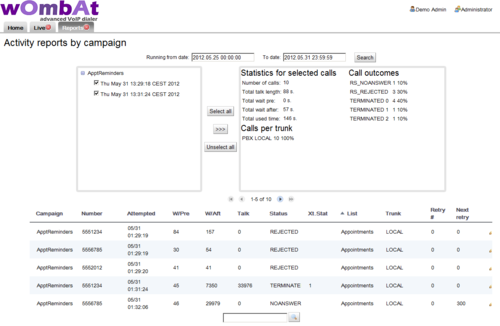
You will see that some calls appear as TERMINATED 0, some as TERMINATED 1 and some as TERMINATED 2, based on the extended call status entered through a user selection. Only calls in state TERMINATED 0 are retried.
You can also see the state of attributes for each call by going to the List editor:
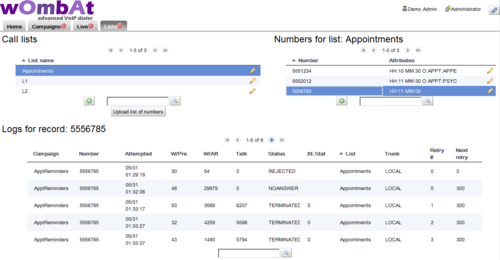
You see that calls successfully placed will have an APPT attribute that is either APPE or PSYC; also you will see a complete log of activity for each number.
As a last item, you’ll remember we enabled HTTP notification. This basically POSTs the result of each call to a HTTP server, where you could have a simple PHP script to parse it, like in the following example:
<?
$out = "";
foreach($_POST as $name => $value) {
   $out .= "$name:$value ";
}
print($out);
error_log("RQ: $out",0, "", "");
?>
The script above basically logs all activity on the HTTP error log. What you get is a sequence of calls like:
RQ: num:5551234 reschedule:0 I_MM:30 extstate:
     state:RS_REJECTED I_HH:10 retry:0
RQ: num:5556785 reschedule:0 I_MM:00 extstate:
     state:RS_REJECTED I_HH:11 retry:0
RQ: num:5552012 reschedule:0 I_MM:30 extstate:
     state:RS_REJECTED I_HH:11 retry:0
RQ: num:5551234 reschedule:0 I_MM:30 extstate:1
     state:TERMINATED I_HH:10 O_APPT:APPE retry:0
RQ: num:5556785 reschedule:300 I_MM:00 extstate:
     state:RS_NOANSWER I_HH:11 retry:0
RQ: num:5552012 reschedule:0 I_MM:30 extstate:2
     state:TERMINATED I_HH:11 O_APPT:PSYC retry:0
RQ: num:5556785 reschedule:300 I_MM:00 extstate:0
     state:TERMINATED I_HH:11 retry:1
RQ: num:5556785 reschedule:300 I_MM:00 extstate:0
     state:TERMINATED I_HH:11 retry:2
RQ: num:5556785 reschedule:300 I_MM:00 extstate:0
     state:TERMINATED I_HH:11 retry:3
RQ: num:5556785 reschedule:0 I_MM:00 extstate:0
     state:TERMINATED I_HH:11 retry:4
You see that for each call:
-
num is set to the number dialed
-
state is the call state at its completion
-
extstate is the call’s extended state, if present
-
retry is the retry counter
-
reschedule is set to the time to be waited before a reschedule; if no reschedule is necessary, it will be set to zero
-
all inbound attributes (the ones you set with the telephone number) are passed along prepended by I_
-
all outbound attributes (the ones you read from the callee), if any, are passed along prepended by O_
This way you can easily create an integration script that stores the results of the call on a database or passes them along for further processing.
Further developments
-
By connecting multiple trunks and end-points residing on multiple servers you can scale this example up to hundreds of parallel lines
-
If you have clients living in different time zones, you could have multiple campaigns active with different time windows to place calls
-
It is often a good idea to set call attributes that are not actually used by Asterisk (e.g. a patient ID) but make life easier for third-party systems to find out what the call was about.
The Google-TTS script used is available at: http://zaf.github.com/asterisk-googletts/
Understanding queue end-points
An end-point of type queue in Wombat tries to determine the number of available channels based on the number of available agents on the queue it is observing. An agent is considered available if it is logged on to the queue, is not paused and is not currently in conversation.
After getting the number of available agents, it multiplies it by the "boost factor" (that is used to account for the success rate in connecting the numbers to be dialed) and tries to schedule as many calls. Therefore, if you have e.g. 7 available agents and a boost factor of 1.3, it will try to connect to 9 numbers at once (7 x 1.3 = 9.1).
It will also enforce two limits:
-
If there are more than "max waiting calls" waiting on a queue, it will not try and place new calls - in theory there should never be calls queued, as they follow the number of available agents, but it is possible that either some agent logs off after being counted to place calls or some calls reach a queue without passing through Wombat. This also acts as a counterbalance to high "boost factor" values.
-
it will never place more than "max channels" calls on the queue - this lets you use a shared queue where some calls come from inbound activity and some come from Wombat itself. Of course you can turn this off by setting "max channel" to a value higher than the total number of agents on the queue.
It is also important to notice that the queue is used only as a way to know how many calls can be placed on a queue, but calls will still be transferred to a point in the dial-plan that should lead to the queue. This lets you execute dialplan logic (e.g. playing pre-recorded messages or running IVRs) on the calls it just placed.
In order to use WombatDialer effectively with a queue, the following guidelines are best followed:
-
though Wombat would work with static member channels, if you want your calls to go through to agents who may or may not be available (e.g. some days they may be sick) it is strongly advisable to use dynamic agents who log on and off from the queue.
-
as an agent cannot be physically available at all times during the day, it is important that they have a way to pause themselves, be it to run "wrap up" activities after calls or to take breaks. The QueueMetrics web interface offers an excellent panel that lets you add pause codes as well
-
the queue must provide events to Wombat about agent activities. On modern Asterisks (12+) it works natively; if not, you must set
eventswhencalled=true, otherwise the queue will be unobservable. It is also important that extension presence is correctly observed - e.g. if an end-point is busy because the agent is doing a personal call, its queue status should immediately reflect this. Whether this happens or not on your system is a matter of Asterisk version and type of channel that is used to reach the agent - with recent versions of Asterisk and SIP channels this should work automatically. -
the queue should connect calls to agent as efficiently as possible when there are multiple calls waiting and multiple available agents, so it should have the "autofill" option set to true.
In order to run a campaign with a Queue endpoint, it is best to:
-
create a campaign with a Queue endpoint. You may create it IDLE and add no call lists, so the campaign does not actually do anything until fed some numbers.
-
run that campaign
-
reload the Dialer status in order to see if the queue is being observed (you have to click on the reload icon manually each time).
-
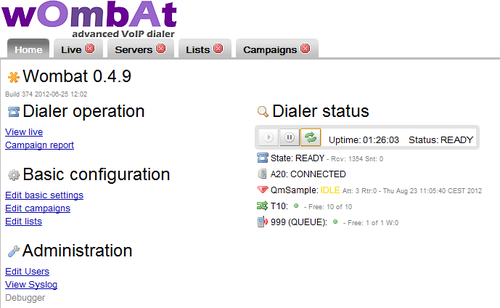
If the queue is present, you should see it something saying "Free 4 of 7 W:2". This means that WD is seeing 7 agents connected of which 4 are free (where 4 is the result of multiplying the actual number of observed channels by its boost factor), and that there are 2 calls waiting on the queue.
-
try and log on, log off, pause and unpause an agent. You should see the number of free and available channels change accordingly. Try also sending calls to the queue and see if the number of free agents and of waiting calls is correct.
-
try also placing calls from some agent extensions and see if the number of free channels reflects this correctly.
-
if you plan to have agents working on multiple queues at once, run the tests above while the agents are logged on in at least two queues and make sure statues are updated correctly.
The Queue EPs let you use WD as a powerful progressive dialer and can lead to very complex integration scenarios, but as it involves actual people being called and answering the phone, it is better to understand it well before actually using it in production.
A custom QueueMetrics integration
The WombatDialer can be used as a stand-alone product for message broadcasting, but it was built to integrate easily with QueueMetrics, the premier call-center monitoring and reporting tool for the Asterisk PBX. WombatDialer and QueueMetrics do different things, but together can be a very powerful call-center solution.
-
WombatDialer is able to use a Queue as and end-point in order to connect calls to a set of agents
-
QueueMetrics is able to monitor extensively the queue and provides a convenient agent interface that works well with WombatDialer
In this example, we improve the scenario described in a previous tutorial - Helping Wombats one carrot at a time - imagining that the want to:
-
use a custom CRM interface so that agents can immediately see the name of the person being called and can open up an external CRM application for each client so they can gather donation data
-
monitor each agent’s performance
-
use a dynamic list of people to be called so that as soon as you know of an interesting lead, you can add it to the list of persons to be called.
You can have WombatDialer and QueueMetrics installed on the same server, unless you have a very high load or a very high number of lines.
As a first step, we’ll have to create a small interface script that will be our CRM application. We will call it wombatPopup.php and will store it on one of our servers as http://10.10.5.10/lenz/wombatPopup.php
Plain WombatDialer Agent Panel<hr>
<?
$number = $_REQUEST["caller"];
$agent  = $_REQUEST["agent"];
$unique = $_REQUEST["unique"];

preg_match('/#(\d+)\s(.+)/', $number, $matches);
$id = $matches[1];
$name = $matches[2];
?>

Person is: <?= $name ?> (ID #<?= $id ?>)<p>
Agent is: <?= $agent ?> <p>
Call unique is: <?= $unique ?>
This page basically displays the person’s name and ID, so we can display it immediately - or this could redirect to an external CRM application.
At the Asterisk level, if you have not already done so, create a queue "999" with the correct parameters to be monitored by Wombat - see Understanding queue end-points . Then edit your extensions_custom.conf file so that you have an extension "1235" that leads to the queue:
[from-internal-custom]
....
exten => 1235,1,Answer
exten => 1235,n,Set(CALLERID(num)=#${ID} ${PERS})
exten => 1235,n,Goto(from-internal,999,1)
This rewrites the incoming caller-id for the queue to e.g. "#1234 John_Doe", so this is what the agent sees - even before the agent pop-up is opened. This also is recorded in QueueMetrics, so this is what you will see when you run call reports. Note that if you run FreePBX you cannot call the queue directly using the Queue() command but you’ll have to go through its dialplan in order to have all parameters correctly set.
In QueueMetrics, set the following properties in configuration.properties:
realtime.agent_autoopenurl=true
default.crmapp=
Then create a queue "999" and set its Queue URL to:
http://10.10.5.10/lenz/wombatPopup.php?caller=[C]&unique=[U]&agent=[A]
This tells QueueMetrics that it has to enable a screen-pop for calls coming in through that queue.
Now log on to WombatDialer; create an EndPoint of type Queue set for queue 999, and its entry point in the dialplan to 1235@from-internal-custom . Do not forget to set the "Boost factor" to 1 and the "Maximum queue length" to 2.
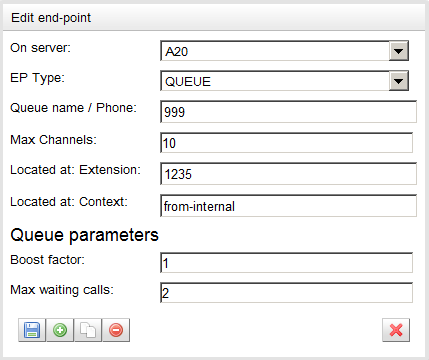
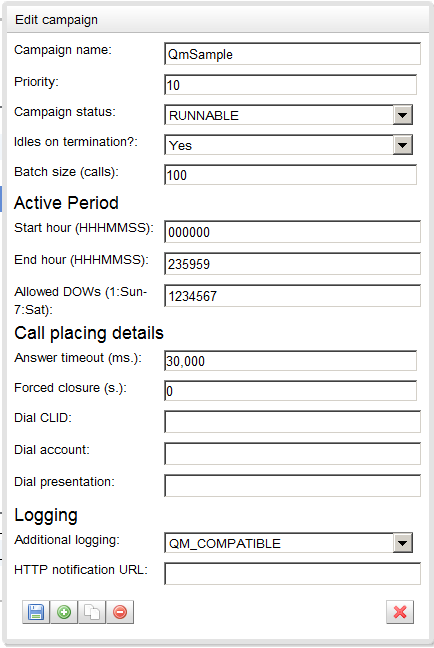
Then create a campaign called "QmSample" that idles on termination.
Set the trunks, the EP we just created, add no lists and define any reschedule rules you need. The end result should look like the following:
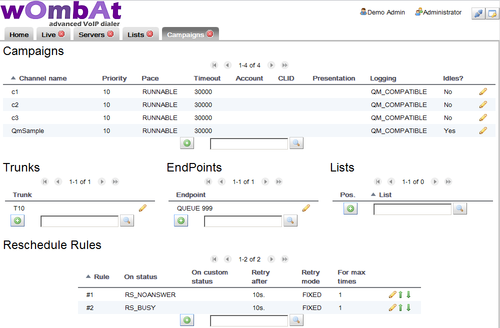
Now start the campaign. It will go in status IDLE immediately, as it has no numbers to dial, and you will see it all yellow in the Live page of WombatDialer.

At this point, it is time for your agents to log in in QueueMetrics. Have them log-in to their Agent’s page, and from there log them on to queue 999. At this point, make sure that each agent’s browser allows QueueMetrics to open pop-up windows (this is usually disabled in modern browsers).
Now, for each call you’d like to be started, send an HTTP request to WombatDialer that looks like the following one (we do this through the Linux shell, but there is nothing preventing you to script this in some other way:
curl "http://10.10.5.18:8080/wombat/api/calls/index.jsp
   ?op=addcall
   &campaign=QmSample
   &number=2000136
   &attrs=ID:2301,PERS:John_Doe"
Note that you associate two parameters: ID that is a unique id used by your CRM and PERS that is the called person’s name. You could also add additional parameters you may need, e.g. a person’s class or their telephone number.
What happens now is that when the call goes through, its caller-id is rewritten as "#2301 John_Doe" as soon as it reaches Asterisk. When your agent receives the call, they will reload the agent’s page and the pop-up will be immediately opened.
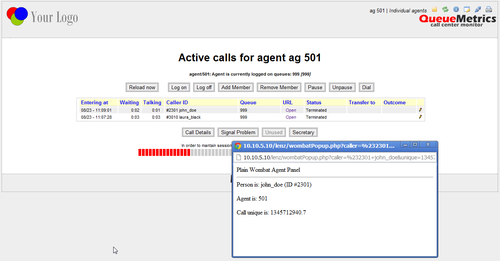
In the pop-up, you parse the caller field and extract your CRM id, so you can use this for your external application to display the correct data.
From the agent’s page you can also manually open other forms for recent calls. The agent will also see the person’s name in QueueMetrics, so this makes their life easier. The agent may also set a manual status code for each call through QueueMetrics, e.g. if the sale was successful or not, and this lets you measure your agent’s performance. You may also use QueueMetrics’s extensive QA monitoring features to analyze calls and improve the process.
Analyzing outbound campaigns
If you set your campaign to have QM_COMPATIBLE logging, you will find data about two different queues on QueueMetrics:
-
If you run a report for queue "QmSample", you will see all calls that WD attempted - the successful as well as the unsuccessful ones. This is basically the activity that WombatDialer performed and the actual telephone usage duration. In a real-life scenario, the vast majority of calls will be unanswered.
-
If you run a report for queue "999", you will see activity about calls that were successfully connected and were actually queued to be answered by agents, You would expect to have a very low unanswered rate here - if it is high, it means something is not working as expected. You will of course have some lost calls, e.g. because the called person hung up before the agent was connected.
-
The difference between the number of successful calls in "QmSample" and the total number of calls in "999" are calls that were hangup before reaching the queue, e.g. during an initial IVR phase.
Elastix queue call-backs
You are called in to a client site; they seem to have a problem. They run a small (10 agents) inbound call center, and when you join everybody else in the meeting room, there is a large and colorful graph in the middle of the table. The graph shows the call wait times during the week and boy, it’s not a good sight. Their main inbound activity is to offer client support for a company selling sport bikes, and everybody seems to be calling on Monday morning. It looks like people go riding on weekends and whatever problem they have, they call on Monday morning. Wait times peak, abandon rates spike, and nobody is happy. The call center manager is mostly concerned of having to hire and train some temp people in order to handle the load that only happens one day a week. They ask you if you have any better idea on what can be done. And yes, you have some.
You can program an Asterisk queue so that when people tire of waiting, they press a digit and get to a menu where they can leave their number. Then the system queues their call and attempts to call them at a convenient time. This way:
-
your customer are happy; they don’t have to wait in queue for so long
-
your call center manager is twice happy: the first time because wait times and abandon rates go down, the second one because by placing calls at a convenient time they can smooth out the workload of their agents during the day
This scenario requires some additional "glue" to what is basically supported by Asterisk - exiting a queue and reading a number are easy, but then starts the pain. You’ll have to create a database and write a script that reads back from it. You have to handle invalid numbers, busy numbers and the like (if we promised to call back the client, we cannot just try once and forget about it). You’ll have to have a GUI of some kind for the manager to start and stop dialing. You’ll have to adapt to the number of available agents. You’ll have to report on this activities. You’ll have to avoid flooding the trunks of your PBX with too many calls. In short, it’s the kind of thing that gets more complex the more you think about it. That’s what WombatDialer is for.
What we plan to do is to use WombatDialer as the call-back engine. It can be controlled by an external HTTP API, so you can do that from the Asterisk dial-plan. It has exact knowledge of the current set-up and call back rules, so you get the number of calls you expect on one or more Asterisk servers. It can work with an existing PBX and does not interfere with calls that are not its own. It keeps track of call completions and knows what to do in case of invalid and busy numbers. It has reports of its own and can work with QueueMetrics for powerful and detailed reports.
The client uses Elastix as PBX system, so we’ll have to integrate it with WombatDialer. No problem!
So what we do is:
-
First we create a normal queue, for inbound. We call it "400".
-
Then we create a call-back queue. If our main queue is called "400", then let’s call this second queue "401". The idea is that WD will monitor this queue - when you have members on this queue, then WD will start placing calls. This way an inbound call-center with multiple queues will find it very natural to have some agents join and leave a call-back queue. When you create this queue, make sure you set "Ring Strategy: rrmemory", "Event When Called: Yes", "Member Status: Yes", "Autofill: yes" so that WD can use it effectively.
-
we create a piece of dialplan that will handle the exits from queue "400" and will gather the telephone number
-
we create a new "custom extension" (399) that will jump in the dialplan at "Local/1@queue-leavenumber"
-
In Elastix, we create an IVR menu and set it as a destination for queue "400". This menu has only one option (1) that basically jumps to the custom extension "399" that we just created, in order to call our script
-
we go back to the queue "400" and set its "Fail Over Destination" as our IVR we just created
We start by editing the extensions_custom.conf file in our system, adding a new stanza like:
[queue-leavenumber]
exten => 1,1,NoOp
exten => 1,n(Start),agi(googletts.agi,"Please enter your telephone
           number and we will call you back.",en)
exten => 1,n,agi(googletts.agi,"The number must be composed of 7 digits.",en)
exten => 1,n,Read(CBNUM,beep,7,,2,5)
exten => 1,n,NoOp( Num ${CBNUM} )
exten => 1,n,GotoIf($["${LEN(${CBNUM})}"="7"]?lenOk)
exten => 1,n,agi(googletts.agi,"The number you entered has the wrong number
           of digits.",en)
exten => 1,n,GoTo(1)

exten => 1,n(lenOk),agi(googletts.agi,"You entered the following number",en)
exten => 1,n,SayDigits(${CBNUM})
exten => 1,n,Wait(1)
exten => 1,n,agi(googletts.agi,"Press 1 to confirm or any other digit to start
           again.",en)
exten => 1,n,Read(CONF,beep,1,,2,5)
exten => 1,n,GotoIf($["${CONF}"="1"]?Store:Start)

exten => 1,n(Store),NoOp
exten => 1,n,Set(WHEN=${STRFTIME(${EPOCH},,%y%m%d-%H%M%S )}
exten => 1,n,Set(PARM=number=${CBNUM}&attrs=orgQ:400%2Cwhen:${WHEN})
exten => 1,n,Set(foo=${CURL(http://10.10.5.18:8080/wombat/api/calls/?
           op=addcall&campaign=callback&${PARM})})
exten => 1,n,agi(googletts.agi,"Thank you! we will call you back as soon
           as possible.",en)
exten => 1,n,Hangup
We use Google TTS as a voice synthesizer - you could use a different one or you could have the messages custom-recorded for you. What our dialplan does is first to collect a 7-digit number, then read it back asking for confirmation and when confirmed, it sends it over to WombatDialer on a campaign called "callback". Together with the number, we also store the code of the queue that the call was on and the date and time this number was gathered. (Please note that in order to send multiple comma-separated parameters in the HTTP request, we have to use '%2C' instead of the plain comma ",").
In order to configure WombatDialer:
-
We create a trunk called "Trunk" with a dial-string of Local/9$\{num\}@from-internal and a capacity of 10 lines. This basically replies all numbers as if they were entered on a local extension prefixed by 9.
-
We create an End-Point of type Queue for monitoring queue 401; set extension to "401" and context to "from-internal"; max number of lines to 10; boost factor as 1 and max waiting calls to 2. This means that the number of calls placed will match the number of available agents on queue 401.
-
We create a campaign called "callback"; set it to Idle on termination and turn on QM_COMPATILE logging. We add the trunk and the EP we just created. We create a set of reschedule rules in order to handle REJECTED, BUSY, INVALID and NOANSWER calls, e.g. by retrying up to 5 times each waiting 10 minutes between each attempt. Note that we create no lists for this campaign.
-
We start the new campaign; having no numbers, it should immediately turn yellow on the Live page to tell you it’s idling.
If we start sending calls to the queue and we try and leave any numbers, we will see that a new list will be created on WombatDialer under the name "callback/AUTO" and that will contain the numbers and attributes like:
Number:
            5551235
Attributes:
            orgQ:400
            when:121115-153402
Those numbers are NOT immediately called, but WD will wait for some agent to be present and active on queue "401" so that they can be called back. This way, the call-center manager can monitor the current call backlog and decide who and when it is to join the callback queue.
Further improvements
-
If there is a caller-id on the call, you could ask the caller whether to use it as the number to be called back
-
You could add time limits to the WD campaign so that you are sure that no calls are made outside acceptable periods
Automated recall of lost inbound calls
If you run a call center, serving clients in a timely way is often very complex, as it requires having enough people available to handle traffic spikes. The number of callers that disconnect because they have been waiting too long in a queue is then an important driver of the quality of your work, and these frustrated callers are the focus of much attention and scheduling/planning efforts in all call centers. This is because in a traditional setting doing inbound calling you basically had no other way of servicing the client but waiting for the person to call in.
With an Asterisk-based PBX and using digital lines, this scenario changes a bit, as:
-
Your average caller has an associated caller-id that often matches a physical phone in their proximity
-
Telephone traffic is very cheap compared to the cost of agent time for call handling
-
You have ample means of programming the PBX to suit your exact needs
So it is now a conceivable scenario to improve the services you are offering by adding an automated call-back option, so that you search the logs of lost calls and you actively schedule recalls on them in order to get back to people who hung up in frustration.
The plan: automatic queue recalls
In this article, we explain how to implement a basic call-back scenario using QueueMetrics and WombatDialer. What we do is very easy, as in:
-
We periodically run a script to gather the caller-ids of lost calls that were handled on a queue
-
We check each caller-id as to be sure is a valid number
-
We check that there is no subsequent successful call on the queue from the same caller-id (as to prevent recalling people who already retried themselves)
-
We schedule those calls for dialing no more than once per number per day
As our dialing schedule happens on a WombatDialer campaign, we can control the flow of calls through it by adding and removing agents supposed to handle outbound traffic, or pausing it completely during periods of high inbound traffic.
Step 1. Configuring QueueMetrics
In order to gather information from QueueMetrics to an external script, we need to enable XML-RPC access credentials. This is usually very easy to do, as QueueMetrics ships with a (disabled) ROBOT login that allows external access.
Enabling it is very easy: log in as an administrator, click on "Edit users", edit the "robot" user and set "Enabled" to yes. While you are at it, take a second to change the default password.
Step 2. Configuring WombatDialer
Set up WombatDialer with a queue end-point (as described for example in Elastix Queue call-backs with WombatDialer) and make sure everything is working.
Create a new campaign for calling back people - set its "Idles on termination" property to yes and make the logging QueueMetrics-compatible. This way the campaign can run until needed, waiting for more numbers to be added when idle. Do not add any call list as we will load numbers to be called through the WombatDialer APIs.
Before you start scheduling recalls, your campaign should look like the following one:

You might also want to pause it, so you can decide when to run it.
Step 3. The script
Scripting QueueMetrics and WombatDialer is really easy. It can be done in any language - we chose PHP as it is well known, has good XML-RPC support to query QueueMetrics and is very simple to edit and customize.
We created a sample script that can easily be downloaded from GitHub - as you will likely edit this to suit your needs, feel free to fork a new project and work on that. Our script is available from https://github.com/Loway/OpenWombatDialerAddOns in a folder named "AutoRecall".
The following parameters should be edited in the script:
$qm_server = "10.10.5.11";
$qm_port = 8080;
$qm_webapp = "queuemetrics";
$qm_login ="robot";
$qm_pass = "robot";
These parameters specify the XML-RPC connector of your QueueMetrics instance.
$wbt_url = "http://10.10.5.18:8080/wombat";
$wbt_cmp = "c1";
These parameters specify the URL of WombatDialer and the campaign that calls should be added to. The dialer must be running when the calls are added and the campaign should be active (usually IDLE). Note that the campaign you use for call-back might be paused so that call-backs are actually deferred during periods of high activity.
$queue = "300";
$lookback = 3600 * 8 ; // in seconds
$allowedPatterns = array(
    "/^555..../",
    "/^0041.+/"
);
These parameters decide which set of queue(s) should be scanned and how long is to look back for the current day. Multiple queues can be used, separated by the pipe character.
The last parameter is a set of regexps that will be used to check the numbers read from QueueMetrics. At least one regexp must match for the number to be queued. This is used to avoid queuing invalid numbers or - worse - malicious numbers.
Step 4. Putting it all together
In order to run the script periodically, you could create a cron-job that runs it every 20 minutes. As number are never recalled more than once and the script keeps an history files of numbers already dialed, you can safely run it over and over again.
Once tested, a crontab entry like the following one will automate the running:
*/20 * * * * /usr/bin/php /root/WombatDialerExamples/AutoRecall/autoRecall.php
This is how a simple run looks like - the scripts logs its activity to STDOUT, so you may want to redirect it to some log file for the keeping.
$>php autoRecall.php
Finding applicable period
Loading call log file for 2013-01-24
Looking for data between 2013-01-24.07:54:33 and 2013-01-24.15:54:33
 on server '10.10.5.25' - queues '300'
Query took 0 seconds.
# 201 - Last call lost @ 2013-01-24.15:46:39 - Scheduling.
Adding 201 to campaign c1 on WombatDialer.
Saving call log
After running this, you should see that new numbers are added to an AUTO call list like the one shown in the following screenshot; and if the campaign is not paused and agents are available on the recall queue, calls will be dialed as needed.

Improving the solution
In order to run this solution in a real-life scenario, you should edit the campaign in order to:
-
set up a time window that matches your agents' presence and when it is customarily allowed to recall. For example, even if a call is queued at 11 PM on a Saturday night, a recall might be acceptable only on Monday morning. This of course depends on what you are doing and the local customs.
-
set up reschedule rules in order to handle calls unanswered and busy lines correctly. It would be too bad not to be able to recall just because the caller’s phone was busy at the moment
-
it could also be useful to connect the caller to a reverse-IVR first, so that they get a message like "Hello, we are calling you back because of your call made at 10.30AM. If you’d like to talk to one of our agents, please press 1 now" before being routed to an agent
-
a simple addition that could be made to the script would be to set up a minimum wait time to qualify calls; that is, you would recall only people who waited in queue for more than 10 seconds.
-
using a technique very similar to the one explained here, it would be trivial to set up campaigns for quality assessment or customer satisfaction, run as reverse IVRs.
Preview dialing with QueueMetrics
Preview dialing is a type of reverse dialing where the agent has a chance to "preview" the number that is to be called before actually having a call placed.
The way it works is:
-
The agent logs on to a queue. WombatDialer uses the queue (as it usually does in Reverse dialing modes) to know which agents are available. This makes integration with QueueMetrics very easy.
-
The agent asks WombatDialer for a number to call. WombatDialer gets the next number out - considering all its dialing and reschedule rules - and reserves it for the agent.
-
The agent uses a GUI where they can see the number to be dialed and typically embeds, or links to, an external CRM app so that they can review the call
-
When the agent is ready, they ask for the call to be either placed or skipped.
-
If the call is to be placed, the agent is connected immediately and listens to Music on Hold until the callee is on line
-
If the call is not to be placed, it is made with a special code
-
Reschedule rules apply - so error states are handled correctly
Step 1: Set up your PBX:
In order to run this tutorial, we need to set up our PBX as follows:
-
Three SIP extensions: 201, 202 and 203. We will use 201 as the agent extension while 202 and 203 will be used as sample end-points
-
One queue, called "999", to hold our agent. Note that calls will NOT be processed through the queue but we will use the queue to keep track of which agents are available. When defining it, we make sure that we set: "Ring Strategy: rrmemory" - "Event when called: yes" - "Member status: yes" so that WombatDialer can fully observe it.
Step 2: Installing WombatDialer
We install WombatDialer on the PBX system using yum. When we log in, we create:
-
An Asterisk server that can talk to PBX. We can use the AMI user "admin" with the default password you gave during the system installation.
-
A trunk named named "Trunk", which dial string will be
Local/${num}@from-internal -
An end-point of type QUEUE, which name is "999" (so that it observes queue 999), located at extension "999" context "from-internal" (this is not really needed if you run only reverse campaigns), setting both "Reverse dialing: yes" and "Manual preview: yes"
-
We create a list called "Numbers" and leave it blank for now
-
We create a campaign called "Reverse", which has logging set as "QM_COMPATIBLE" and which logging code is "999". We add to it the trunk, the EP and the list we just created.
Now we go to the list manager and upload the following list:
200,NAME:John
202,NAME:Mike
This tells WD to dial numbers 202 and 203, and sets a NAME attribute for each call (that will be useful when previewing).
Step 3: Installing and configuring QueueMetrics
Install QueueMetrics on the same machine as the PBX system by typing:
yum install queuemetrics
Now log in into QM and configure:
-
An agent called agent/201
-
A user for agent 201 called "agent/201" password "201" class "AGENTS"
-
A general monitoring queue called "999". Set agent/201 in the MAIN level of that queue.
Now edit the "System parameters" and edit the section realtime.agent_web1 as follows:
realtime.agent_web1_url=http://10.10.5.46:8080/wombat/agents/rd_pop.jsp?agent=Local/[A]@from-internal
realtime.agent_web1_label=WombatPreview
Edit the public IP of your PBX server and replace the "10.10.5.46" address above.
Making it all work together
-
Log "agent/201" into QueueMetrics and have him join queue 999 on extension "201". Note that we are using Hotdesking - the agent logs into Asterisk with their SIP extension.
-
Start the dialer. From the Live page, start the campaign "Reverse". No calls will be placed.
-
Check the dialer status. You should see WombatDialer observing queue 999 and finding "Local/201@from-internal" logged on. Try pausing and unpausing the agent and refreshing the dialer: the status of Local/201@from-internal should change accordingly.
Now click on the button called "WombatPreview" from the Agent’s page. You should see a preview panel like the one in the picture:
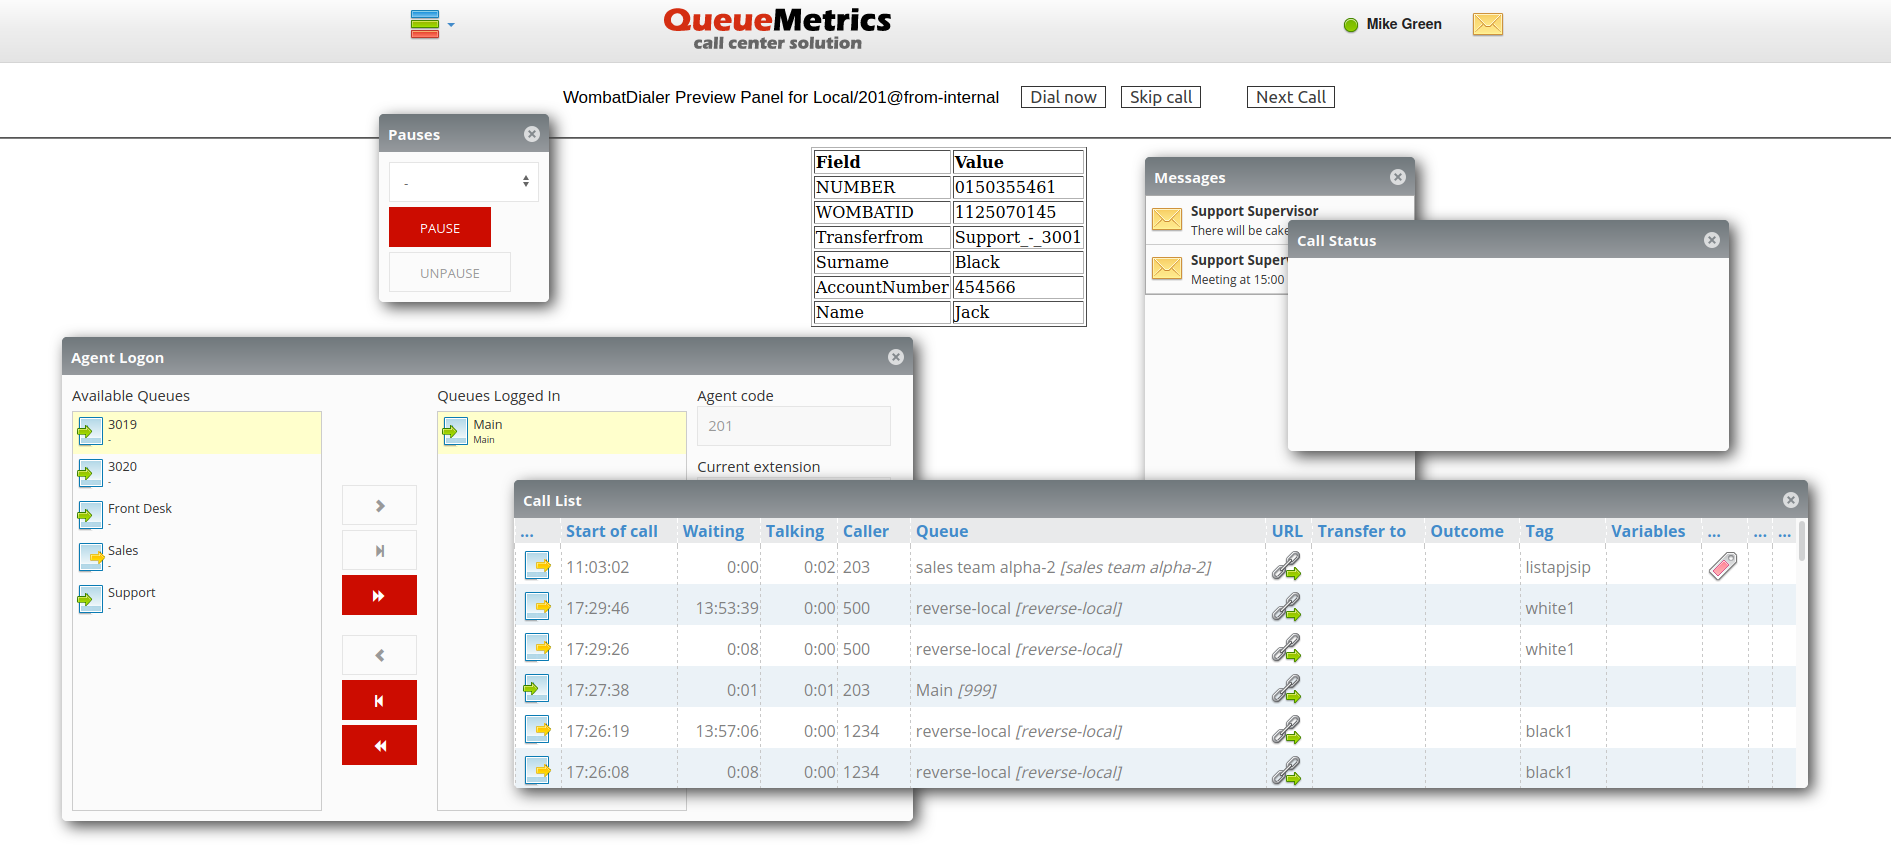
As you can see the Preview panel is displaying the right record.
If you look at the Live page on WombatDialer, the call should appear as "Reserved". When the agent clicks on Dial, the call should start. Once the agent answers, your dialer will try and connect the other extension.
When dialing, the Live page will show what is going on:
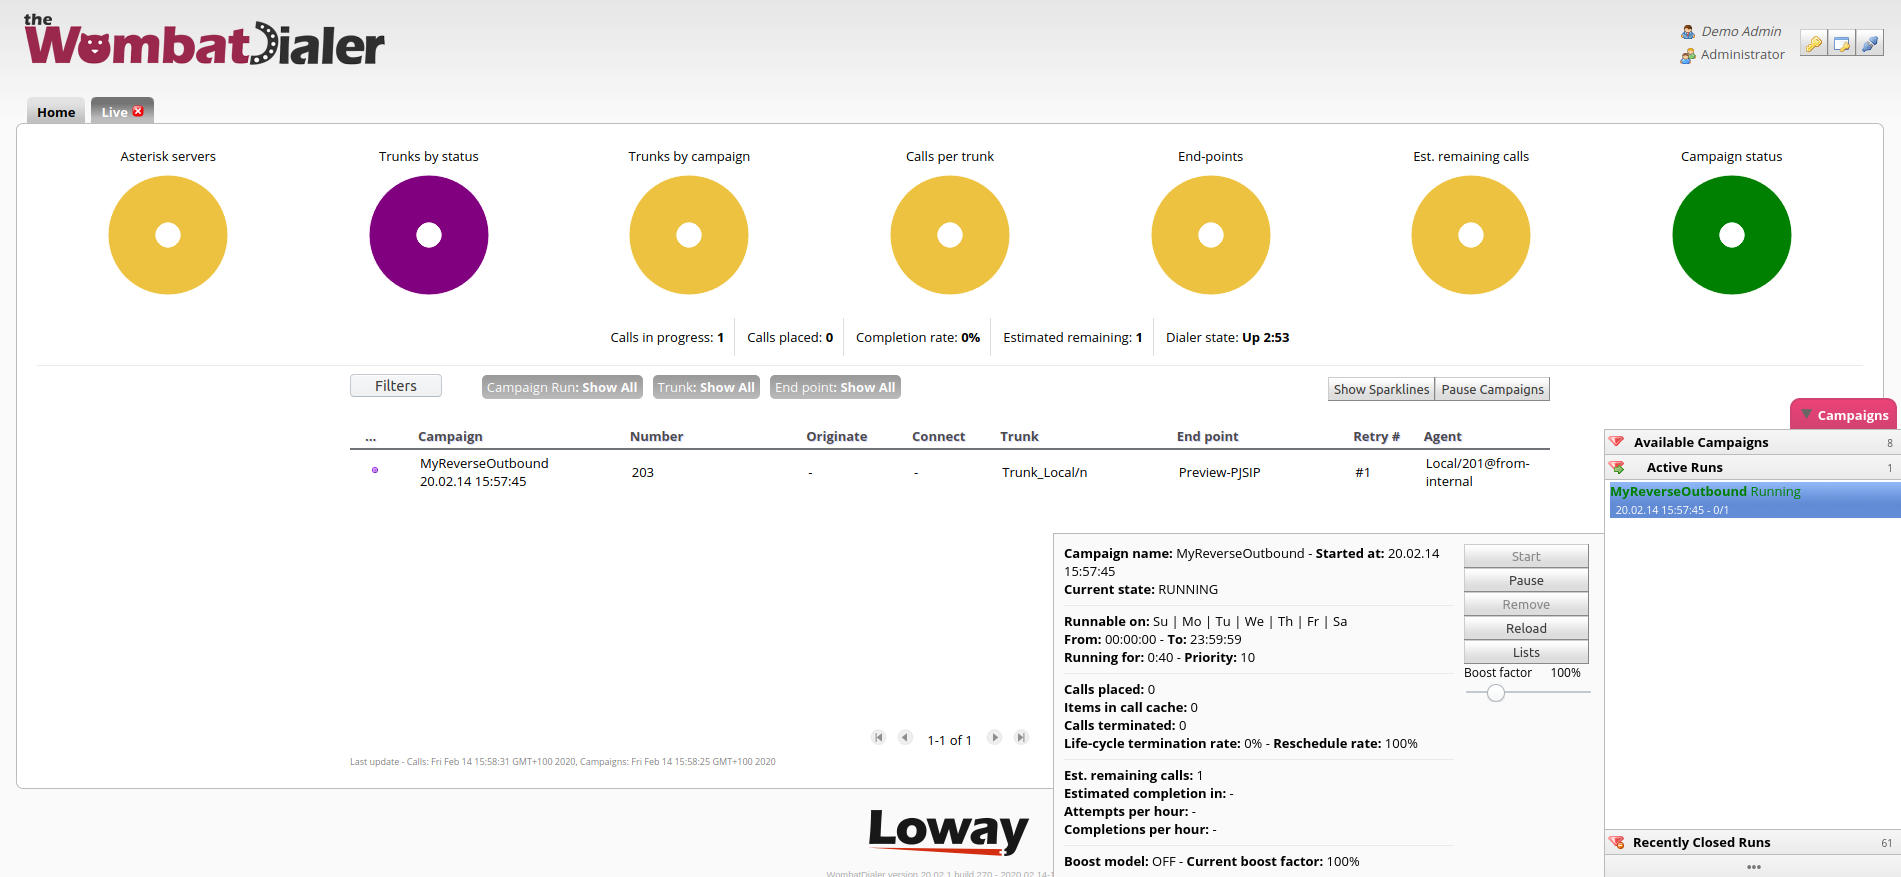
And the same thing will happen on the Agent’s page:

Nice work, isn’t it? :)
Improving the solution
-
You can add PSTN numbers to your lists and the will be dialed as if the had been entered on a local extension.
-
If you want WombatDialer to dial without waiting for an agent decision, just remove the "Manual preview" check and restart the dialer.
-
If you want a customized preview panel, you can create one by using the WombatDialer API.
Effective answering-machine detection
We want to run a simple outbound campaign, in which we plan to play a file and wait for the receiver’s acknowledgment by pressing '1'. We also want to make sure that in case the receiver has an Answering Machine, we play a specific audio message that will be recorded by the machine.
The first thing we need is to set up the Answering Machine Detector in Asterisk; this can be done using the embedded application AMD or a number of external tools. In this tutorial we cover the embedded AMD application.
So the first thing we do is to configure the file 'amd.conf' so that it has the following contents:
initial_silence            = 2500
greeting                   = 1500
after_greeting_silence     = 300
total_analysis_time        = 5000
min_word_length            = 120
between_words_silence      = 50
maximum_number_of_words    = 4
silence_threshold          = 384
These are the default parameters used to detect a machine and they may need some tweaking for your local market and spoken language.
The we create a special dialplan extension:
[amddetect]
exten => 1,n,Answer
exten => 1,n,Background(beep)
exten => 1,n,AMD(${AMD_EXTRA})
exten => 1,n,NoOp("AMD: ${AMDSTATUS} - ${AMDCAUSE}")
exten => 1,n,GotoIf($["${AMDSTATUS}" = "MACHINE"]?machine)

exten => 1,n,Set(TIMEOUT(response)=5)
exten => 1,n,Playback(/var/lib/asterisk/sounds/custom/${HUMANMSG})
exten => 1,n,Read(ack,,1)
exten => 1,n,GotoIf($["${ack}" = "1"]?confirmed)
exten => 1,n,Hangup

exten => 1,n(confirmed),UserEvent(CALLSTATUS,Uniqueid:${UNIQUEID},V:OK)
exten => 1,n,Wait(1)
exten => 1,n,Hangup

exten => 1,n(machine),UserEvent(CALLSTATUS,Uniqueid:${UNIQUEID},V:AMD)
exten => 1,n,WaitForSilence(2500)
exten => 1,n,Playback(/var/lib/asterisk/sounds/custom/${MACHINEMSG})
exten => 1,n,UserEvent(CALLSTATUS,Uniqueid:${UNIQUEID},V:AMDALL)
exten => 1,n,Wait(1)
exten => 1,n,Hangup
And we define an extension of type PHONE that points to '1@amddetect'.
When we answer the call, we play a short beep to make sure that the channel is up, and then we start AMD detection. The call will be blocked until AMD detection is complete; so there is a definite trade-off between quick and accurate detection. To make your life easier during testing, we print the result of the detection and its cause on the Asterisk console.
On the campaign itself, we define two campaign variables that will hold the names of audio files to be played back in either case:
-
HUMANMSG: is the audio file to be played back to humans
-
MACHINEMSG: is the audio file to be played to answering machines
Though this is not strictly needed, you can tweak the parameters of the AMD detector by editing the 'Extra AMD settings' on the campaigns; these are passed as parameters to the AMD detector; if blank, defaults are used.
The final status for answered calls will be:
-
TERMINATED: a call that went to a human that did not acknowledge it
-
TERMINATED/OK: a call that went to a human that acknowledged it
-
TERMINATED/AMD: a call that went to AMD but was hung up before the message was played completely
-
TERMINATED/AMDALL: a call that went to AMD and the message was played completely.
You can use these call statuses to decide how to reschedule those calls, and to create new lists or blacklist some specific numbers.
| Fax detection works in a very similar way, but it kicks in automatically when enabled on a channel. |
Understanding blacklists
One of the most important features of a dialer, paradoxical as it sounds, is to avoid calling numbers that are not supposed to be contacted. But why should you, in the first place, try to call numbers that you are not supposed to call?
In practice, this is a common scenario - for example, let’s say we work for a car dealership, and you prepare a list of customers to contact because their car is ready for pick up after its service ticket. While you are running this campaign, some especially eager customers decide to contact us first to inquire about the status of their vehicle, and you tell them that it’s ready. At this point, calling them again would be a waste. It would also give the impression that we do not know about their previous interaction.
But how to do it? Once WombatDialer schedules a number, the right thing to do is to cancel the call on the campaign, if the campaign hasn’t placed the call already. So, we say, let’s delete it from the relevant list, but we may want to re-use the same list of numbers more than once, and we do not want to strike some numbers out of it "just because".
Also, if there callee ever asks "Why didn’t anybody call me? I was waiting for your call!", it is important to understand that it was an explicit decision and not a failure. As you have no way of knowing about the cancellation when preparing the list of contacts to reach, it must be an "add-on" while the system is running. That’s what blacklists do: we can keep a separate list of numbers we don’t want to call and check it dynamically as we progress through our lists.
A second common reason why you could use a blacklist is because the customer directly asks us not to be recalled. By adding them to a blacklist we can keep this information in a separate place from the lists we manage, and WombatDialer makes sure we never forget to remove those numbers from the ones we are supposed to dial.
This way, our employees tasked with extracting call lists need not worry about making sure that all canceled numbers are manually removed, and why. In many countries, you have a legal obligation to adhere to a customer’s will never to be called again, so you need to be 100% sure you are doing this process right.
So there are two related but different scenarios: in one case you want to "edit" the current run of your campaign only; in the other, you want to create a long-term database of numbers that are not to be recalled. And, in practice, you likely want to do both things on actual campaigns you are running.
How do blacklists work?
WombatDialer checks a number against blacklists every time it has to dial it. If a number is present on any blacklist, then it is not dialed at all and it goes straight to a special state BLACKLIST.
As WombatDialer will try dialing an unsuccessful number multiple times and with different rules, a number might then live for a while in a state when it has already been called, but Wombat still wants to dial it in the future. At any time you add that number to a blacklist, all further redials are automatically blocked. This is handy because sometimes recalls may happen after hours or days from the first trial, so it makes sense that we can pull the handbrake on them at any time.
We can even blacklist a number for a specified period only; by setting the attribute BLACKLISTED_UNTIL on a call to a specific date, we make sure that the given number is blacklisted only up to that point in time. Similarly, as with plain call lists, the same number can be present multiple times on a blacklist; and WombatDialer makes sure that if it has a time limit, it is enforced. A number with no time limit is considered blacklisted forever.
As you do for lists, you can have multiple blacklists linked to the same campaign - the difference here is that while calls from plain lists are loaded in sequence, one at a time, every number to dial is checked at once against all blacklists linked to that campaign. Having multiple blacklists is handy because you can use them as different "rules" - for example, you could have a temporary blacklist that you use to avoid recalling people that just called in, and at the same time, a general blacklist (maybe shared between all of your campaigns) where you keep customers that are never to be recalled. This gives you a lot of flexibility in how you organize your work.
Plain lists vs blacklists
So, what is the difference between a normal call list and a blacklist? The answer, surprisingly, is "none". Being a blacklist or a normal list depends on the role that the list plays in the campaign. This means that all functions meant to update lists work the same way in both cases.
For example, you can ask WombatDialer to add the current number to a list as a disposition rule at the end of the call cycle. It will simply oblige, and then it is up to you to decide if you want to use that list to place or to avoid further recalls.
Blacklists and multiple numbers
WombatDialer can use a set of numbers to reach out to customers (see Using multiple numbers per call). For example, when calling a person, it can first try their home number, then their mobile, then their office…. as you see fit. In WombatDialer lingo, this is called a MULTINUM - and while we use it as the "main" number in the identity, on every attempt the number dialed is rotated in a round-robin fashion.
When blacklisting, you want to stop all calls going to a specific person - so you add the main number to a blacklist, and it will automatically block all further recalls. On the other hand, additional numbers cannot be blocked directly.
This is not usually an issue, because the main number, the one that must be blocked, will be tied to the person’s identity on your database.
APIs and integrations
We have so far seen that blacklists, by their nature, tend to be very dynamic. Sometimes you decide which customers to call based on a fixed, given list of numbers, in other cases, you will use the API to "drip-feed" numbers to Wombat when there is a need to call them - for example, a visitor leaving their number on your website might be added to a current campaign. If all goes well, they will be recalled in a few seconds.
Note: all examples below are issued as HTTP GET calls. To maintain readability, we break them into multiple lines and may not quote all characters properly. You should.
This is how you would do it using Wombat APIs:
http://127.0.0.1:8080/wombat/api/calls/
  ?op=addcall
  &campaign=WEBSITE
  &number=1234
  &attrs=NAME:John,SURN:Doe
  &schedule=2024-03-18.14:00:00
This says "Call number 1234 on campaign WEBSITE, where we know that the person’s name is John and their surname is Doe, after 2 PM today". Behind the scenes, their number is added to a list called WEBSITE/AUTO that Wombat manages for you,
and will then do the recalls.
But what happens if they call us in the meantime, and we want to cancel the call? in this case, we have to know which blacklist to use - that is, one that is currently linked to the campaign WEBSITE. Let’s say it was called DNC.
http://127.0.0.1:8080/wombat/api/lists/
  ?op=addToList
      &list=DNC
      &numbers=1234,REASON:recalled
This says "Add number 1234 to list DNC". As you know that list DNC is a blacklist that is set for the campaign WEBSITE, once you add the number, every number to be called on that campaign will be checked and skipped if necessary. While it’s not mandatory, we suggest adding a REASON
attribute to that number, so we know WHY this number was blacklisted and, possibly, by whom.
You could also do the opposite - what if there is a new case open for the same customer, and you need to remove this number from the list DNC? you could use the following API call:
http://127.0.0.1:8080/wombat/api/calls/
  ?op=cancelBlacklist
  &list=DNC
  &numbers=1234
  &reason=NEWCASE
This says "If there is number 1234 on the list DNC, mark it so that it is not used for blacklisting, and write the reason for de-blacklisting as NEWCASE". This is because it is important to keep track of why a number was added to a blacklist or removed from it.
When adding a new number to a blacklist, you could use any attribute to keep track of the reason - WombatDialer does not care, but it will make your life easier when auditing what went on. When removing, WombatDialer writes a special attribute BLACKLISTED_CANCELLED that contains the reason you gave it and the time the de-blacklisting happened.
Note that, to cancel a blacklisting, it must be canceled on all the blacklists linked to that campaign where the number might be present. If the number is present multiple times on the same list, all the instances where it is currently blacklisting (that is, where it was not already canceled or where its blacklisting period has already expired) will be changed to earmark them as canceled.
At this point, of course, you are free to add the number again if you need to cancel it again.