Running WombatDialer
Understanding the GUI
The WombatDialer GUI is made up of a set of editors - there can be multiple editors on the same page.
An editor can:
-
display a set of records (e.g a list of servers, campaigns or end-points)
-
select a record in the set (usually in order to load a dependent editor - e.g. when you select a List then the editor for the numbers of that list will be enabled)
-
edit a record
Using editors
Editors let you search by text in their items and let you sort data by clicking on the relevant columns.
When you are editing an item, the following functions might be available:
![]()
From left to right, these icons mean:
-
Save current record
-
Add a new record
-
Clone the current record
-
Delete the current record
-
Know who created the current record, when it was created, who modified it last time and when it was last modified
Sometimes when an editor has an item selected and it’s impossible to unselect it, it is then necessary to close the relevant tab and reopen it from the Home page.
Hiding and deleting entities
In many cases it will not be possible to delete records when you created them. This is because such records are referenced by other records that cannot be deleted - for example, a campaign that has run cannot be delete anymore, as it is referenced by the logs created during the run.
Still, it would sometimes be useful to hide things you do not currently need. So campaigns and lists have the concept of visibility - you can make them invisible so they won’t appear anymore in selection menus and on the main screens.
They will not be deleted though - you can still search them by name, and you can get a complete view of all records (including deleted ones) by searching for "~".
Controlling the dialer
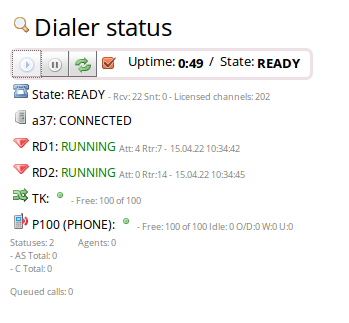
From the main page, you can control the status of the dialer process.
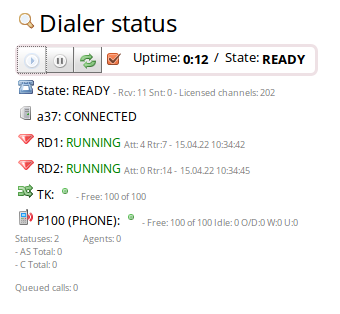
You can see how long the dialer has been used, its current status and the entities currently loaded (that is the campaigns, trunks and end-points being used). The dialer is "lazy" and loads entities only when needed, so entities do not appear until they are actually used.
The check box next to the Reload button is used to set the control in auto-reload mode; this way the current state of the dialer is refreshed automatically every 5 seconds.
You should see:
-
for the dialer, the current state (usually DOWN or READY) and the number of licensed channels.
-
For each PBX, whether it is successfully connected or not
-
For each running campaign, the current status, the total number of calls placed ("Att") and the size of the current reschedule buffer ("Rtr"), plus the date when the run was started
-
For each trunk, the total capacity and the current used channels. A green / red icon shows whether the relevant PBX is on-line or not
-
For each EP, the total and used capacity. A green / red icon shows whether the relevant PBX is on-line or not.
For Queue EPs, a number of additional entries are displayed:
-
You can see the number of free agents in respect to the correct queue capacity, the number of idle entities, the over-dialing channels ("O/D"), the number of queued calls that are ringing or waiting to be connected ("W") and the used channels ( "U").
-
If dialing is currently not allowed because the queue has too many waiting calls, the string "BK_W" is displayed.
-
A list of statuses that are reported by the queue ("AS") and a set of statuses that are computed by Wombat ("C")
-
A list of queued calls (if any)
-
A list of agents working on the queue, and their current status (Paused, Talking, Ringing, Idle or Error)
When you restart the dialer, all state is synchronized to disk and all entities are reloaded.
If you want to have a deeper view about what the dialer is doing, especially when it’s not dialing out, you should check the Dialer state page that has a deeper view of the decisions Wombat took for each specific campaign.
In general, the dialer is supposed to start automatically when the system starts - see Dialer startup for more information on the issue.
Observing Asterisk queues
When an EP of type Queue is used, its status should immediately reflect the state of the underlying queue.
Before using those EPs, it is advisable to run a limited test to make sure the configuration is in working order.
In order to run such a test:
-
create a campaign with a Queue endpoint. You may create it IDLE and add no call lists, as we do not need the campaign to do anything special
-
run that campaign
-
reload the Dialer status in order to see if the queue is being observed (you have to click on the reload icon manually each time).
-
If the queue is present, you should see it something saying "Free 4 of 7 W:2". This means that WD is seeing 7 agents connected of which 4 are free (where 4 is the result of multiplying the actual number of observed channels by its boost factor), and that there are 2 calls waiting on the queue.
-
You should be able to see the current agents and waiting calls - if any - the queue is processing.
-
try and log on, log off, pause and unpause an agent. You should see the number of free and available channels change accordingly. Try also sending calls to the queue and see if the number of free agents and of waiting calls is correct.
-
try also placing calls from some agent extensions and see if the number of free channels reflects this correctly.
-
if you plan to have agents working on multiple queues at once, run the tests above while the agents are logged on in at least two queues and make sure statues are updated correctly.
The Live page
The Live page lets you interactively control and monitor what the dialer is doing. You will be able to see at once all the Runs of Campaigns that you can access.
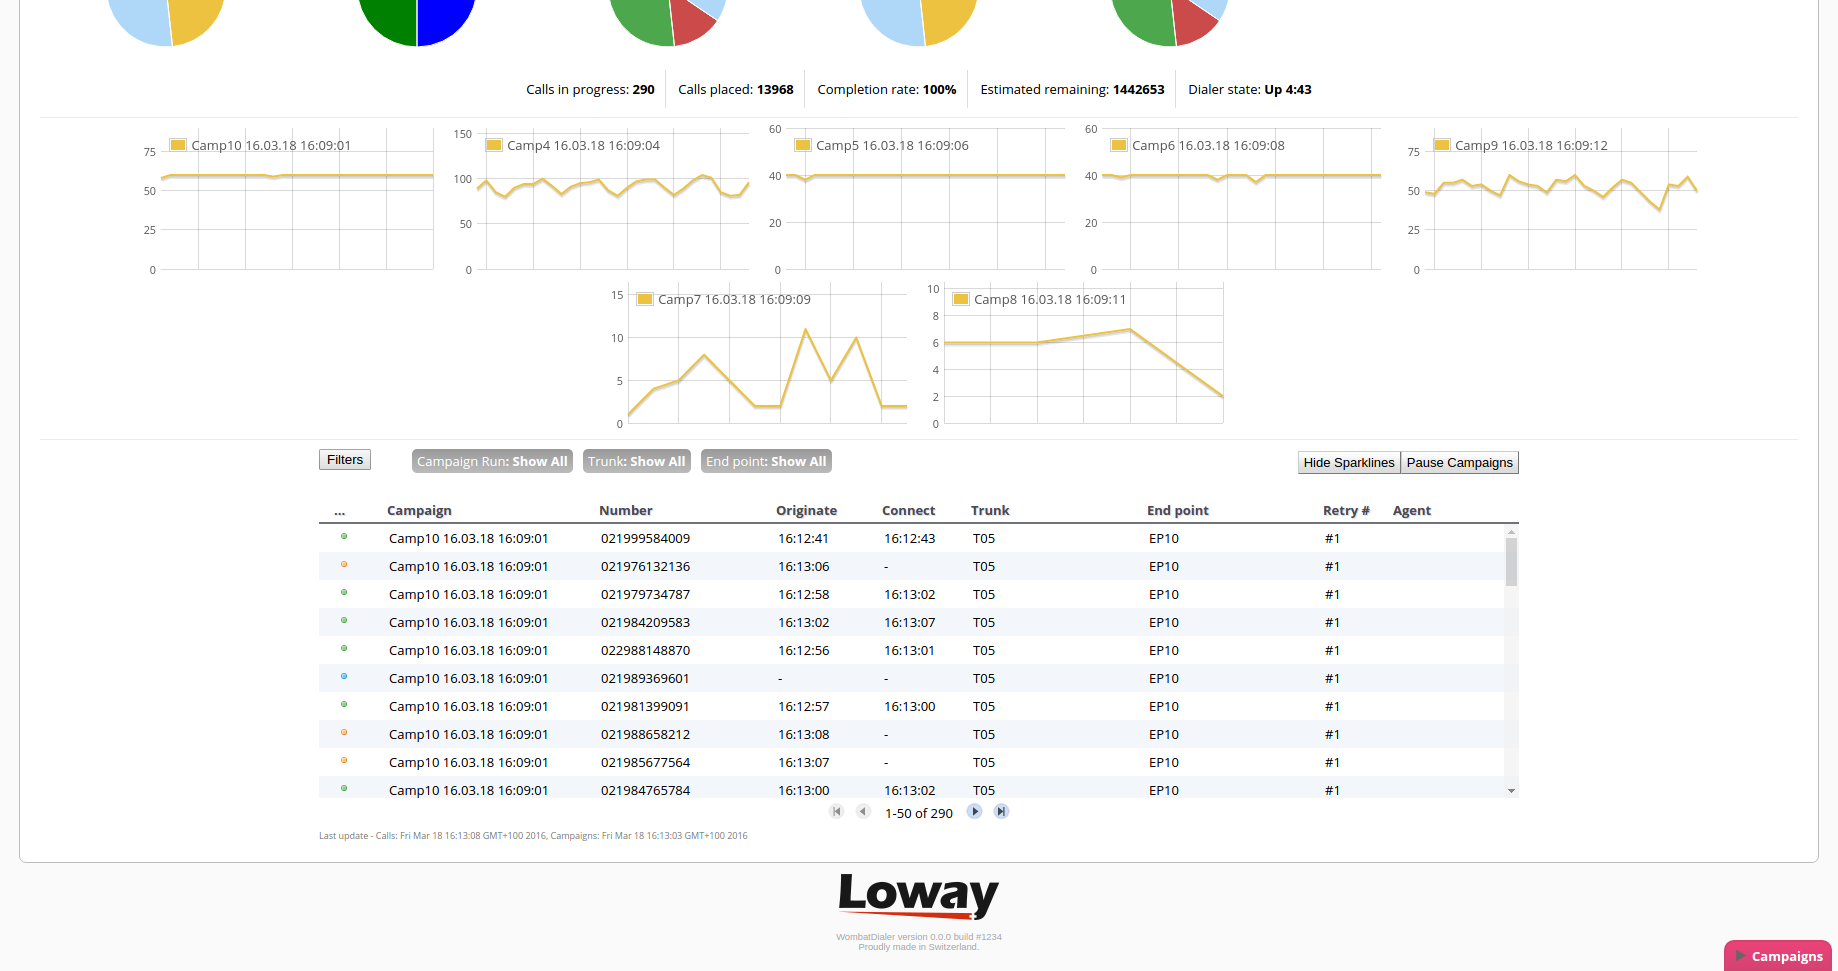
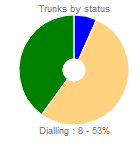
The top part of the page displays a set of "doughnut" graphs, showing:
-
The active channels per Asterisk servers involved. Each Asterisk server is displayed in a different color and you can see which is which by hovering over it
-
The status of calls on trunks. This shows how many calls are in each state.
-
The usage of trunks by campaigns
-
The relative number of calls per each trunk
-
The usage of end-points by campaign
-
An estimated number of remaining calls, divided by campaigns. This number is estimated as it is impossible to know in advance how many recalls will be necessary to complete each campaign.
-
The status of each running campaign
If you fly over each pie slice in the graphs, then a legend will be shown explaining what that slice means. Note that for live calls and campaign runs, the color codes are fixed to make them easily recognizable at a glance.
Just below the graphs, there is a row displaying (for all campaigns):
-
The number of open calls
-
The total number of calls placed on running campaigns (since they were started)
-
The call termination rate, that is the percentage of calls attempted for which a reschedule was not necessary
-
An estimated backlog of calls that have to be placed for running campaigns. This only counts calls in the dialing buffer
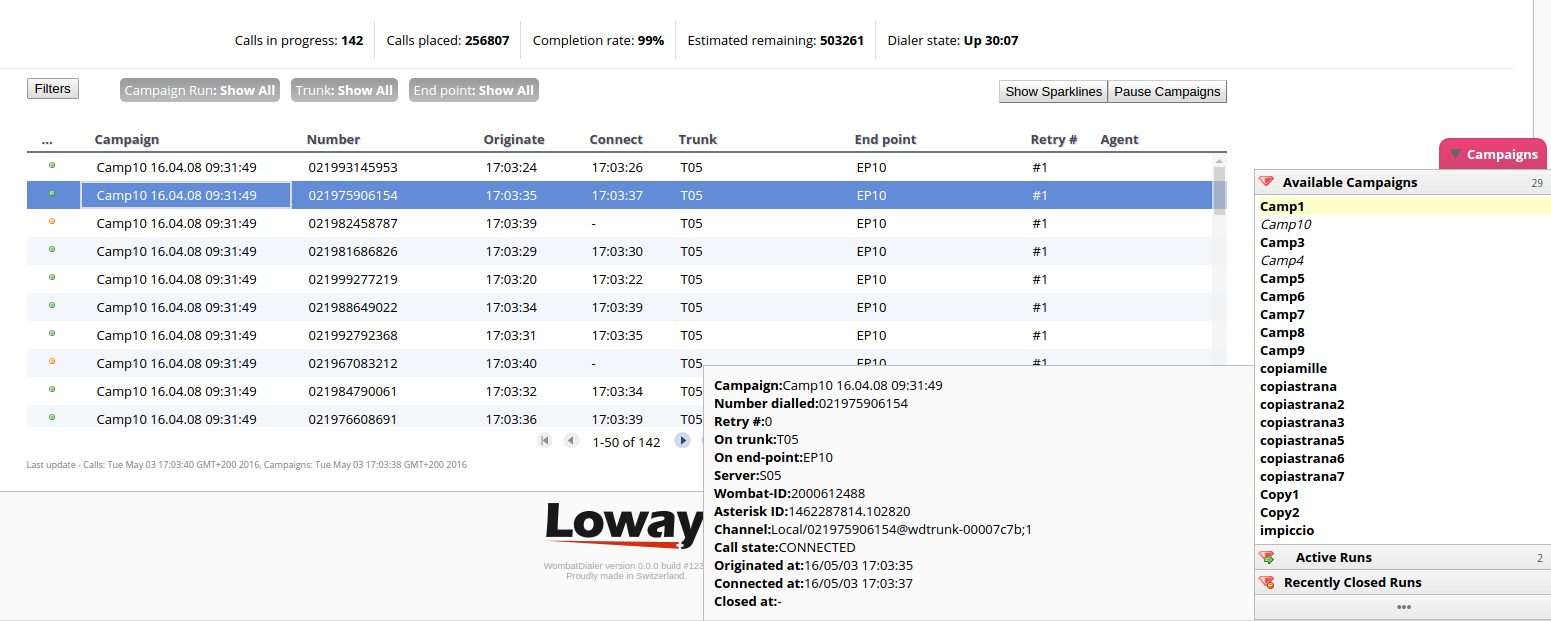
Below is a pageable list of live calls, that is refreshed every few seconds. For each call you can see:
-
The number dialed
-
When the call was originated
-
When the call was answered
-
The trunk used
-
The end-point the call was connected to
-
The number of times this call was attempted
-
If present, the actual agent taking the call (depending on whether the call is dialed in reverse or direct mode, the agent may appear immediately or only when the call connects).
In this list only calls managed by WD are shown, so you can still use your PBX as usual and such calls will not be displayed.
By the bottom of the page there is a "Details" section, where you see the details for the last item you selected - be it a call, a campaign to be started, a running campaign or a closed campaign.
For example, here is what you would see by selecting a connected call:
And here is what you would see by selecting a running campaign:
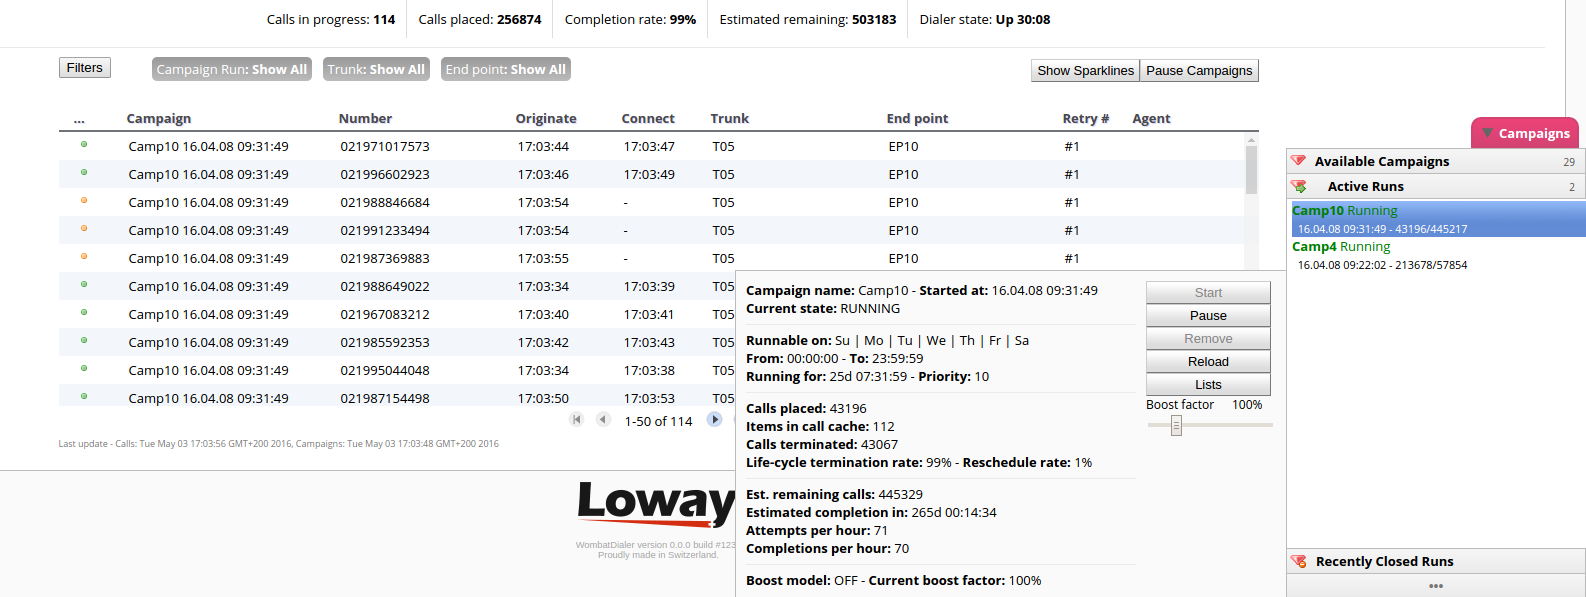
Next to the "Details" section there are buttons with possible actions for the item being displayed - you may for example start and stop campaigns. When you perform an action, a pop-up will be displayed to confirm that the action was received.
Filters
Right above the live Calls list we can see the "Filters" button that presents the user with the Filtering panel.
This feature focuses on giving the user the possibility to filter, in an useful way, the data displayed in the Live Calls Table. Essentially the Live page analyzes the data flowing through the table, and automatically calculates possible filters that might be of use. These filters include:
-
Campaign Runs: Every time a call belonging to a new Campaign Run is analyzed, the filter system adds a new filter to the Campaign Run filter menu.
-
Trunks: The same thing as above goes for new Trunks detected by the Filter System.
-
Endpoints: The same goes also for new Endpoints.
-
Search: A search bar component has been added, allowing the user to display only the lines containing the words typed in the search bar.
Sparklines
Next to the Filters Button you can see the Show Sparklines button. This button presents the user with the Sparkline System panel.
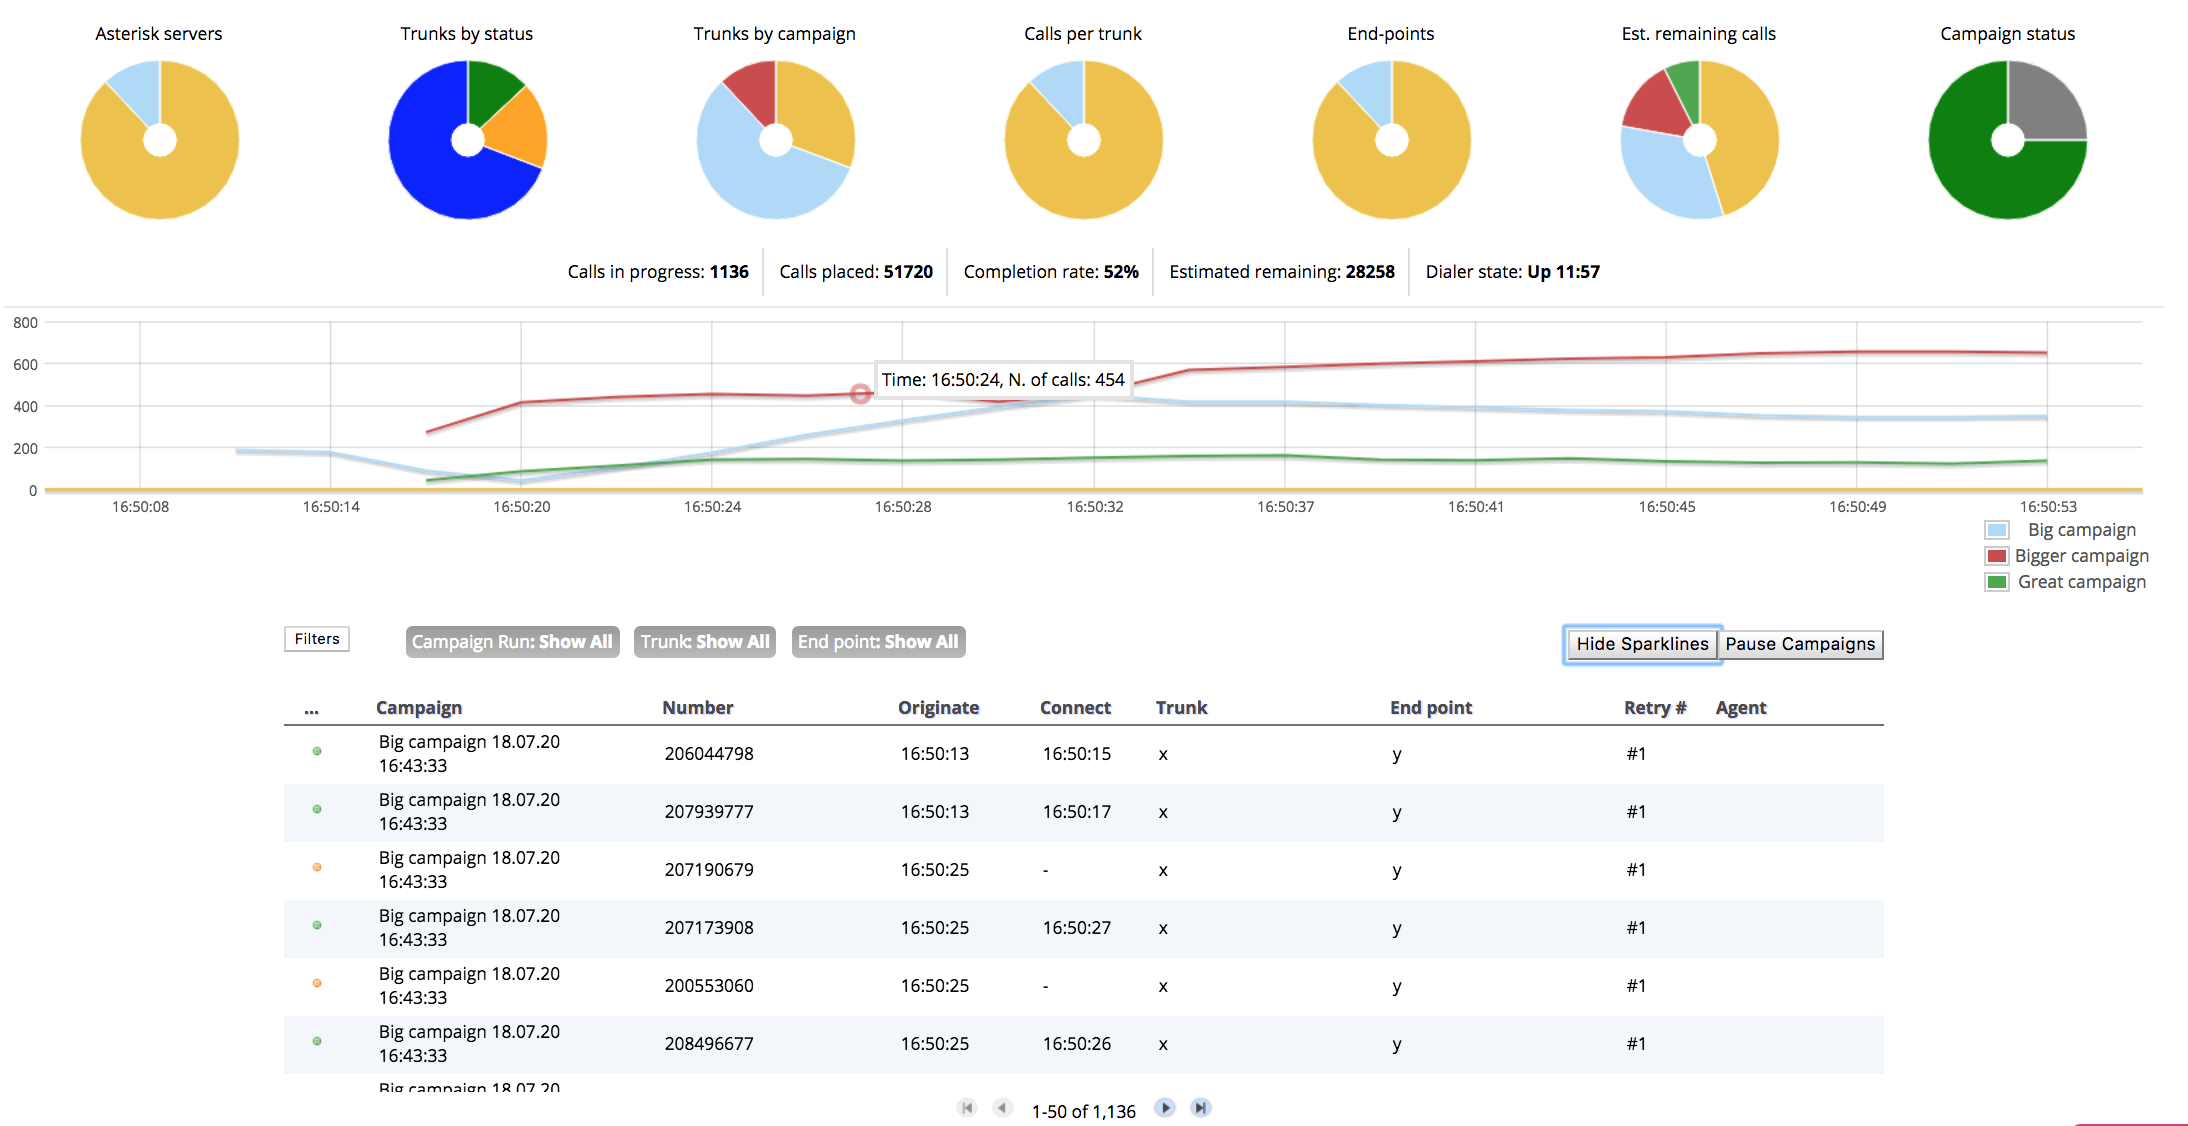
For every active Campaign Run detected (where active means that is currently holding at least one call), the Live Page generates a SparkLine Graph that shows the number of calls over time, concerning that particular campaign.
If you hover with the mouse pointer over one of the Sparklines, a pop-up label shows you the number of calls active at that particular moment. If the number of active calls belonging to a particular campaign reaches zero, the corresponding Sparkline is removed from the page.
Multiple pauses
Finally, next to the Show Sparklines button, you can see the Pause Campaigns button.
This button prompts a pop up that allows the user to select multiple campaigns to be paused. This is useful if you want to pause all running campaigns in one simple instruction.
| The Live page does not work unless the dialer is running (state READY). So if you try starting a campaign but the dialer is not working, you will see the notification but nothing will happen. |
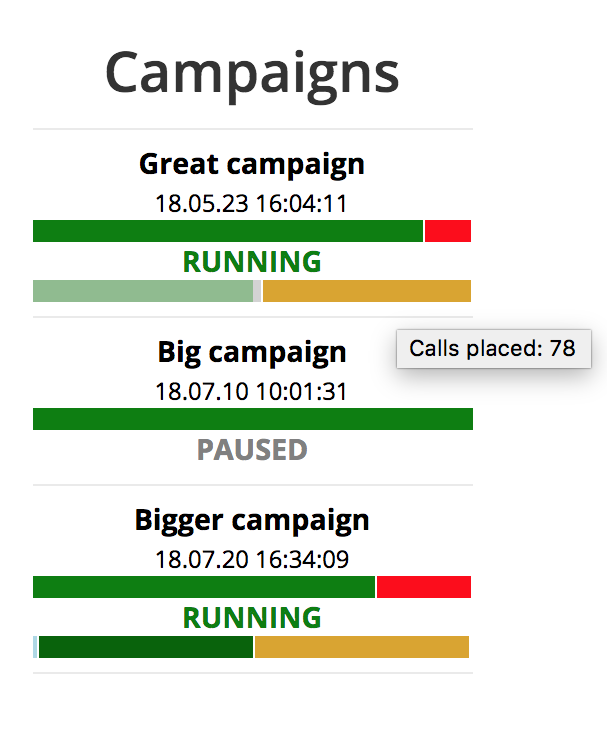
Campaigns and runs
On the right-hand side of the screen there is a pull-up overlay box made up of three sections plus one, labeled "Campaigns". It is usually hidden and you have to open it manually in order to see it.
On the right-hand side of the screen there is a panel with:
-
Available campaigns: the set of campaigns that can actually be run. As a campaign can be run only once, campaigns that are running and therefore not startable are displayed in italics.
-
Running campaigns: these campaigns are running now, or could be running if some condition was met - e.g. having some more calls appended for IDLE campaigns, or a different moment in time for WRONG_TIME campaigns
-
Recently closed campaigns: here are displayed the details of each recent run
For each campaign run, a color code is used to display the state it is in. You will also see:
-
when the run was started (as to distinguish it from other runs)
-
the number of calls placed
-
an estimate of the current backlog for this run
The section labeled "…" lets you modify the order under which campaigns and runs appear.
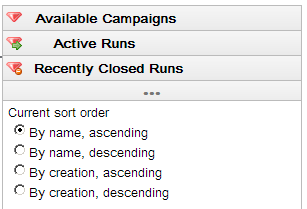
The selection you make will be applied to all campaigns and runs while the page is open.
When you select a startable, running or recently closed run you will see a panel showing its details plus available actions. You can start, pause and remove runs, plus you can control the dialer’s "boost factor".
Controlling the boost factor
You can manually "tune" the boosting currently applied to a campaign by dynamically setting an additional factor that will be used to decide how many channels to dial.
The way this works is:
-
The number of free agents on a queue will be multiplied by the EP’s boost factor
-
The result will be again multiplied by the run’s boost factor. Boost factors below 1 will reduce the number of available channels, while values over 1 will increase it.
So if you have a queue with 2 idle agents, with an EP’s boost factor of 2, and your current boost factor on the Live page is set to 1.5, WD will try placing 2 * 2 * 1.5 = 6 calls. If you tune the boost factor on the Live page to 0.5, WD will only place 3 calls.
When a run starts, its boost factor is always set to 1. In general, you should change the boost factor from the Live page only in cases where the pattern of answered calls changes strongly during the day. WD is build for unattended operation, so there should be no need to have a person constantly changing this value.
| You will get best results by changing this value slowly and waiting for a while after each change to let it stabilize. By constantly moving between very high and very low factors, you will send Wombat into a self-oscillating mode where you will have a lot of idle agents and a lot of lost calls. In any case, Wombat converges automatically towards a stable state, so if bad things happen, just wait a couple of minutes. |
Using dynamic lists
Right from the Live page, you can control the lists that are run on a campaign.
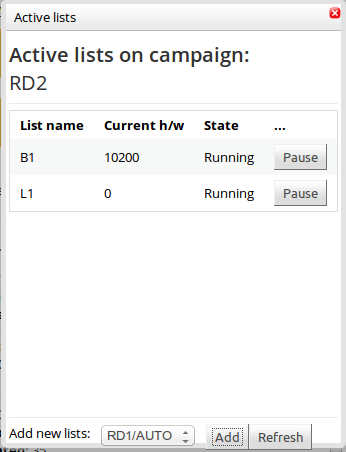
You can access this information by clicking on the "Lists" button next to a campaign run details.
You can add new lists to a running campaign, pause and unpause lists on existing campaigns, and see how far lists were processed so far.
| If you stop all lists on a run that does not IDLE on termination, the campaign run will simply terminate - make sure this is what you want to do. |
Please note that if you change lists on a running campaign and reload it, the new lists (or any removed list) are NOT added or removed from a running campaign. This is an expected behavior as, by forcing a list reload, you could override the finer list control you have from the Live page itself. The next time your campaign runs, though, its initial set of lists will be taken from the current configuration.
Remember that automatic lists behave differently - they won’t appear in this panel, and if they do, it’s most likely a mistake - see Automatic lists for details.
Using multiple numbers per call
WombatDialer allows you to set additional numbers for a call to be placed. The idea is that if a call has two additional numbers, the number chosen takes into consideration the current retry, so that:
-
The first attempt is always placed on the main number
-
The second attempt is on the first multi-number
-
The third attempt is on the second multi-number
-
The fourth attempt is on the main number again
-
The fifth attempt is on the first multi-number
-
…and so on
In order to define a multi-number on a call, you need to provide attributes which names beginning with MULTINUM - eg MULTINUM1, MULTINUM2 and so on. If a MULTINUM is empty or not present, it is skipped - so it is valid to upload a call with MULTINUM1=123, MULTINUM2 is empty and MULTINUM3=456.
When reporting on a call where a multi-number was used, it will appear as "123 / 456", where this means that the call is the one which main number is "123" but the actual number dialed was "456". Still, the main number will only appear as "123".
When applying a blacklist to a multinum, only the "main" number will be checked against the blacklist; if that is present, then all multinums are considered blacklisted at once.
Color codes used for live calls
| State | Color |
|---|---|
RD_RESERVED |
purple |
RD_REQUESTED |
pink |
REQUESTED |
blue |
DIALLING |
orange |
CONNECTED |
green |
TRANSFERRED |
light green |
TERMINATED |
black |
Any other |
red |
A complete description of a call’s life-cycle can be found in A call’s life cycle.
Color codes used for campaign runs
| State | Color |
|---|---|
COMPLETED |
black |
ERROR |
red |
IDLE |
gold |
PAUSED |
gray |
RUNNABLE |
blue |
RUNNING |
green |
WRONG_TIME |
maroon |
Any other |
pink |
A complete description of a call’s life-cycle can be found in chapter A campaign run’s life cycle.
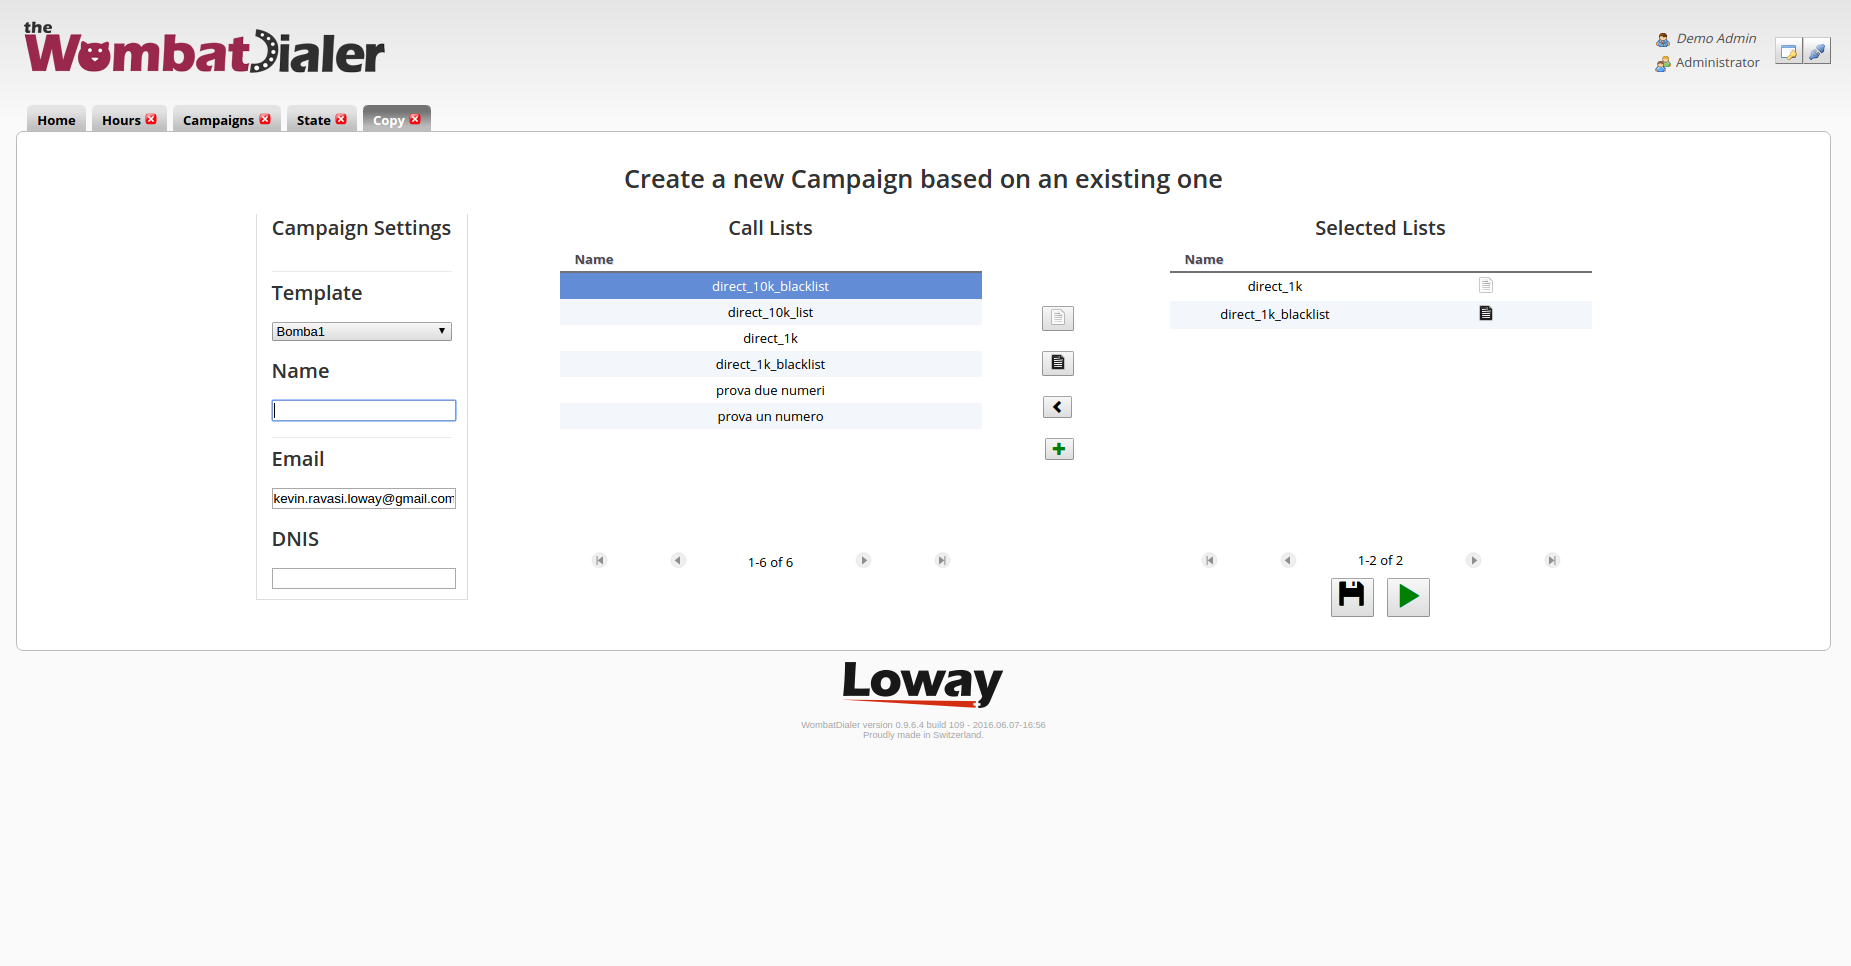
The Copy Campaigns Panel
This feature allows you to create a new campaign, using an existing campaign as a template. The page prompts you to choose an existing campaign and loads its data. You can then modify some essential data, see the call lists connected to it, remove them , add some existing lists to it or, eventually, create new lists uploading them from a CSV file. Finally, the page allows you to simply create the new campaign or, if you choose to, to create it and run it directly.
On the left side of the panel you can see a List Box named “Template”, which contains all the campaigns available for copying. If you select a template, the Selected Lists Table will be filled by default with the same call lists and black lists originally tied to the campaign you chose as a template. Below the Template List you can see the Name text box. This is where you need to specify the name of the new campaign you are creating. The Email text Field is located right under the Name Field, this is where you set the email connected to the new campaign. The same thing goes for the campaign’s DNIS, by typing in the DNIS Text Field located under the Email Field.
In the middle section of the panel, we can see a list containing all the available call lists that can be attached to the new campaign you are creating. To add or remove these call lists you can use the control buttons located between the Available Lists Table and the Selected Lists Table.These control buttons are listed below.
Add list: The green Ok Check button adds the selected list to the Selected Lists Table as a normal call list. Add blacklist: The red Cancel button adds the selected list to the Selected Lists Table as a blacklist. Remove List: The black Left Arrow button removes the selected list from the Selected Lists Table. Create List: The green Plus Button prompts a pop-up containing a Call List creation wizard that allows you to create a new call list by uploading a CSV file.
Once you have inserted all the data you can save the new campaign by clicking on the Floppy Disk Button in the bottom right of the panel, or you can save and run the campaign directly by clicking on the Play Button next to the save button. By doing this Wombat Dialer will open the Live page Automatically.
The Dialer State Page
The new Dialer State page provides the user with more detailed information about the dialer status, also showing synthetic information about Campaigns, Trunks, Endpoints, Agents and Waiting Calls.
The Wombat Controller Box on the Home Page has been simplified, and a substantial part of the information has migrated to the new Dialer State Page.
The new page shows different columns containing significant Data. The Endpoints column in particular, can be clicked upon, selecting each endpoint. If the endpoint type is QUEUE, information regarding the Agents logged on the queue and the calls currently waiting to be answered.
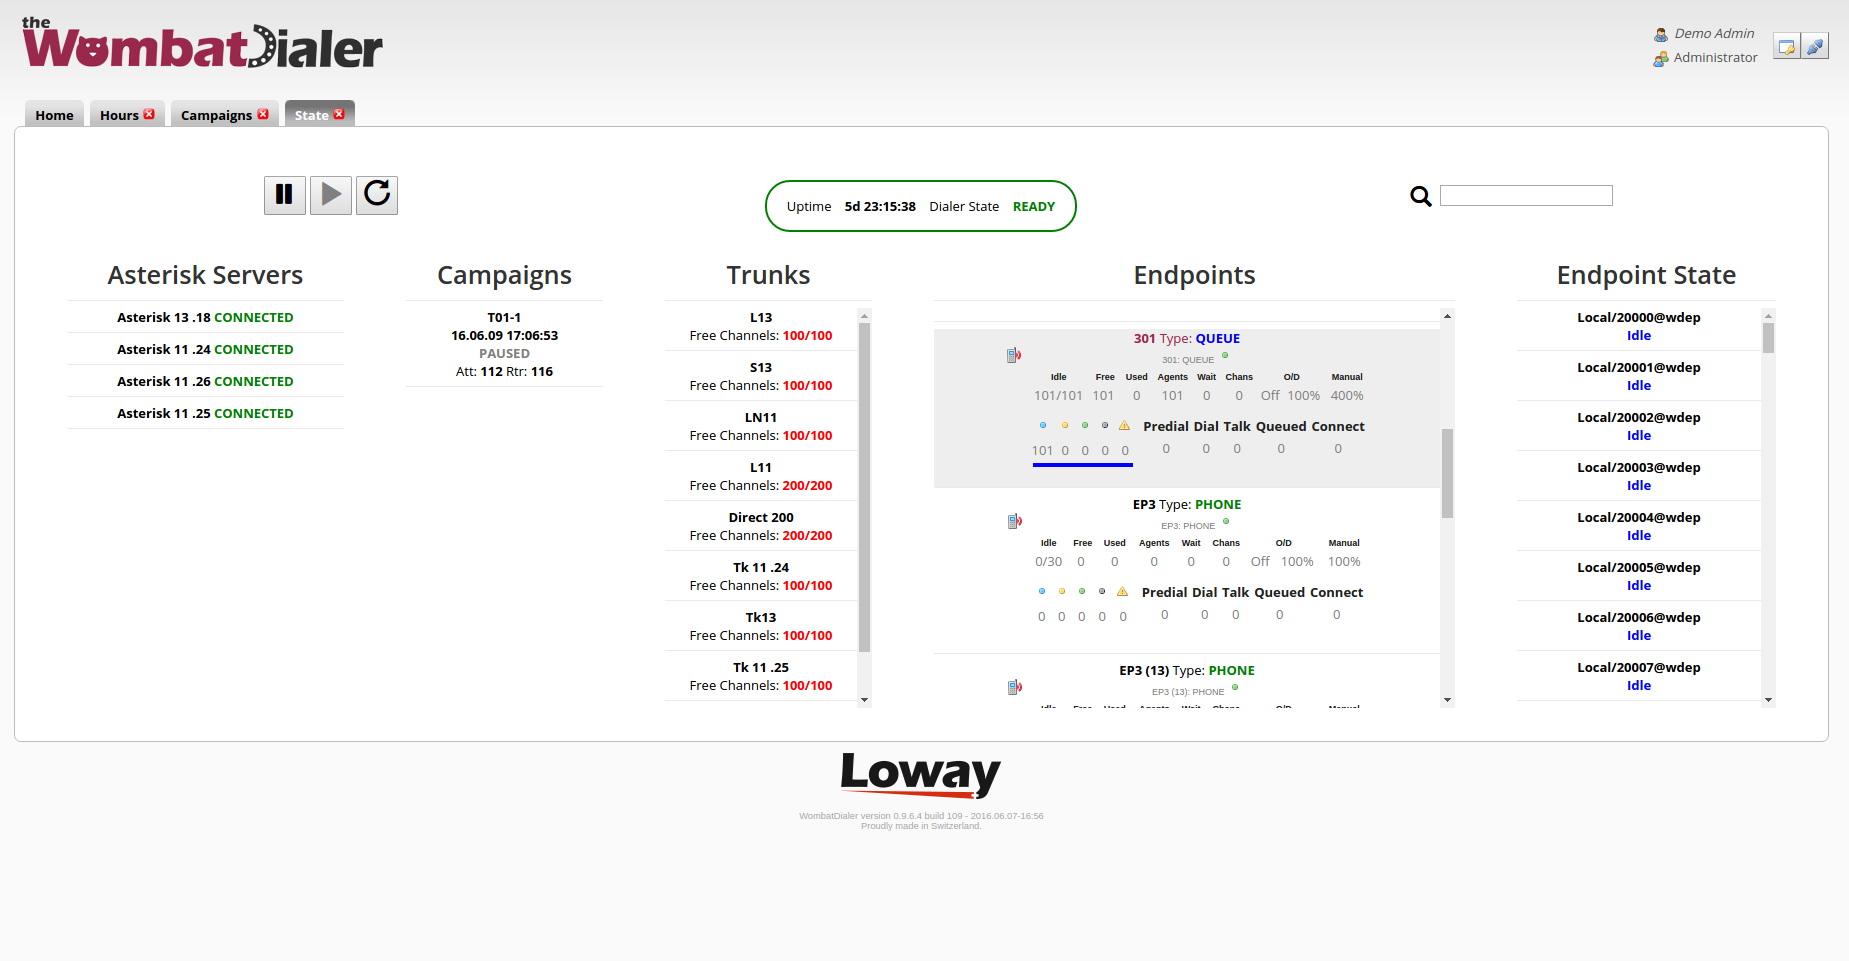
In order to start seing any data on this page, you need to have a running campaign. If there is no need to actively use them, Wombat won’t try and monitor servers, queues or extensions.
Understanding WombatDialer decisions
If you want to understand what WombatDialer is actually doing, under each running campaign in the Dialer State page there is an information bar that displays the latest decisions that Wombat took related to that campaign.
Wombat runs repeatedly for each active campaign run, and based on the state of current calls, trunks and end-points tries to decide whether more calls should be made. The color bar under a campaign displays those decisions and lets you understand what Wombat is doing and why it is dialing or not.
To read the graph, you need to find the most common states and read them according to the list below:
-
NO ENDPOINTS FOR RUN: This run does not appear to have any valid end-point configured.
-
NO TRUNKS FOR RUN: This run does not appear to have any valid trunk configured.
-
NO CHANNELS ON TRUNK: There are zero free channels on trunks.
-
NO EP FOUND WITH FREE CHANNELS: No EP has free channels - they are all used. On an EP of type queue, it might mean that WD is not receiving events from the queue, so it has no way of knowing when to dial out.
-
ALL LICENSED CHANNELS USED: This run cannot temporarily run as there are no free licensed channels - usually because some other campaign is using them all.
-
NO CALLS FETCHED: WD is trying to fetch new calls from lists or recalls, but it’s finding nothing. Usually appears before campaign termination.
-
LIMITED BY EP SIZE: WD would be able to place more calls, but it has to limit itself to the number of available EP channels.
-
LIMITED BY LICENSED CHANS: WD would be able to place more calls if you had a larger license key.
-
LIMITED BY TRUNK RATE: WD would be able to place more calls, but you are asking it not to overcome a fixed CPS threshold (see Trunk CPS limits).
-
LIMITED BY ACTUAL FETCH: WD would be able to dial more calls, but it did not receive enough calls from the database. If this happens often, increase the batch size settings on your campaign.
-
CALLS NOT NEEDED: No need to place new calls.
-
CALLS PLACED: Some calls were placed.
| Sometimes an error may be displayed as a static number (e.g., 49) representing a 30-second time interval; the number remains stable because new errors replace previous ones dating back 30 seconds and will remain at this peak until the problem is resolved. |
| It is normal that not all runs end with some calls placed. Ideally, most runs should end with CALLS PLACED or NO CALLS NEEDED. |
Running campaign reports
You can use WombatDialer to get hands-on details on the activities it performed.
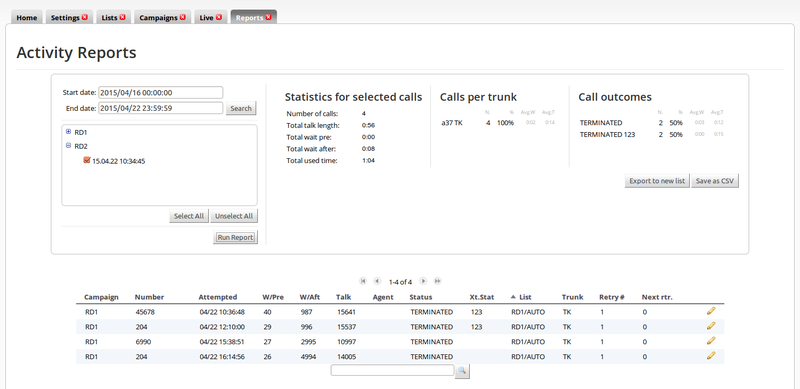
Reports are performed per run, so the first thing you have to do is to search a set of runs by selecting a suitable time period and selecting runs of campaigns that were started within that time period. Each run is identified by the date and time it was started.
| If you see no data for a campaign that you know has placed calls, you need to enlarge the time period for when it was started. |
When you click on ">>>", statistics are computed and displayed in the right-hand side of the screen.
You can see:
-
The total number of calls placed
-
The total talk duration (in seconds)
-
The total "wait pre" and "wait after" times (in seconds). "Wait pre" is linked to PBX latency, while "Wait After" is actual time waiting for a call to be picked up. See Call logs.
-
The total conversation time (in seconds)
-
The number of calls that were placed on each trunk - trunk names are prefixed with the server they belong to
-
The number of calls that got each specific outcome
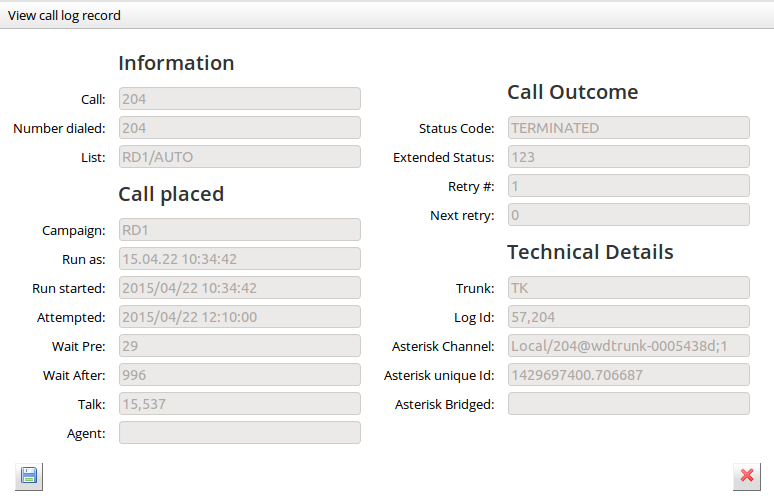
By the bottom of the page you can then see a paged list of calls that belong to the set you selected. You can use the search tool to zoom in on some specific number, and by clicking on the Pencil icon you can get a complete display of the call logs.
Tracking outcomes at the recall level
If you want, you can drill down on the outcomes that the dialer got for each attempt - so how many calls were successful on the first attempt, how many on the second, etc. - you may want to click on the "Recall Stats" button. This show you the same information that is shown under "Cal Outcomes" but with an extra level of detail.

For each set of runs, you will see:
-
a column for each "recall level" present in the data set
-
the list of outcomes, one for each row, and how many calls belong to each
-
in the bottom line, how many calls were placed to serve each recall
-
in the last column, how many calls in total ended in specific outcome
This is quite handy to understand at a glance if your recall policies are "good enough" or you are losing out possible contacts because you are not retrying enough times.
| Recall number 0 is of course the first attempt at dialling; technically only recalls numbered from 1 upwards are "recalls". |
Exporting campaign lists
Looking at the list of dialed calls interactively is useful to understand what went on, but sometimes you want to save the details of all calls into a spreadsheet for later review.
This can easily be obtained by clicking on the "Export to CSV" button - you will get a spreadsheet of all the calls belonging to your selected runs.
| Most spreadsheet packages cannot manipulate more than 50,000 records in a single file. Though WombatDialer will not enforce this, make sure you avoid exporting data files that are too large to be usable. |
Building new call lists out of run results
When you run a campaign, you usually set reschedule rules so that call can be retried in case of errors.
Still, it is often handy to operate on a different time-scale so that you can:
-
run a campaign to completion
-
get the set of calls that would not complete
-
reschedule those calls as a separate campaign at a later time
This can be done using the "Export to new list" button on the Reports page.
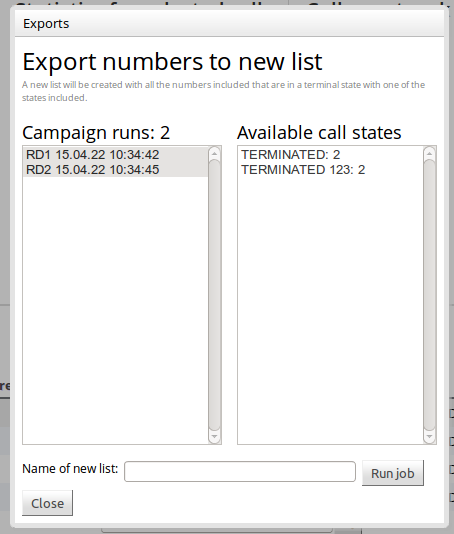
When you click on that icon, calls are counted by their final status, that is the status of the last retry. For example, if a call was tried at 10AM and got BUSY, and was retried at 11AM and completed successfully, its final status will be TERMINATED.
As terminal states are not available before this transaction runs, the states you see in the list and the number of calls for each state are about all possible states of all possible calls within the selected runs. So it is quite common to find that the numbers of calls actually created is way lower than the numbers shown, or that a specific state has actually no terminal calls.
We first select a set of runs from the ones we selected in the Reports page, and select a set of termination codes. Then you enter a name for the new list to be created and click on "Run job".
A new list will be created under the new name and containing the records for the calls you just selected. In order to see it, you must go to the Lists page (it might be necessary to close the Lists tab and reopen it).
| You can also use this feature to create lists of numbers that were answered correctly in order to "prune" existing lists of old and invalid entries. |
| By creating a call list numbers you know to be invalid, you can add it to your campaigns as a black list so that those numbers will be immediately discarded. |
Importing and exporting call lists
From the Lists page, you can import and export data to and from call lists. WombatDialer lets you select either native or CSV format.
Importing call lists - Native mode
By clicking on "Upload list of numbers" when a list is selected, you can copy and paste a set of numbers to be added to an existing list. As numbers might have associated call attributes, there is no control over possible duplicate numbers as you may want to dial the same number multiple times.
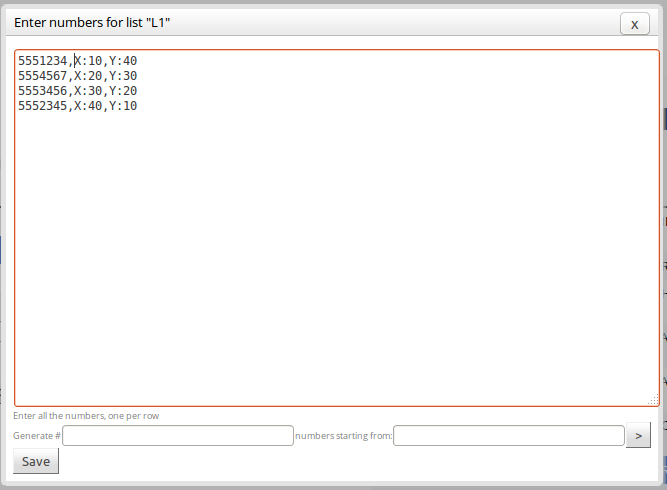
Numbers should be uploaded as a set of rows, each starting with the number to be dialed. If you want to add attributes to be passed to the PBX, you should have them in the format "ATTR:VALUE" separated by a comma.
For example, the line:
5551234,A:1,B:HELLO
Loads the number "5551234" with attribute A set to "1" and attribute B set to "HELLO".
You can also use a wizard to generate a set of progressive numbers, e.g. generate 1000 numbers from 5550000 onwards. The generator is smart enough to handle the generation of numbers starting with one or more zeros.
| the maximum set uploadable in one batch is about 2Mb, or about 100,000 numbers. It would be advisable to use smaller sets as to avoid causing CPU spikes. |
Importing call lists - CSV mode
By clicking on "Upload CSV", you will be able to drag and drop a CSV file containing numbers and attributes to be added to the selected list. You can easily create CSV files from your favorite spreadsheet.
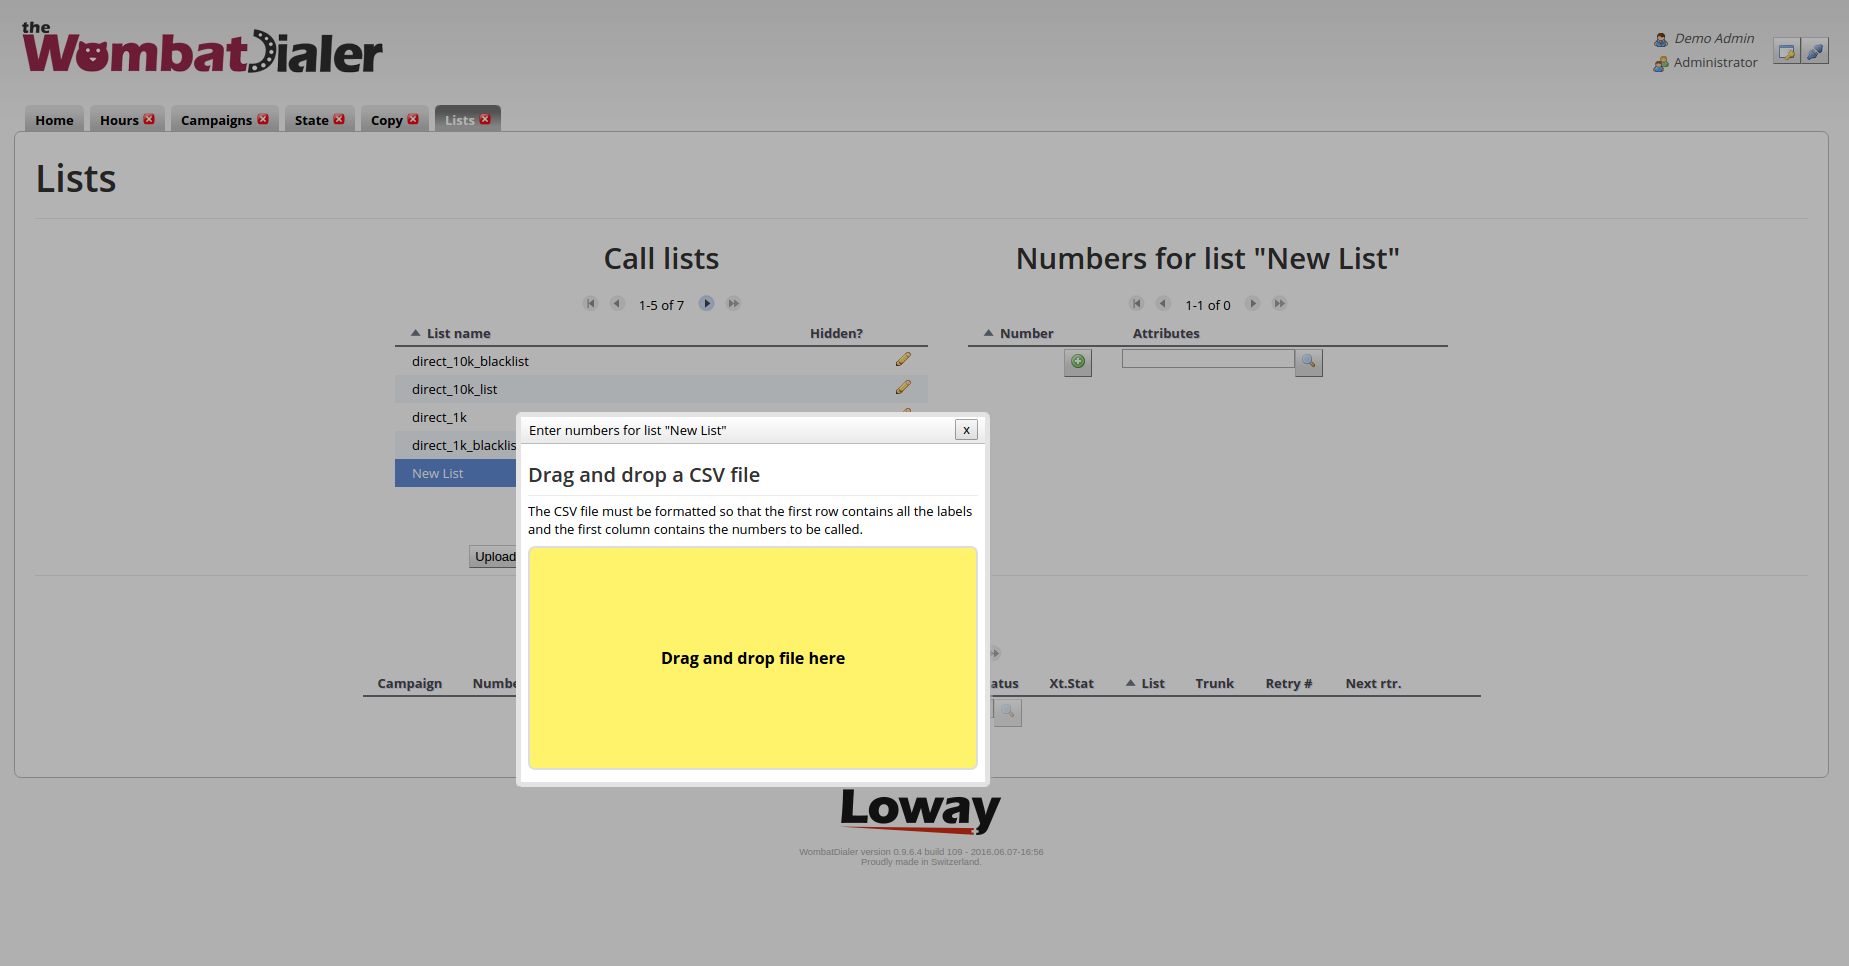
You simply drag and drop the CSV file to the yellow box on screen. When done, the file will be read and previewed.
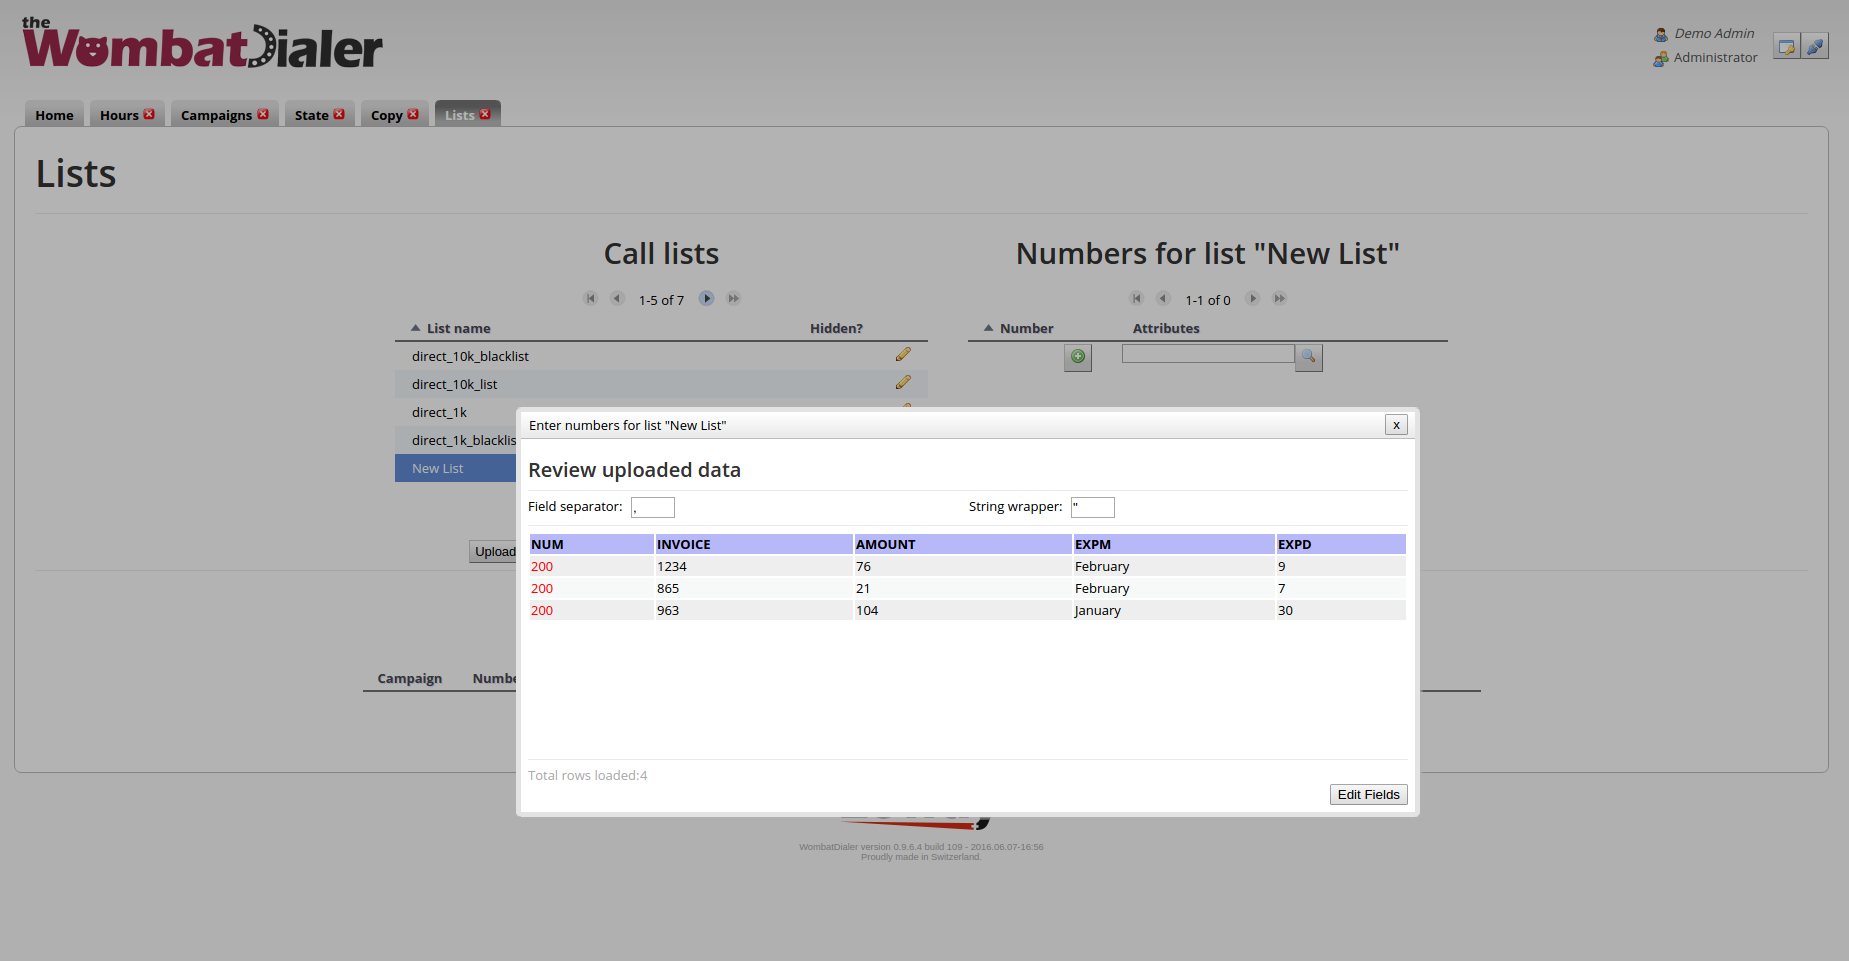
As your CSV file might have different field delimiters, once you have uploaded the file you will be able to change the delimiters until the file looks right. The numbers to be called will be shown in red.
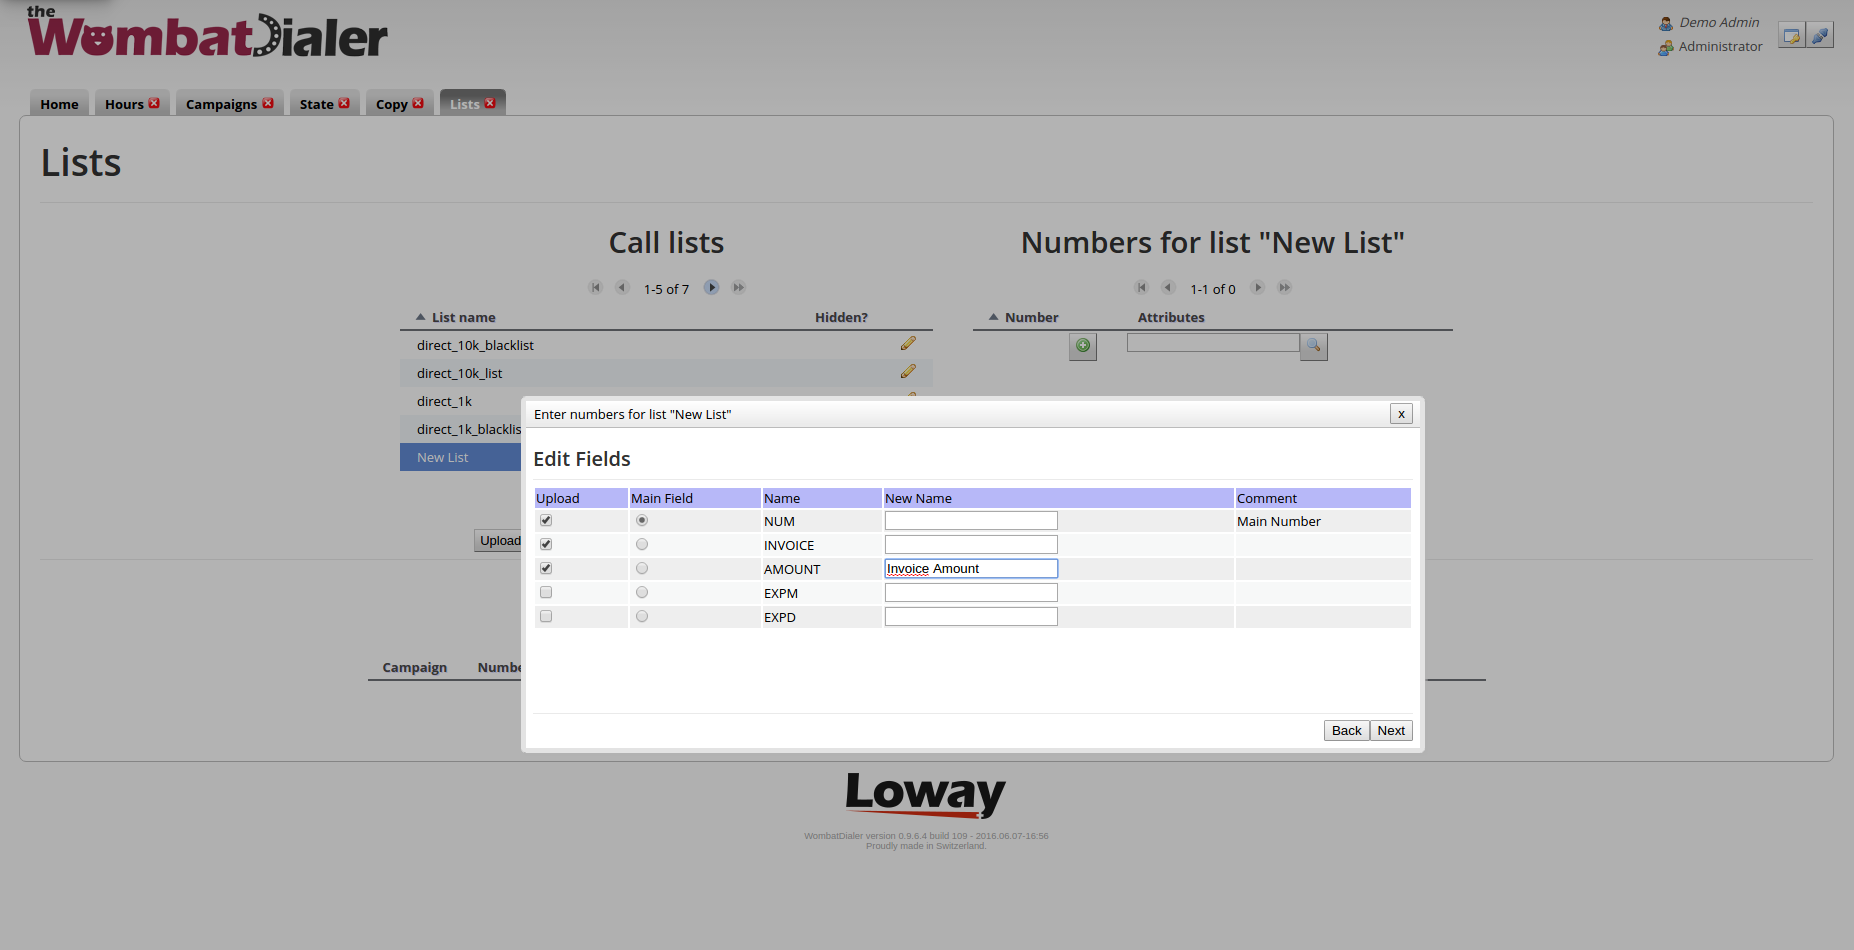
After reviewing you file, you can edit any field in the next step of the process. By clicking on the "Edit Fields" button, you will jump to the fields editor page, through which you can modify the structure of the CSV data by selecting the field that will represent the “Main Number” field (that is the number that will be called when campaigns implementing this list will run). You can also rename eventual fields or decide not to upload some of them in particular.
| In order for this to work, your browser must support the HTML5 File API. This may not work on older browsers. |
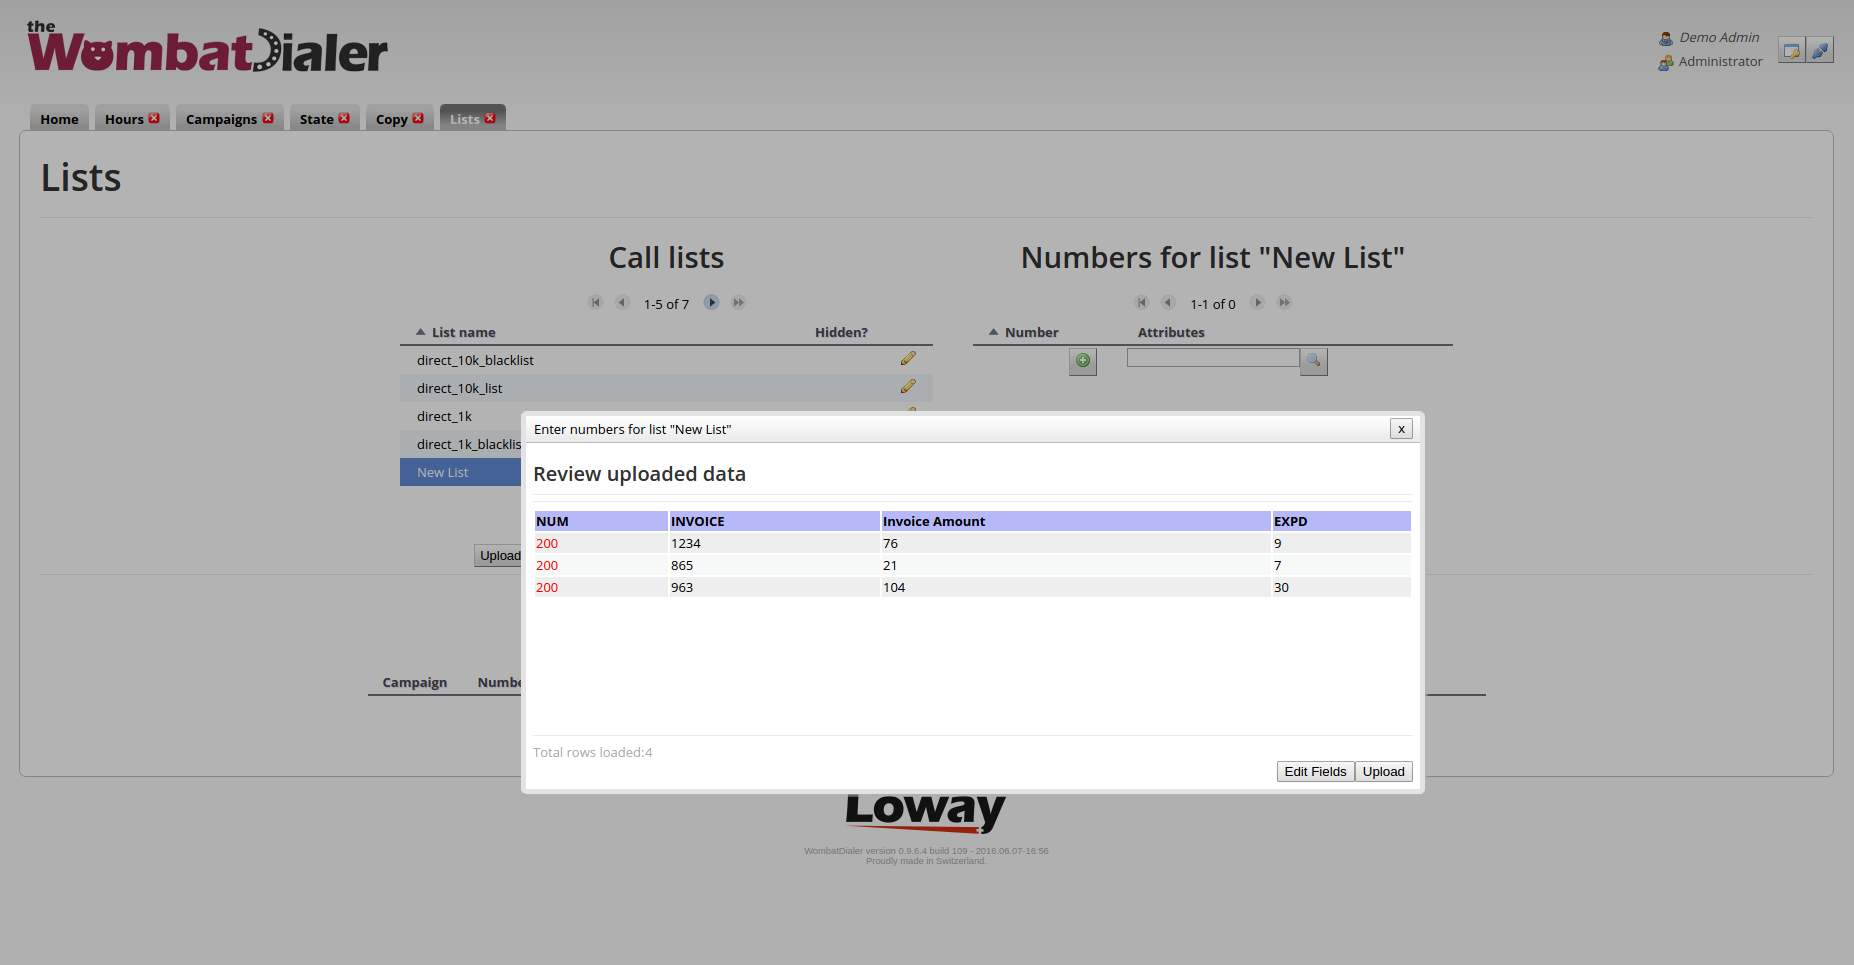
Once you apply the desired change, by clicking on the "next" button, you can go to the final preview page. Here you will see the results of your CSV customization (if any at all). From here you can go back to the "Edit Fields" page, or you can upload the file to WombatDialer.
Exporting call lists
You can export a call list in textual format. By pressing on the "Export calls" button while a list is selected, you get a new text page with data in the format:
5551234,A:1,B:2
5551235,Y:20,X:10
5551236,Y:20,X:20
5551237,Y:30,X:10
All current attributes (inbound and outbound) are reported.
If you click on "Export CSV" the export file will be downloaded as a CSV file.
The License page
You can access the License page by clicking on the "key" icon on the top-right of the WombatDialer instance.
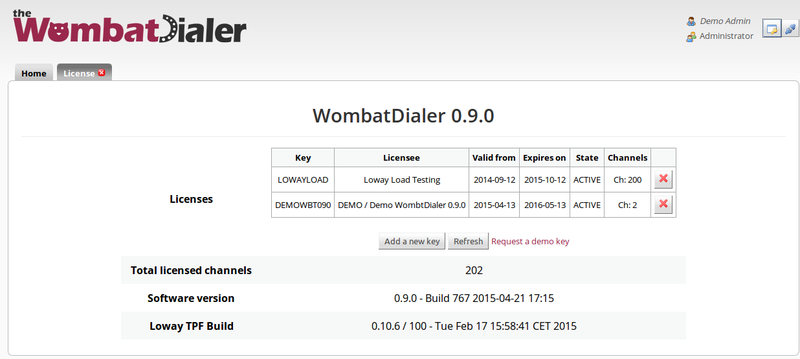
It displays:
-
The set of license keys installed on your WombatDialer system. For each license you can see:
-
The name of the license
-
The licensee
-
From when to when this license is valid. Note that you can install immediately a license that will only be valid in the future
-
The status of the license
-
The number of licensed channels
-
-
The total number of licensed channels across all licenses
-
The current version of the dialer, when it was built and the versions of the embedded TPF frameworks.
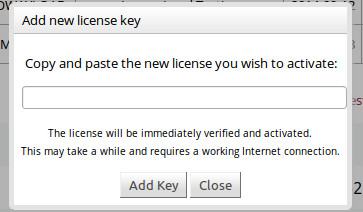
Installing a new license key
If you get a new license key from Loway, be it a full license or a demo key, it will look like the following item:
YOURCOMPANYNAME.12345678-23456789
You can install it by clicking on the "Add license key" button and entering the new code. You will need a working Internet connection from the server, as the new license will be downloaded and activated. This may take a few seconds to complete.
You may also force a check of all licenses by restarting the WombatDialer webapp.
Please note that:
-
commercial licenses are additive, this means you can install two 10-channel licenses together in order to get a 20-channel license (though they will disable previous demo keys)
-
demo license are exclusive, this means that they will disable other demo keys as only one can be active at a given time.
Any disabled keys will appear in state REVOKED (or possibly DISABLED if there is a license violation issue). Licenses that are past their expiry date will appear as EXPIRED, while licenses that are not yet active - for example, if you renew a license a month in advance - will appear as FUTURE, and will automatically become ACTIVE when their time comes.
If a license appears in state W/P (Waiting for license) or ACTIVE_P (Active pending verification), it means that WombatDialer cannot talk to the licensing server to download, activate or verify the license key. In this case, if the license was downloaded in the past, the license can be still be used but only for a a limited period until it is verified, and thence it will display an incorrect expiry date. WombatDialer tries verifying it up to that point in time, but if that’s not possible, it is shut down.
| WombatDialer requires outbound HTTPS internet connectivity to our licensing servers and cannot run without. See Outbound proxy to know more. |