AudioVault
AudioVault is a remote storage for media files (usually, audio recordings) that allows a remote QueueMetrics find them and play them back. This was designed for QueueMetrics Live systems, as they have no access to the local file system that the PBX is saving files on, but you can use it on on-prem systems just as well.
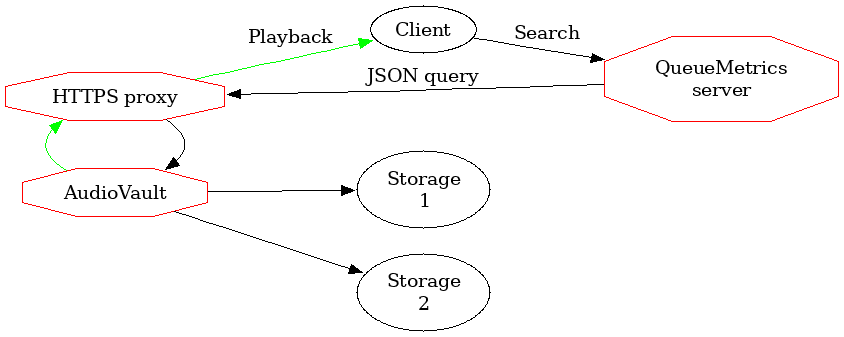
AudioVault runs as a local HTTP server, and is easily exposed through a front-end proxy to the internet. QueueMetrics will call a webservice on AudioVault in order to find whether there are any recordings, and will play them back as needed.
Media files found are returned by exposing a public URLs that can be downloaded by the client’s browsers; to reduce related risks, they are encoded with an anti-tamper mechanism so that a third party cannot retrieve arbitrary files on arbitrary paths. They also have an expiry date embedded that ensures a link is only valid for a short period after it is generated. Also, on each run a specific random link secret is generated, so that only links generated within the current execution are valid.
AudioVault has the concept of storage drivers, each of which is able to search using a different strategy; multiple drivers are queried in sequence, from first to last, until a match is found.
For example, if you set your drivers up as file:/var/media,file:/mnt/nas/%YY-%MM,
AudioVault will first attempt to find your media under a local folder, and
then, if nothing found, will attempt the NAS.
In order to run searches, a QueueMetrics instance must hold a security token, and that is checked each time a search is performed.
| A number of countries have enacted strict legal regulations in terms of how and why call recordings are taken, stored and distribuited; and may have harsh penalities for violations. Before you start working with call recordings, make sure you understand your local laws and regulations and their implications. |
The FileSearch driver
At the moment there is only one kind of driver, and its prefix is file:.
This driver expects a root directory to start searching from. The root directory may contain placeholders that are expanded to some information about the call, as in the list below:
-
%YY is the 4-digit year when the call was made
-
%MM is the 2-digit month when the call was made
-
%ME is the three-letter English short name for a month (e.g. 'Jan' for January)
-
%DD is the 2-digit day of month when the call was made
-
%SE in a clustered environment, the server name (all lower case)
-
%QU is the queue name (all lower case)
-
%TE is the current tenant
As directories are rescanned on each search, it is important that for efficiency that you split your files in different folders based on when they were recorded. Scanning a month’s worth of recordings will be 10x as fast as scanning one year’s!
Serve: runs the AudioVault service
You can easily serve one or more local folders by running AudioVault like:
uniloader av serve \
   --path file:/mnt/audio \
   --token Sup3rZ3brA  \
   --public-url https://audiovault.my.server \
   --bind-to :4000
This command lets QueueMetrics search in the local path /mnt/audio, by running
an HTTP server on port 4000 that will be available externally as https://audiovault.my.server
and will protect it with a shared security token Sup3rZ3brA.
| To allow a different public URL, you need an HTTPS proxy to handle the request at that address and forward it to AudioVault. |
The full list of options are:
OPTIONS:
   --bind-to value          The address and port that AudioVault will listen on (default: ":4000")
   --public-url value       The public URL that is proxied through to AudioVault
   --token value            Your own security token, as set on QueueMetrics. [$TOKEN]
   --display-info           Whether to display system information on the base address
   --path value             One or more search driver(s), separated by ','
   --link-duration value    The validity of links returned, in seconds. 0: Valid forever (default: 3600)
   --link-secret value      A secret key used to verify links. If blank, set randomly. [$LINKSECRET]
   --tenants value          The path of a JSON file describing allowed tenants
   --certificate value      A file containing the full TLS cert chain (eg. fullchain.pem)
   --certificate-key value  A file containing the private TLS cert key (eg. privkey.pem)
   --pid value              The PID file to write. If already present, won't start.
The default link duration is one hour and the default link secret is randomly assigned every time AudioVault starts, but you are free to change these settings as you best see fit.
Once AudioVault is up, you can see a visual confirmation by accessing its main URL:
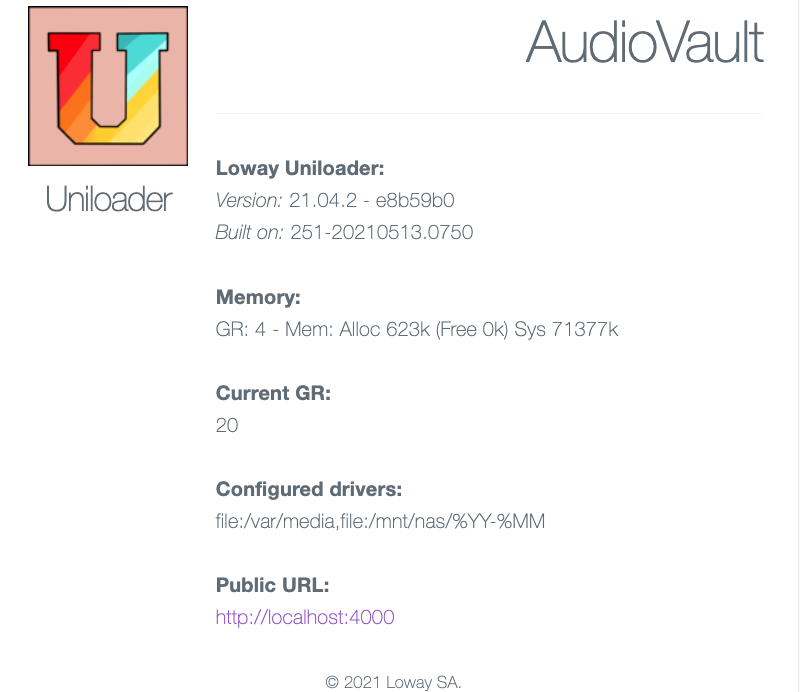
The example above is generated with --display-info set; usually, sensitive
information/configuration is not disclosed.
Handling multi-tenancy
If you have a shared repository of recordings that is supposed to be accessed by different tenants, each of which runs its own QueueMetrics instance, you can have AudioVault check security on each tenant so that:
-
they don’t share the same secret, and
-
each tenant has its own "root folder" for recordings
To do this, you define tenants in a JSON file that is passed to Uniloader
through the --tenants parameter on start, like:
[
     {
          "tenant": "t1.example.com",
          "secret": "superSecret",
          "note":   "A custom note for this tenant"
     },
     {
          "tenant": "t2.example.com",
          "secret": "N0b0dyKn0ws",
          "note":   ""
     }
]
Now, when there is a request for tenant t1.example.com, its secret is checked
with the one on file; if it matches, the variable %TE is filled with the
name of the tenant, so your search driver can make good use of this information.
Any tenants not defined will not be able to access their recordings.
For example, by default FusionPBX stores recordings in files that have names like:
/var/lib/freeswitch/recordings/t1.example.com/archive/2025/Apr/01/7ded3683-2335-41e4-915f-60de54d353e0.wav
So a path of file:///var/lib/freeswitch/recordings/%TE/archive/%YY/%ME/%DD will point to the
right folder for each tenant.
| If you make changes to the tenants definition file, you need to restart AudioVault. |
Setting up QueueMetrics
In order for QueueMetrics to access those recordings, you need to set the following configuration properties:
audio.server=it.loway.app.queuemetrics.callListen.listeners.JsonListener
audio.jsonlistener.url=https://audiovault.my.server/search/
audio.jsonlistener.method=POST
audio.jsonlistener.searchtoken=Sup3rZ3brA
audio.jsonlistener.verbose=false
audio.html5player=true
Note that the URL is based on the public URL as set in AudioVault plus the /search/ suffix.
If there is a defined tenant, it is added to the URL as ?tenant=t1.example.com
The easiest way to make sure this configuration is correct is to have Uniloader generate it for you after making sure it is correct - see Diagnostics: Test an AudioVault server for details.
| While it’s very easy to do, you should never send audio recordings unencrypted over the internet! Make sure you have an HTTPS proxy correctly configured instead of just opening up a firewall port and pointing it to AudioVault. See Securing AudioVault with HTTPS. |
Easy testing with ngrok
The easiest way to make AudioVault available to an external QueueMetrics is by running ngrok - https://ngrok.com/
By running:
ngrok http 4000 --region eu
It will print a public HTTP and HTTPS address that you can configure in AudioVault and QueueMetrics-Live and it will be your inbound tunnel.
| As a paid service, ngrok offers custom or reserved domains (so that they don’t change on each run) and traffic plans to match your production usage. |
Securing AudioVault with HTTPS
You definitely don’t want to serve recordings as unencrypted traffic. You have two options:
-
having AudioVault serve HTTP requests, and binding it so that it is accessible from
localhostonly. This presumes that you will put an HTTPS proxy in front of it. This option gives you the highest flexibility in terms of logging, rewriting, etc. -
having AudioVault serve answers in HTTPS directly. It’s very hand in case your PBX server already has (and likely renews automatically) an HTTPS certificate. We can use the same certificate ourselves, to start a new server on a different port.
On start-up, AudioVault will print whether it’s running in HTTP or HTTPS mode.
AudioVault’s native HTTPS server
If you run AudioVault on a server where other HTTPS services are configured, you can simply
use the same set of certificates. Say for example that it uses a script called dehydrated - https://dehydrated.io/ - to create them
and keep them fresh.
You could run then:
uniloader av serve \
   --path file:/mnt/audio \
   --token Sup3rZ3brA  \
   --public-url https://audiovault.my.server:4000 \
   --bind-to :4000 \
   --certificate /etc/dehydrated/certs/popk.net/fullchain.pem \
   --certificate-key /etc/dehydrated/certs/popk.net/privkey.pem
If both --certificate and --certificate-key parameters are specified, the server
will try and use them and start in HTTPS.
This works just as well if you use a certificate you bought from a commercial provider.
Make sure you restart AudioVault when certificates change, or, if you want to be on the safe side, just do it nightly.
Please note that the public URL, in this case, will contain the custom port we use for HTTPS.
| If the certificate is a wildcard, AudioVault will reply to any valid name. This is useful in the case you use multiple domains for multiple tenants, so that you can have the same AudioVault reply to each customer’s domanin name. |
Using an HTTPS proxy
In the example above, you should set up an HTTPS proxy (e.g. nginx) that will redirect over
HTTP to a local instance of AudioVault. In this case, it is advisable to use the
parameter --bind-to localhost:4000 so that AudioVault is not reachable externally.
A very simple, all-in-one proxy service is Caddy; it can easily be
installed on CentOS with yum install caddy where will automatically
generate HTTPS keys for you through Let’s Encrypt and will manage renewals
all on its own.
A very basic configuration in /etc/caddy/caddy.conf could then be:
audiovault.my.server {
    proxy / http://127.0.0.1:4000 {
	     header_upstream X-Forwarded-Proto "{scheme}"
	     header_upstream X-Forwarded-Host "{host}"
	     header_upstream X-Forwarded-Port "{server_port}"
	}
    gzip
    tls "youremail@audiovault.my.server"
}
And all HTTPS request would transparently be sent to AudioVault.
| Caddy is a very powerful piece of software and has many tricks up its sleeve - see https://github.com/caddyserver/caddy - you should e.g. add request logging, and possibly IP-address based security checks, as appropriate for your company. |
find: Testing a configuration
Testing drivers, especially if there are many of them, can sometimes be tricky; as a debug aid, there is a way to run everything from the command line:
uniloader av find \
   --path file:/mnt/audios/a-%YY \
   --call-id 1606400741.4 --timestamp 1606400744

2021/01/20 18:25:50 [FileSearch] Mounted path: /mnt/audios/a-%YY
2021/01/20 18:25:50 ========= RESULTS FOUND:
2021/01/20 18:25:50   #| Type|     Size|                                  File
2021/01/20 18:25:50 ---|-----| --------|--------------------------------------
2021/01/20 18:25:50   1|  MP3|  4634277|                audio_1606400741.4.mp3
2021/01/20 18:25:50   2|OTHER|     1365|                 chat_1606400741.4.txt
In this case, we can see that there are two media available for this call; an audio recording and a chat transcript.
Note that we need the original timestamp in order to expand date tokens - e.g. to know the day or month of the call you are looking for. There is no need to pass it explicitly if the call-id has the format "12345678.12" like is the default for Asterisk systems.
If you are testing a multi-tenant configuration, do not forget to set your tenant
through the --for-tenant option.
| A complete debug cycle when setting up AudioVault can be found in the documentation for the command test audiovault. |