QueueMetrics-Live Reseller Portal
The Reseller Portal is your central hub for managing QueueMetrics-Live instances for your customers. Here you can:
-
Check instance status
-
Activate or deactivate instances
-
Adjust the number of agents per instance
To access the Reseller Portal, operators must enter their login credentials in the Login Panel. Once logged in, you can create new QueueMetrics-Live instances or modify existing ones for your customers.
| All activities that can be performed through the Reseller Portal can also be performed through the QueueMetrics-Live API. Please contact the upport team at Loway in case you want to access the APIs directly to automate customer integration into your administrative systems. |
Login Panel
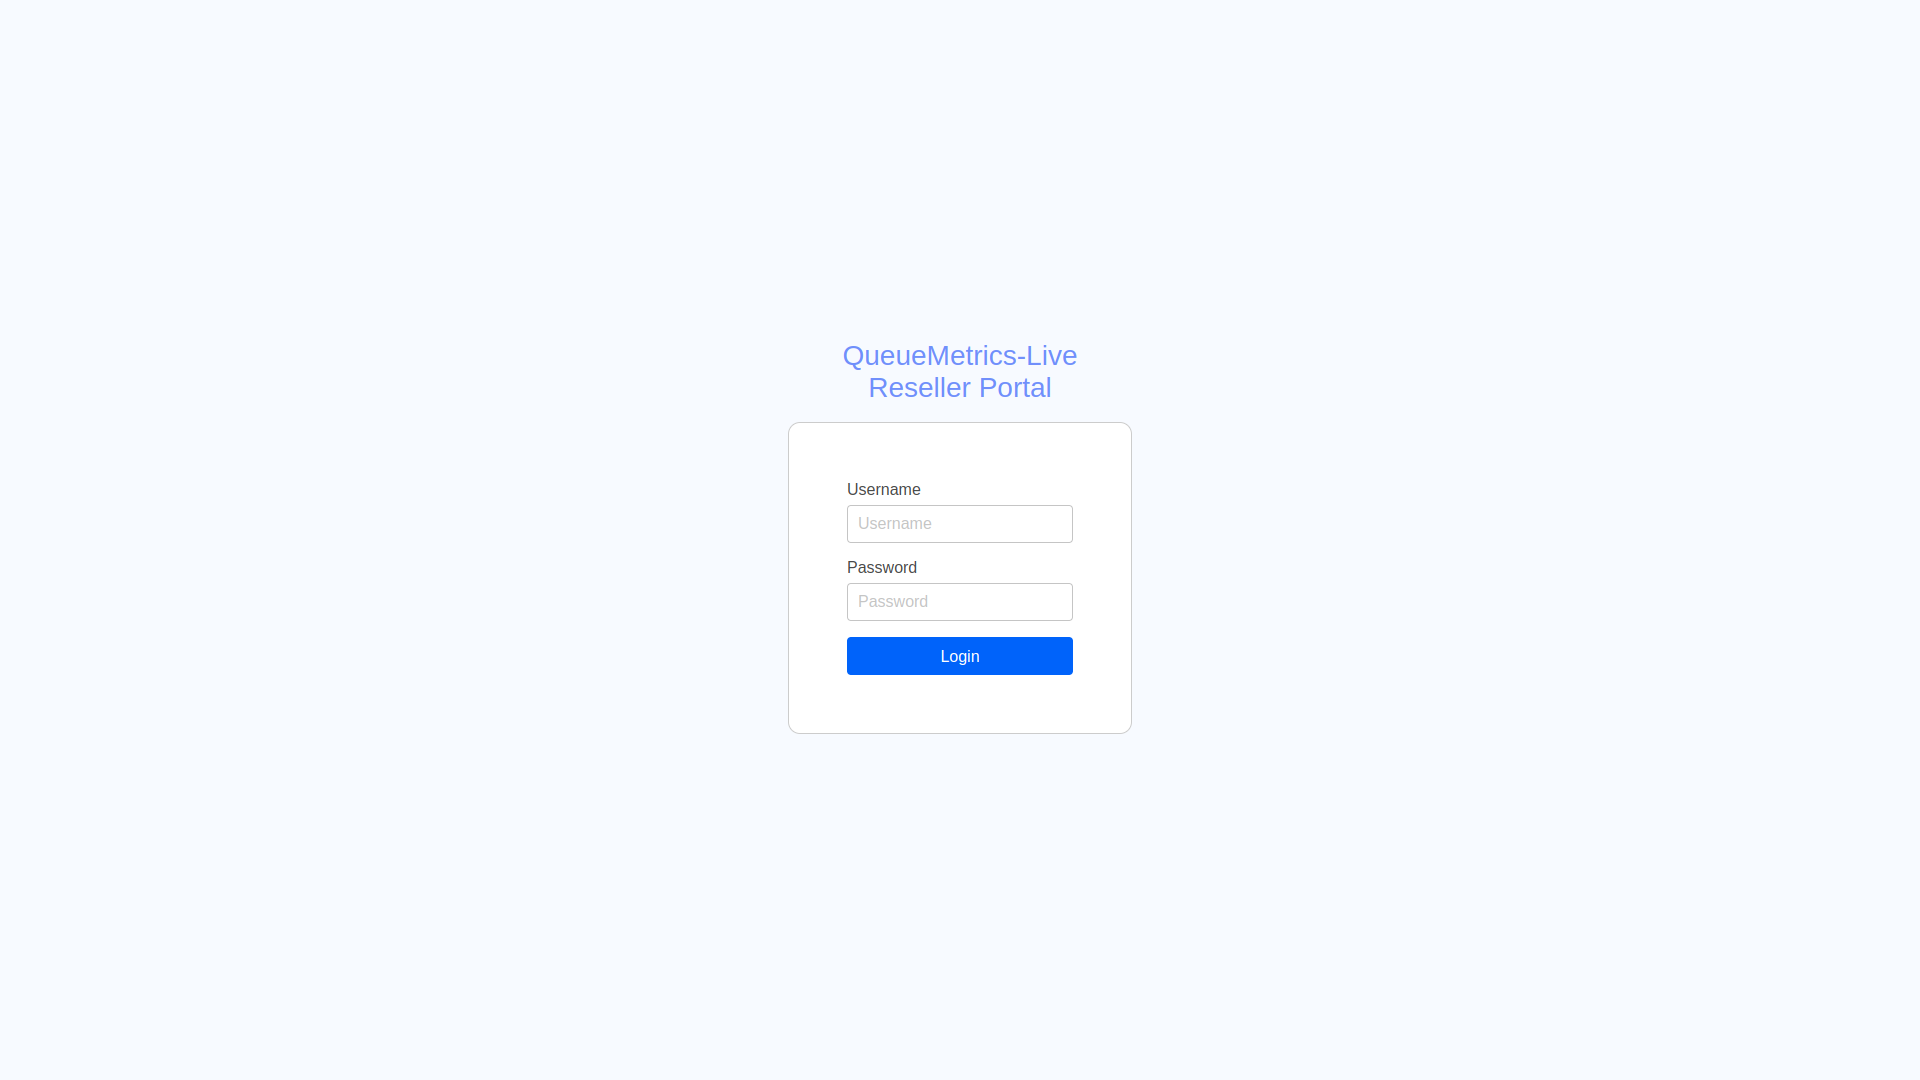
Once successfully logged in, the Operator will see a list of all the instances under their purview.
Please note that a user can have more than one operator linked to them (in case your company runs multiple profiles - e.g. one for customers in Europe and one for customers in the US), and that each operator can control more than one QueueMetrics-Live instance.
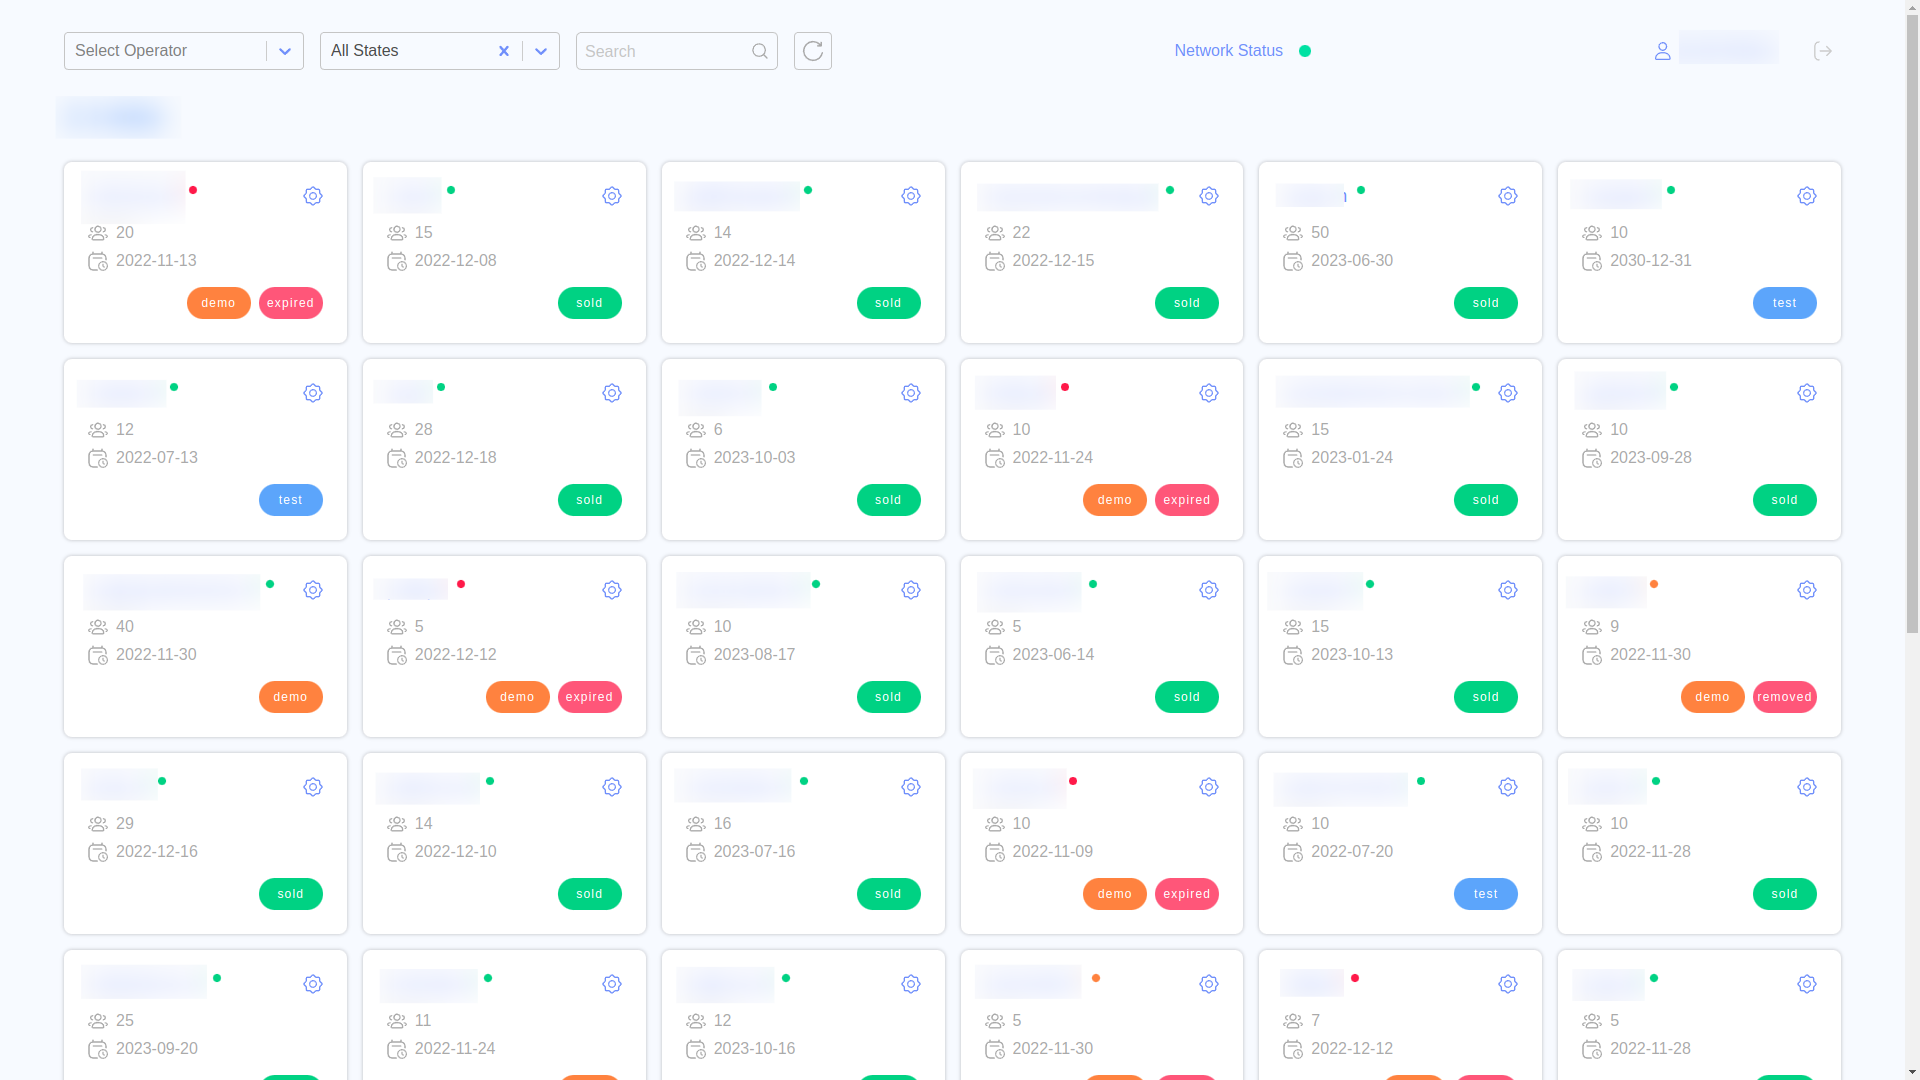
Each Square Card represents a QueueMetrics-Live Instance, and their Operator is clearly marked in the top left with a Person-shaped Icon next to their name.
SSL Certificate Management
Just below the Operator name, the reseller portal displays the domain name that hosts your instances. If you provide Loway with an SSL certificate to encrypt traffic, the portal also shows the certificate expiration date next to the domain name. This allows you to stay informed and plan for renewal. When renewal becomes urgent, the expiration date appears in orange to highlight the need for immediate action.
| An expired certificate causes a major service disruption, as instances will become inaccessible on all major browsers. Ensure your IT team sends Loway an updated certificate well in advance of the expiration date. |
Edit an Existing Instance
By clicking on the "Cog" icon in the top right of an Instance Card, the user can open a modal panel containing a form that allows them to edit the Instance’s Settings.
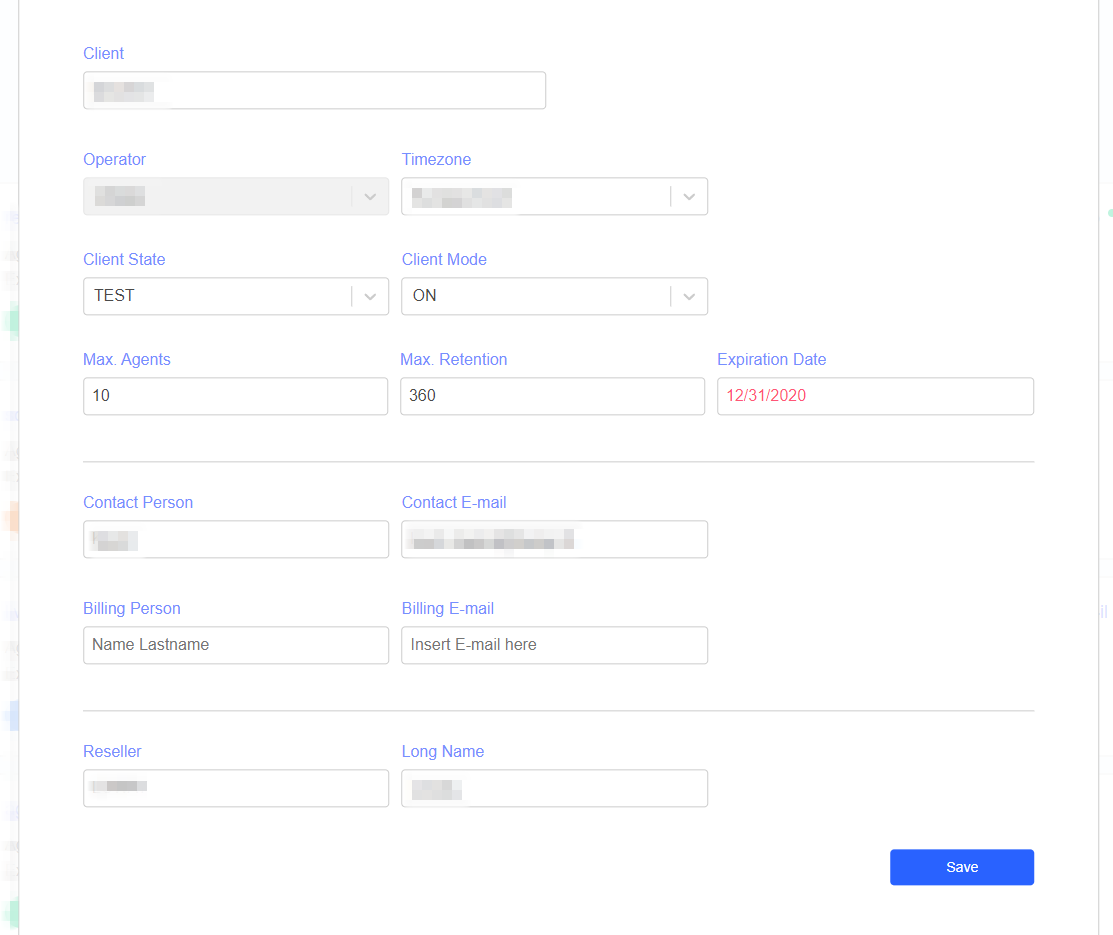
Here is a list of the form’s field and what they represent:
-
Client: the name of the instance. Cannot be edited.
-
Long Name: the instance’s owner full company name.
-
Operator: the name of the operator under which this instance is listed. Cannot be edited.
-
Timezone: the instance’s Timezone.
-
Max. Agents: the number of licensed agents for this instance.
-
Max. Retention: changes the number of days for the data retention policy. Changes are only forward-looking, there is no way to get back data that was deleted.
-
Expiration Date: changes the expiration date of the instance. If the expiration date has passed, it will be marked in red as a reminder to you. The instance won’t be closed automatically - that’s up to you to decide.
-
Client State: the instance’s State. Can be
DEMO,TESTorSOLD. See below for detail. -
Client Mode: the instance’s mode. Can be
ON,EXPIREDorREMOVED. See below for details. -
Contact Person, Contact Email, Billing Person, Billing Email: the information about the actual users of this instance. This data is for your reference only - Loway will never contact your customers directly.
-
K-Mode, K-Number, K-ApiKey: these fields are meant for custom integrations. Leave blank unless instructed to set them.
Once all the relevant fields have been changed, the user can click on the "Save" button in the bottom right to save the new instance settings.
The user can leave the form without saving by clicking outside of the form. Please note that unsaved changes will be lost if the user leaves the form this way.
| Modifying certain fields (time zone, number of agents, retention, state, and mode) will cause the instance to restart. This restart typically occurs within 3-5 minutes of making your changes. During this process, all logged-in users will be forcibly logged off, and the instance will be unavailable for a few seconds. Therefore, it is advisable to avoid making these changes during the customer’s working hours. |
Client States and Modes
Client State determines whether this instance is a demo for a customer, a production system, or a test system used by your company for testing. Only instances in state SOLD are billed.
-
DEMOinstances are for customers to try out the product. These demos are meant to last no more than 30 days and can only be run once per customer. You are required to manually setDEMOinstances toSOLD(or delete them) after this period. These instances are not billed. -
SOLDinstances are normal production customers and are billed. -
TESTinstances are not billed and are meant to be used by you to test the integration. You cannot createTESTinstances directly, but you can ask Loway to set a newly created instance toTEST. Each operator has one of these instances - if you don’t want to use the default one we provide, Loway can remove it and set to TEST an instance you created.
Client Mode determines whether the instance is actually running or not.
-
ONmeans that the instance is running; it also means that if the instance isSOLD, it will be billed. -
EXPIREDmeans that the instance is not running but all data is still present and you can reactivate it at any time by setting it toONagain. This is to avoid issues with mistakes where you deactivate the wrong customer, or customers who change their mind after a few days and still want to use the system. It is not billed, but after a few days, it is automatically moved toREMOVED. -
REMOVEDmeans that the instance is no longer available, and all its data has been physically deleted. It is still possible to recover it from backups if needed, though this will incur an extra charge. After a few days, the instance is deleted. This instance is not billed.
After an instance is fully deleted and disappears from your control panel, after a few days you can reuse the same name to create a new (but empty) instance.
Create a New Instance
Scrolling to the end of the page, the user will find the New Instance button.

Clicking on this button will trigger the opening of a similar form to the one described in the previous section, with the only difference being the password field, and the icon next to the client’s name.
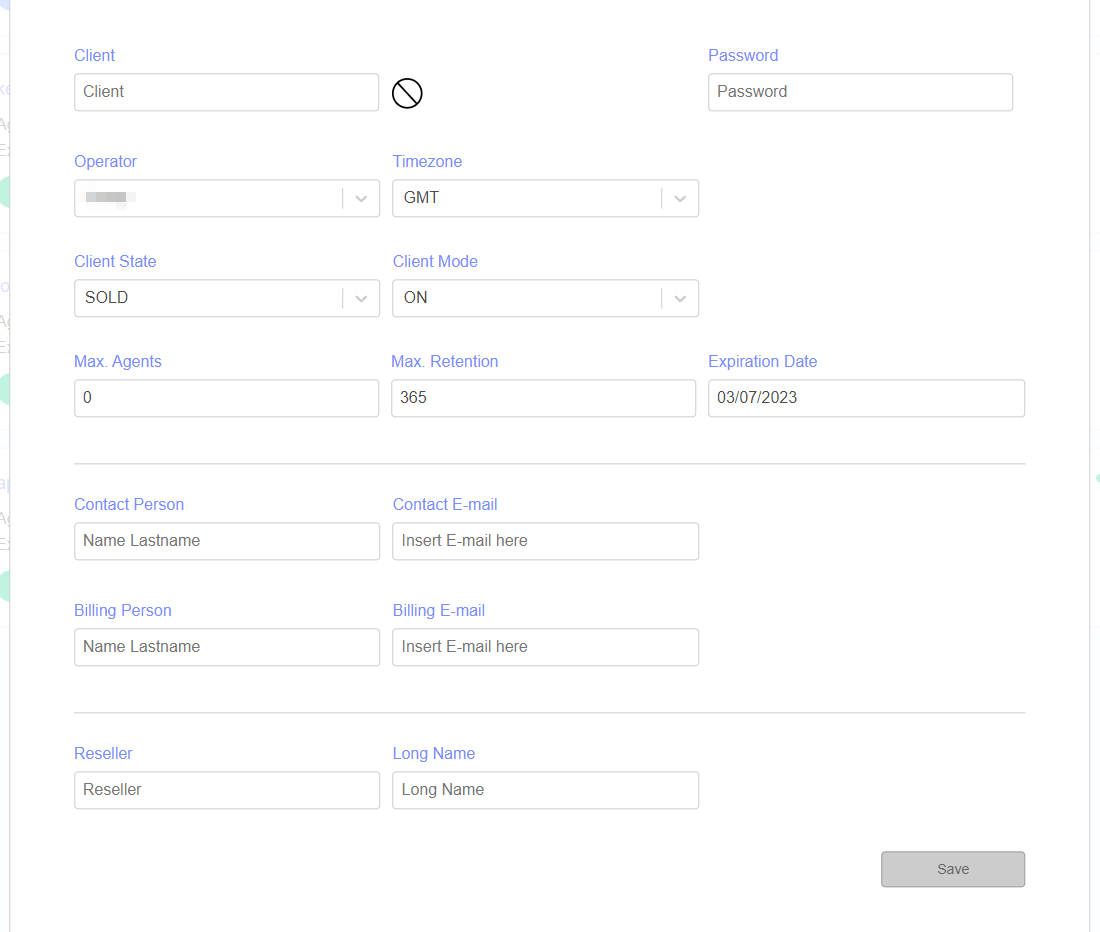
The password field represents the password of the new instance’s administrator user (demoadmin) and the password used by Uniloader to upload call data. For security reasons, the password should be at least 8 characters long.
The icon next to the client’s name shows the user if the selected instance name is valid. When the user inputs a name, the form will check if the name is available. The form will show a "check" icon next to the name if the name is valid and available.
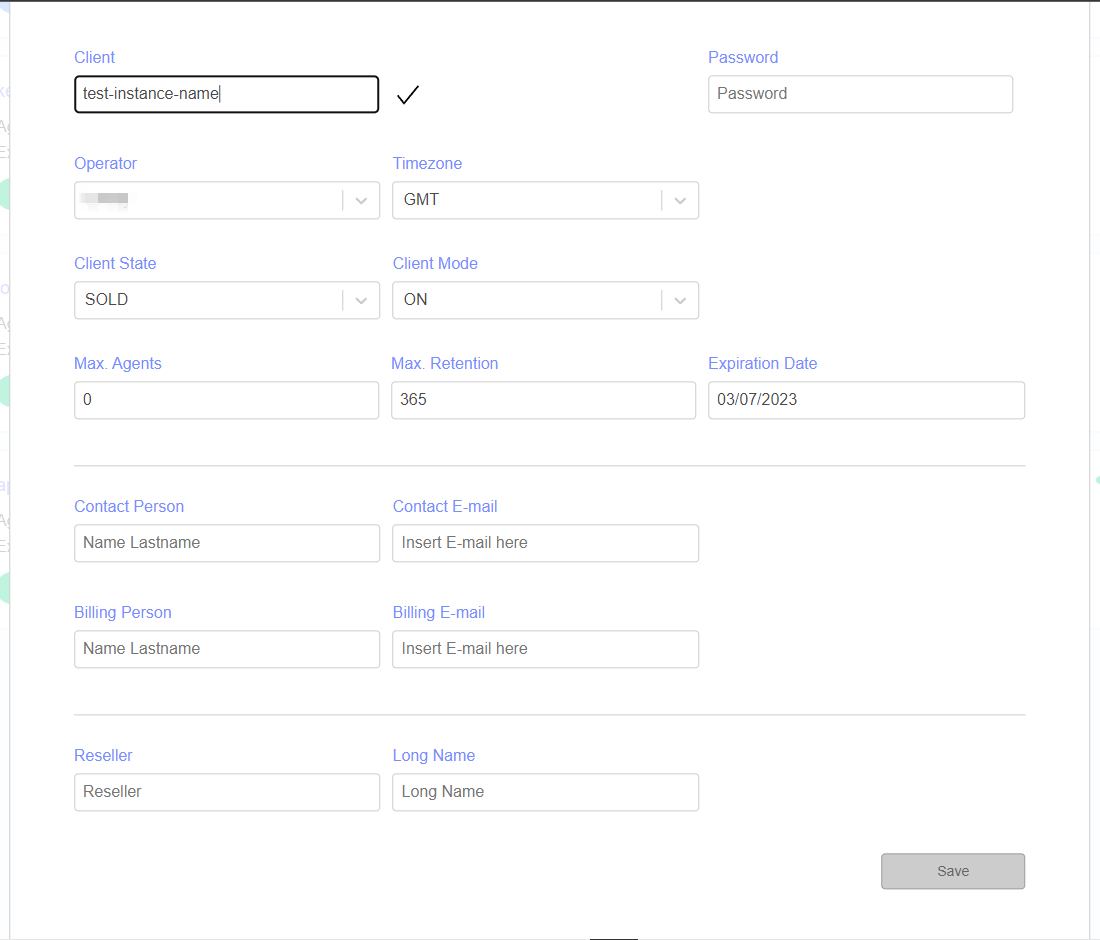
Once all the relevant fields have been filled, the user can click on the "Save" button in the bottom right to create the instance. The instance will become available within 5 to 10 minutes.
| The Client name, as it appears in the URL to access the instance, is unique across all QueueMetrics-Live customers and operators. So it is possible that a name you tried will be refused because it already exists elsewhere. In this case, just modify it slightly and try again. |
Filters
Operator Filter
The top bar in the page contains two dropdowns and a search bar. Those are the Reseller Portal Filters.
The Operator Filter allows the user to filter their instance by one of your Operators. By selecting an operator in this menu, only instances belonging to that Operator will be shown on the screen.
You can clear all filters by clicking on the "X" icon on the right side of the drop-down menu.
Instance State Filter
Similarly to the Operator Filter, by selecting an instance state from the menu, only instances that are currently in that particular state will be shown. Possible states are:
-
SOLD
-
DEMO
-
TEST
By clicking on the State tag inside of every individual Instance card, the user will automatically filter by that specific state. E.g. by clicking on a green "demo" tag, all the instances will be filtered, showing only the instances in the DEMO state.
Search Bar
By typing in the search bar, you can search for instances by instance name. If you input a string, only instance that contain that string in their instance name will be shown.
Reload Button
By clicking on the reload button, the Reseller Portal will update all the instances' information.
Network Status
The Network Status is an immediate indicator for the current state of the QueueMetrics-Live server clusters. Clicking on the text will open a new browser tab, sending the user to the System Status page.
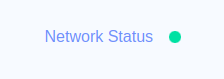
The colored dot next to the text indicates the current status of the systems. Different colors correspond to different statuses.
-
Green: All systems operational.
-
Blue: Degraded Performance. One or more systems are experiencing performance issues.
-
Yellow: Partial Outage. One or more systems are not fully operational.
-
Red: Outage. One or more systems are not operational.
Logout
The user can logout by clicking on the logout icon in the top right of the Reseller Portal. This will take the user back to the Login Panel. The user also logout by reloading the page with their browser’s reload function.